Klemm Vintage Kawasaki AHRMA "Sleeper" H1 500
Turning the Widow-Maker into a Reliable, Good Handling, 21st Century Street Bike
A Brief Technical History of the H1 Kawasaki introduced the H1 500 triple in 1969, and ended production in 1976. While the H1 certainly evolved in those years, its overall reputation as a poor handling motorcycle with a narrow powerband remains even today. The H1 was not intended to be all things to all motorcycle riders. Kawasaki wanted to make the first production bike that would be focused almost exclusively at excelling in ¼ mile drag racing . And not much else.
The engineers who developed the H1 for this ¼ mile excellence, achieved the goals the marketing execs wanted, but they badly missed the mark for most other serious motorcyclists of the day . And still so today. To be sure, production H1s had plenty of technical problems that kept them from being a bike for the serious motorcyclists of the day. And as time has marched on, the poor powerband, poor handling, and heavy smoking of the H1 has made it a bike that fewer and fewer vintage owners would choose as their daily rider.
About our H1 500 AHRMA Sleeper Modifications for the H1
The Kawasaki H1 500 continues to be a very popular vintage bike worldwide. There are no two H1 owners who agree on what modifications make up the "ideal" H1 street bike .... and that's okay. For our project H1, we wanted to build a machine that could be a reliable and practical street bike ...... that could also win an AHRMA road racing championship.
In the USA, AHRMA is the only truly nationwide race assn, that offers national road racing titles for vintage bikes. Of the classes that AHRMA permits the H1 to race in, the Heavyweight Historic Production class offered the best opportunity for our "daily-driver/racer" project. We don't expect that all H1 owners will want to build exactly the same H1 we have built here, but we do expect that many of the modifications we performed and developed for our bike will be attractive for other H1 owners to apply to their own bikes. It bears noting that we did everything possible to apply racing modifications that did not compromise street abilities, as well as applying street-ability mods that did not compromise racing performance.
Given that we had to comply with the AHRMA Production Class rules, we were mandated to run stock pipes, stock carb size, stock chassis and rim sizes. Despite all that, we contend that our finished AHRMA Production Sleeper is very easily as fast and good handling as most "chambers&carbs" cafe bikes. The difference is that our AHRMA Sleeper offers a level of rider comfort and reliability that few Chambers&Carbs machines can match. Our Sleeper H1 is not a one-trick-pony specialty bike .... it has the speed, handling, reliability and comfort to be the best of both worlds.
Our H1 500 AHRMA Sleeper performance goals are as follows:
Retain stock pipes, stock carbs, stock engine lower end, and a stock appearance
Deliver reliable street use performance on todays 91 octane pump gas
Offer reliable 70-75mph cruising speeds, and a peak of 110+mph
Deliver a smooth and linear powerband suitable for street riding
Maintain reasonable fuel range
Reduce street riding exhaust smoke to near non-visible levels
Offer secure high speed handling with a stock chassis
Prove the bikes speed and handling by winning an AHRMA Production Class championship
Prove the peak speed ability at Bonneville (115mph with a 220lb rider, 4300ft alt)
WE ACHIEVED ALL THESE GOALS We contend that all the technical issues of the H1 are very solvable and can be resolved without turning the bike into a chambers & carbs café racer bike. More over, our 21st century H1 can look virtually stock to the vintage-correct aficionados.
An Overview of our H1 Build-up and Testing
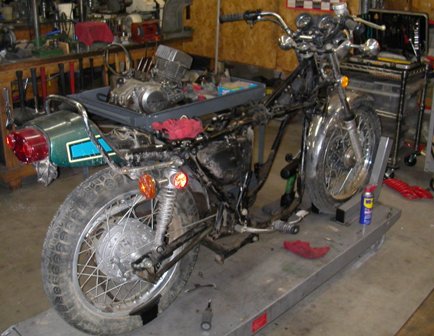
Like many owners, we bought a very rough non-running H1 for our project . We fully planned to do a complete frame-off restoration anyway. The initial build-up of our test bike took 6 months. We did the initial road testing on a stock machine with our 91-octane Head Mod and Decking package. After completing that, we did street testing of the prototypes for our Stg1, Stg2 and RIV cylinder porting arrangements.
 |
 |
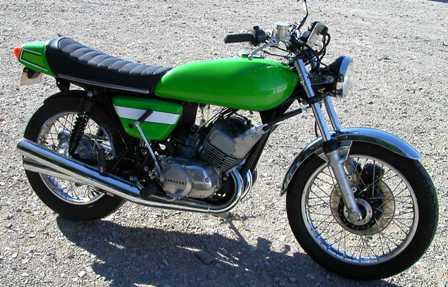 |
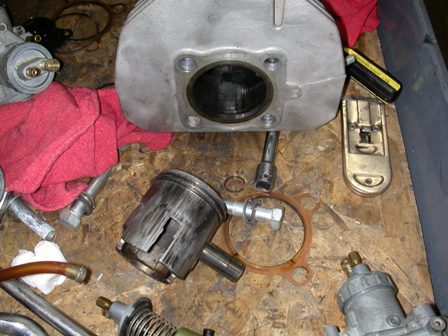
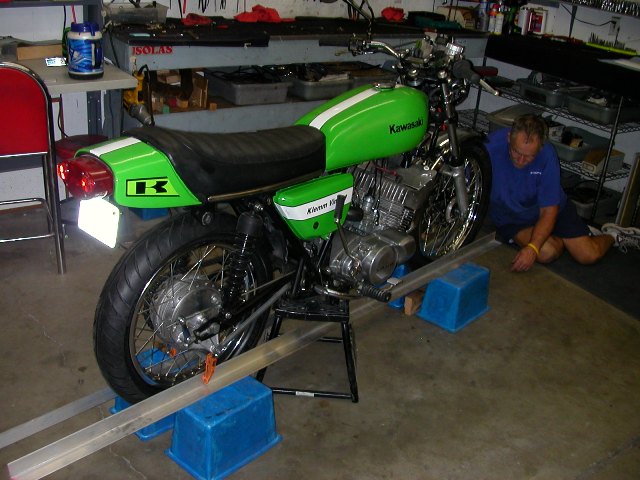
| Our candidate H1 was plenty dirty, but it was low miles (chassis) with no signs of ever going down. | Our "running when parked" engine had good compression .... but little else was good. Like many H1s, it had only a few thousand miles on it... but they were all done 1/4 mile at a time. | 6 months of cleaning, assembling, and much attention to detail. The finished test bike started on the first kick, and ran flawlessly. |
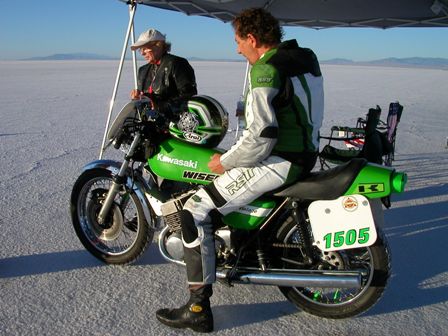
By August 2011 we were ready to take the H1 to Bonneville. At Bonneville, our H1 ran consistent passes of 115mph (8100rpm 15/40 gearing) with no tuning or handling issues. After our final pass, we installed the road-lights in the pits at Bonneville and drained the 32:1 race gas. We then filled the tank with a 91-octane 60:1 premix, and rode the H1 102 miles to the AHRMA road race event at Miller Motorsports Park, where the bike was displayed in the concourse.
 |
 |
 |
| Waiting to be released on to the Bonneville course with the long shadows of morning. | Checking spark plugs in our Bonneville pit. A good view of our air scoop arrangement. | Off and away for the 115.594 measured mile run. 220lb rider (fully dressed) at 4300ft. |
 |
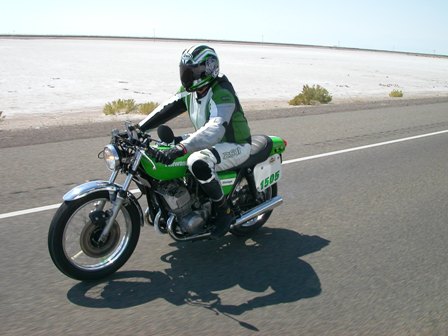 |
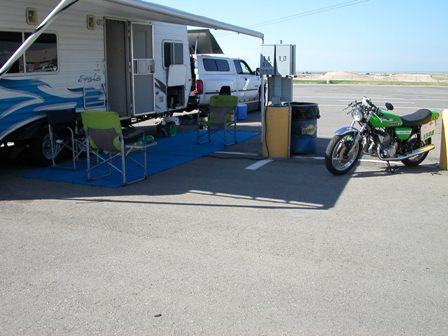 |
| After our record pass, we re-installed the lights in the Bonneville pits to prepare for the 102 mile road ride to Miller Motor Park. | With the Salt Flats in the background, our H1 cruised comfortably at 70-75mph (5000rpm with our 15/40 Bonneville gearing) | Arriving at the paddock area of Miller Motorsports Park with still a bit of fuel left in the tank. |
In 2012 we road raced the H1 in the AHRMA Historic Heavyweight Production class at Willow Springs and Miller Motorsports. We won every race we were in, and were never challenged by any class competitor.
 |
 |
 http://www.youtube.com/watch?v=YfebXhhv0p8&feature=player_embedded |
| Our rider, Russ Grainger, piloted the H1 to a decisive win on both days of the AHRMA road race at Willow. | The H1 never exhibited a single wiggle, wobble, or any other drama. We ran the license plate for psych effect. | Russ put together this You-Tube video of his Willow race. This footage speaks volumes for the speed and handling of our Sleeper H1. |
During the non-racing time in this two year span, the bike was consistently ridden on public highways around the South-western USA. As of this writing, it continues to be used as a daily rider.
An Overview of the H1s Biggest Problem Areas and the Solutions.
Building a stock-pipe, stock-carb H1 that runs 110+mph, and handles good enough to win a road race is actually not that challenging. What is challenging, is making that same 110+mph H1 a comfortable and reliable around town and freeway cruising bike . This was our development goal. The following is a snapshot of the biggest street-ability problems we faced . And an overview of our solutions. More detailed text of these solutions is on the following pages of this document.
Detonation Related Piston Failures
Detonation Measurement 101 - For detail on this subject, please read our tech document about 2 stoke Detonation Management.
To summarize the document relevant to the H1, the ONLY way to truly know the detonation risks of a 2stroke is with a modern deto-sensor of the type sold by 2D in Germany. The introduction of this tool in the mid 1990s was a complete game changer for every 2stroke engine builder worldwide. It became immediately clear that if you did tuning and development without a deto-sensor, you didn't have any idea what was "really" happening inside your engine. It also became clear that all other devices (spark plug temp gauges, EGTs, etc) were suddenly stone-age tools that gave questionable and erroneous data .... the deto-sensor wasn't just a good tool .... it was the "only" tool that gave real data in real time. That is why all the oem manufactures, and all 2stroke Moto GP teams used them.
We started using the deto-sensor in the mid 1990 to develop our endurance racing 3cylinder 2stroke PWCs. The difference it made in precision engine tuning was night and day. When we decided to developed our H1 Sleeper, the deto sensor was the primary tool that guided our tuning choices. It is impossible to overstate how fundamental it was to our testing and development.
The Deto Risks of the H1 - Even bone stock H1s can occasionally seize or score a piston. Adding performance mods like chambers, compression, etc, would often compound that piston scoring problem. There is no single technical problem that causes the many piston seizures that H1s experience, but in general the lions share of H1 piston failures were the result of the same source .. Detonation. Its important to note that not all detonation results in piston crown damage or a holed piston. Milder levels of detonation can super heat the piston, and cause a piston scoring event. Many piston seizures have been blamed on a cylinder being 'too lean" in fuel mixture. In truth, the mixture is often fine, but other design features are causing the increased levels of detonation . And the super heating of the piston from that detonation was the actual cause of the seizure. The true solution is not to run "over-rich" jetting, but rather to redesign the parts responsible for the high detonation risk.
In the case of a stock H1 being run on 91-octane fuel, we found that the center cylinder had a consistently higher deto risk than the outside cylinders (on an engine that is free of air-leaks). It bears noting that premium fuels of the early 70s were 100+ octane with no oxygenates. To safely run an H1 on todays 91-octane premium fuels is doable, but it requires a strong accent on anti-detonation modifications, and operation choices that suit the octane you are running.
We offer several engine modification levels for the H1, and all our packages and mods are designed with detonation resistance as a primary feature. During all of our road testing, road racing, and Bonneville racing, we never once experienced one piston failure or seizure. We attribute this to the numerous measures we took to reduce detonation risk.
Smoking - The excessive exhaust smoke of a stock H1 was barely passable back in the day, and downright illegal today. Many USA states (and various nations) now ticket motorcycles that smoke excessively, and follow that up by disallowing registration renewal until the machine is fixed. In the end, we were able to reduce the smoking of our 21st century H1 to nearly invisible levels, during average street and highway riding. Doing so required the elimination of the oil injection system, and using varying levels of pre-mix for different riding applications . But it worked great.
Air Leaks - Engine air leaks of any kind are harmful to the carburetion of an H1 being run at low rpms, and induces a high risk of piston seizure on an H1 being run a higher rpms. The carb mounting design of the stock H1 has an extremely high risk of allowing air leaks. As the composite sleeves in the stock carbs age, the risk of them randomly fracturing becomes very high ... an so too the risk of a new air leak. To resolve this problem we convert both the cylinders and stock carbs to allow for a reliable rubber spigot type mounting. The text below details how this conversion also resolves several other technical problems at the same time.
Vibration Early H1s had solid mounted engines, and later ('74-'76) versions had rubber mounted engines. Regardless of which one you have, every H1 has a pretty serious and uncomfortable high rpm vibration from 5000-6500 rpm. For racing applications, this is not a big problem because the engine is generally running over 6500 rpm. However for street ridding, this vibration is a huge problem. Our solution was to reconfigure the cylinder porting layout to produce a much wider powerband that allowed for freeway cruising and around town riding in the very smooth 3000-5000 rpm range.
Low RPM Surging - When trying to ride a stock H1 at sustained low rpms, the engine often has rpm surges even though the throttle position is not being moved. This surging is not caused by a problem with the carbs or jetting. The surging is a result of the inlet ports having a much larger volume than what is needed for the engine design. The stock H1 inlet ports (at the piston skirt) are the area equivalent of a 34mm diameter . While the carbs are only 28mm. By reducing the inlet tract volume, the H1 has much cleaner low speed carburetion, as well as the complete elimination of the annoying low-speed surging. We used two different means of inlet tract volume reduction, and both completely eliminated the surging while having no loss of high rpm power.
Poor Handling Characteristics - The stories of stock H1s doing dangerous high speed wobbles (while turning or simply riding in a straight line) are common and plentiful. We contend that any H1 can be made to handle securely, and run arrow straight at any speed without any welding on the chassis. Our 115mph Bonneville passes were made while riding one handed, and during our AHRMA road races, our H1 never exhibited a single wiggle, wobble, or any other evil-handling antics . It was always a safe and solid handling bike.
IN DETAIL ........ The Technical Obstacles of a Fast & Reliable Stock-Pipe/Stock-Carb H1 .And Our Solutions
Head Dome Design and Squish Clearance
Without a doubt, the number one issue that needs attending to for a reliable H1 is the squish clearance and head dome designs. The shape of the stock head dome has numerous design problems that can quickly induce lethal levels of detonation while running on todays 91-octane fuel. As mentioned above, premium fuels were over 100 octane in 1969 when the H1 was developed. With an octane this high, the risk of detonation was very low even with a head dome design and squish clearance spec that was far less than ideal,
Re-cutting the stock heads has always been a popular modification for H1s, however just cutting a proper dome design into the heads does not address the excessive squish clearance problem. To address the squish thickness issue, the cylinders must be decked on both the top and bottom surfaces. With the proper amount removed from both of these surfaces, our redesigned dome has the ideal squish clearance that offers the biggest possible safety margin from detonation. With all the added deto safety margin gained by this mod package, we have the ability to safely run slightly higher compression ratios than you could run on an engine that has only the heads re-cut . And we opt for that slightly higher compression to offer our H1 better overall acceleration.
Please note that we do not discuss compression data in PSI numbers because there is such great variation in compression gauges. The variations are so great the these gauges can only offer general guidance at to whether an engine needs attention. For more details info about this, please see our document About Squish and Compression Measurement.
As mentioned above, our deto-sensor showed the center cylinder to have a significantly higher deto risk than the outside cylinders. To attend to this problem, we actually cut the center cylinder-head dome to a slightly lower compression ratio. This staggered compression helps greatly to equalize the detonation risk of the three cylinders.
There is a belief that staggering compression puts the engine in some way out of balance . And nothing could be farther from the truth. In the world of high-bred 3-cylinder two stroke watercrafts and snowmobiles, the manufactures eventually learned that the biggest priority in getting good reliability was making the deto-risk as equal as possible .. Everything else is secondary. To this end. their high output production 3cylinder models often employed staggered compression ratios, staggered jetting, and even different cdi ignition curves for all three cylinders. Our many years of building championship endurance-racing 3cylinder PWC engines taught us the exact same truth and so we employ staggered specifications into this modification, and our other mods for the 500 H1.
If you do no other modification to your 91-octane daily driver H1, our 91-octane Decking and Head Dome mod is the one mod that should be considered as an absolute must have.
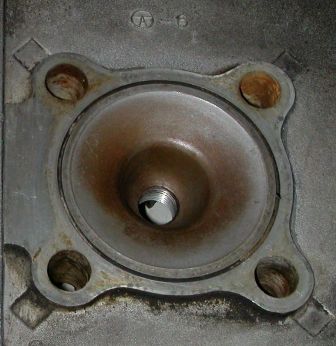 |
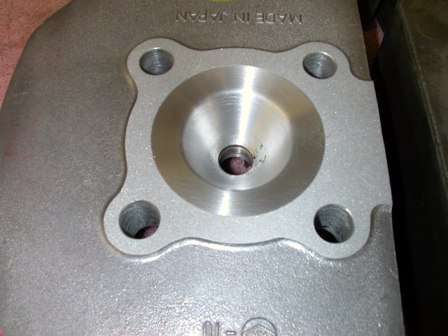 |
| The stock H1 dome has an undersized combustion dome, wrong squish angle, and far too much squish clearance (a result of excessive deck height of the H1 cylinders). | Our modified head has the dome size and squish angle corrected ...... it yields ideal squish clearances (with the decked cylinders). The result is a huge reduction in combustion chamber temperatures and detonation risk. All head and cylinder gasket sealing surfaces are lapped after machining to assure flat surfaces and excellent sealing. |
Inlet Manifold Air Leaks
The stock H1 carbs are hard mounted to the solid aluminum inlet manifolds via a slightly collapsible non-metallic composite sleeve. We have worked with many engines in the past that used this type of mounting . And we found them to be very problematic. The biggest problem, is that these inlets are very prone to small air leaks . And inlet tract air-leaks of any kind can be an engine killer.
We built a fixture that allowed us to test the air-tightness of the joint of a stock H1 carb onto the stock manifold . And the results were dismal. The stock mounting would produce a completely air-leak free fit about 10% of the time. There is no doubt that Kawasaki engineers also learned this, and so fit the more reliable "rubber spigot" carb mounts on the 750cc H2 models.
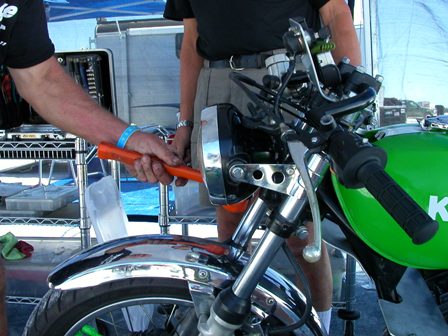
Its important to note that ANY H1 that will be ridden aggressive MUST pass an air-leak test. For such a test, all 3 inlet ports and exhaust ports are blocked off (usually with expandable rubber freeze-plugs, and then the engine is pressurized to 6-8psi. The engine should hold that 6-8 psi for 15-20 minutes with no loss of pressure at all. If there is ANY loss of pressure, the leak point must be located and fixed before the engine is run. For more detail info on pressure testing, read our page on Pressure Testing.
The truth is, having a very small air leak only represents a piston seizure risk on engines that will be run aggressively. An easy-use H1 that never turns beyond 5000rpm is at very low risk of piston seizure from a tiny air-leak . but an air leaking low-rpm engine is subject to other problems. Small air leaks like these will cause, difficult starting, inconsistent idling speeds, and random surging while cruising at lower rpms.
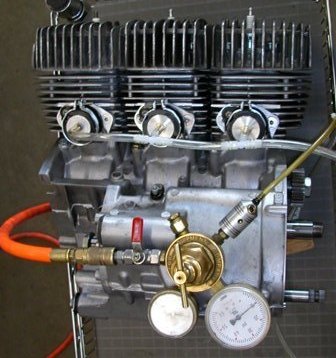 |
This photo shows the H1 engine being
pressure tested. The three inlet ports have all been fitted with
aluminum plugs in the rubber spigot. Each plug has an air fitting
and hose plumbing that allows all three cylinders to be pressure tested
at the same time. The exhaust ports have been blocked off using expandable automotive rubber freeze plugs. The engine should be pressurized to 6-9 psi ... and it should hold that pressure "with no loss at all" for at least 10 minutes. In our shop, we use an air gauge with a regulator to pressurize the engine, however the more simple gauge that comes in our Air Leak Test Kit allows for very easy engine pressuring using a simple bicycle tire pump. |
Regardless of the different levels of seizure risks, we consider the stock carb mounting to have an air-leak risk that is absolutely unacceptable for any 500 H1 that will be expected to give reliable operation. To resolve this problem, we offer a Spigot Conversion modification for the H1 cylinders. This mod allows for the spigot fitment of any small body spigot carburetor. For the owners that prefer to maintain as much stock appearance as possible, we also offer a spigot mount conversion modification for the stock carbs. We used these spigot modified cylinders and carbs for all of our road testing, AHRMA road racing, and our Bonneville record runs. These carbs retain the stock 28mm throat size, and they make jetting changes A LOT less time consuming to do. While the ease of removal, and elimination of air-leak risk were great advantages, this conversion offers another great benefit related to inlet tract volume .. read below for the details.
Inlet Tract Volume
One on-going problem for many H1 owners is the surging of the engine during low rpm cruising. This surging is not caused by carb jetting, but rather by the excessively large volume of the inlet ports that creates very poor inlet signal.
Inlet Signal 101 - Contrary to what some folks may believe, fuel is not pulled from the carb jet circuits by the air that is passing into the carburetor. In truth, fuel is drawn from the jet circuits in the carb by a negative pressure wave that comes up the inlet tract from the crankcase. This negative pressure wave is referred to as the inlet signal. The volume of the crankcase dictates how much inlet signal the engine has to send up the inlet tract and so this is a fixed value. It is the engineers job to maximize the use of the signal that the crankcase can generate. Having a strong signal in the inlet tract results in an engine that starts easier, idles better, and responds to carb tuning better . But sadly, the importance of this concept was not very well understood in the late 60s when the H1 cylinders were designed.
The stock H1 inlet port window (at the piston skirt) is the area equivalent of a 34mm diameter, but the stock carb is only 28mm. It is normal for a well designed inlet window to be slightly larger than the area of the carb throat but not by this big a margin. The stock H1 inlet port window and inlet-passage-volume are clearly much bigger than they need to be to service the 28mm carbs, and the power needs of the stock-pipe H1. The result of this excessively large volume inlet passage is very weak inlet signal at the carburetor.
The only way to reduce (or eliminate) the H1 surging, is to reduce the volume of the inlet tract. With this in mind, we manufactured our spigot manifold modification in a way that measurably reduces the volume of the inlet tract. Reducing this volume increases the strength of the inlet signal . And eliminates the surging. The new stronger signal offered by this manifold modification also resulted in much steadier idling, and more responsive differences during carb adjustments.
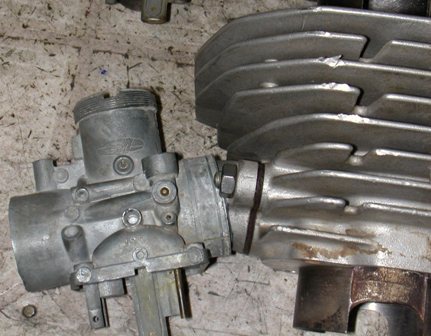 |
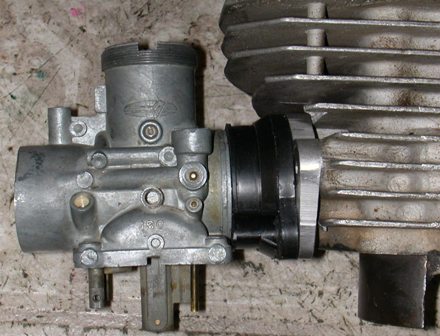 |
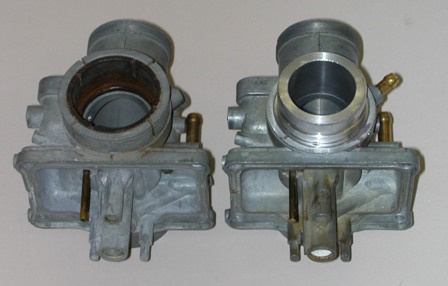 |
| The stock H1 inlet manifold arrangement. The total inlet port volume is 47cc. | Our (smaller inlet volume) Spigot Conversion. (Inlet passage volume of 41cc) | View of the Spigot modified stock 28mm carb body. |
Another added benefit of this manifold modification is that it greatly dampens the high-frequency vibration that the carburetors are exposed to. This reduction in carb vibration also helps the carburetors to meter fuel more precisely at all rpms.
It bears mentioning that the H1 engine generally responds very well (performance wise) to the installation of 34mm carbs because the stock H1 inlet ports are already at that area equivalent. We stayed with the stock 28mm carbs for our project because stock throat carbs were mandated by the AHRMA Production Class rules for both road racing and Bonneville. Besides, we did not want to inflict the loss of fuel range that comes with 34mm carbs. All that said, our H1 blew off plenty of chambers and carbs bikes during our road racing . We thought the 28mm carbs worked out just fine.
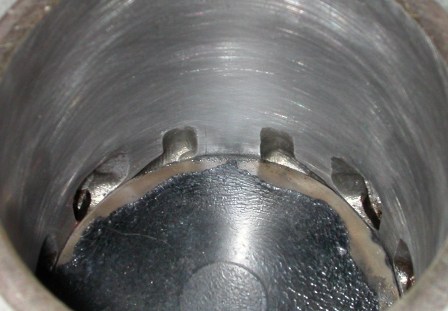
Cylinder Porting - For the H1, we offer three different levels of cylinder porting. Unlike the porting that has typically been offered for H1s, all of our porting modifications are focused toward getting the best possible low and mid range performance, with peak rpm performance as a second priority. In truth all our porting levels offer better top end power as well .... it's just that we don't focus on that.
The technical background on these port levels is below. The porting levels that we offer are as follows :
Stage 1 - This is essentially a blueprinting of the cylinders to eliminate all the port and sleeve mis-matches, as well as perfectly matching the port heights and widths among all three cylinders. Like all our cylinder porting, the inlet and transfer passages are textured for better fuel atomization, and the exhaust ports are smooth finished to help reduce carbon building up.
Stage 2 - This mod includes all the stage 1 upgrades along with port timing changes to offer a broader power-band. The big feature of the stage 2 are the piston fed boost ports in the rear of the cylinder. These ports offer an increase in transfer port area that helps overall acceleration. We strongly recommend the spigot inlet conversion for the Stage 2 cylinders.
RIV Sleeved Cylinder - The "Reduced Inlet Volume" cylinders (RIV) offer the very best in broad powerband and good overall acceleration. We bore out the stock sleeves to replace them with much tougher sleeves made from a high-nickel content alloy. The RIV sleeves feature a smaller inlet port that offers much better low end power, and big boost ports that greatly increase transfer port area.
Technical Background of our Porting - Over the last 38+ years, we have developed cylinder porting modification for many dozens of different two stroke machines, and we know generally what kind of power range will be generated by any one set of port timing specifications. That said, the stock H1 port timings, by most standards, are not very radical. By all rights, these port timings "should" generate a lot more low end power than the average H1 has. Of course, its not realistic to expect any H1 to have stump pulling low end torque. But that said, stock H1s fall very much short of the low end they should have for the port timings they carry . Why? We believe there are two basic reasons. The first is the (previously mentioned) excessively large inlet tract volume. The second reason is a shortage of transfer port area. Weve already spoken to the way we deal with the inlet passage volume, but what about the transfer port area?
Sadly, increasing the transfer port area by raising the transfer ports, would result in a narrower powerband . Not a good option. The other choice is to add additional transfer ports into the cylinder. Our Stage 2 cylinder porting accomplishes this by the use of adding transfer channels into the cylinder wall (often called boost ports, or worm ports). These transfer channels are fed fuel mixture through holes drilled in the piston. While these ports do not move a great deal of transfer fuels, they do offer a very effective supplement that makes a very measurable increase in overall acceleration. An added benefit of these boost ports is that they pass cool gases across the underneath of the crown of the piston, thus reducing piston crown temperatures, and also reducing detonation risk.
 |
 |
 |
| Our Stage 2 Porting with boost ports that are fed through holes in the piston. | The stock oem H1 cylinder porting (47cc inlet port volume). Installing the Our Spigot Conversion reduces the Inlet port volume to 41cc. | Our RIV sleeved and ported cylinder with large boost ports (fed by holes in piston) and 31mm area equivalent inlet port (36.5cc inlet port volume) |
Our RIV Cylinder Sleeving and Porting - We believed that the best way to deal with the H1s porting obstacles, was to install a new steel sleeve that has a considerably smaller inlet port/passage, along with two large and effective transfer boost ports in the rear of the cylinder . This is exactly what we created with our Reduced Inlet Volume (RIV) cylinder modification. The port timings of the RIV cylinder are exactly the same as our Stage 2 porting. However the changed inlet and transfer port areas of the RIV cylinders yield much better low end performance, along with the same excellent high rpm output. The inlet port windows of the RIV cylinders are the area equivalent of a 31mm diameter, so the 28mm carbs are still being well served. The RIV cylinders offer smooth and linear power delivery in the 3000-5000rpm range that is used during inner city and highway driving, as well as stronger mid-range acceleration for acceleration busts. An added benefit is that the higher nickel-content of the RIV sleeves, which makes them far less prone to wear than the stock Kawasaki sleeve material. All in all, the RIV cylinder modification is the last word for a stock-pipe, stock-carb H1 that is expected to be street-able "and" race-worthy .
How can the RIV cylinder make good peak power with smaller inlet ports?
The answer is related to mean-effective port-area.
Mean-Effective Port-Area 101 - Technically, the term mean effective port area (MEPA) refers to the most effective part of a port passageway. In more plain English, MEPA is the part of a port that is open the longest. In the case of a piston port 2stroke like the H1, the MEPA of the inlet port is the bottom 60-70% of the inlet port window because it is open for such a relatively long time (compared to the top of the port). By contrast, the top 20-30% of the H1 inlet port delivers very little inlet gasses because that part of the port is open for such a relatively short amount of time. In the case of the stock H1 engine, the stock inlet port has far more port area than what is needed to produce its power numbers. Given that, blocking off the least effective 20-30% of that inlet port area has a negligible impact on the peak output of a stock-pipe, stock-carb setup.
How Does the RIV modification affect Carburetion?
A Lot. The smaller inlet tract of the RIV cylinders has much stronger inlet signal than a stock cylinder, and so it draws considerably more fuel from all the jets circuits with each cycle. especially the lower speed circuits. As a result, considerably leaner pilot jets, slides, and needle jets are required for the RIV cylinders. However once the adjustments are made, the RIV cylinders deliver far better low speed throttle control, as well as consistent, crisp, and clean carburetion at all rpms.
It bears noting that engines with exceptionally strong inlet signal are much less affected by altitude and temperature changes, as well as being more responsive to jetting changes, so the RIV cylinders tune easily. All this means that with the RIV cylinders, the carbs are far less temperamental. We did all of our carburetor fine tuning at 400ft altitude. We then raced the bike at Willow Springs (2500ft), Bonneville (4300ft), and Miller Motorsports (4400ft) with the exact same jetting. We even tried different settings but none worked better. This happened because the exceptionally strong inlet signal of the RIV cylinders actually helped to compensate for the air density changes.
Other Inlet Details - Its no secret that clamp on pod type filters are very popular among the chambers and carbs crowd. We opted not to use pods for several important reasons. All of our testing and racing was done with the stock 3 into 1 rubber inlet boot.
The stock 3 into 1 rubber boot allows some pulse sharing between the cylinders that can be very beneficial to smoother low speed carburetion. The makers of high performance 3cylinder PWC and snowmobile engines go to great lengths to construct large common area inlet boxes to take advantage of this pulse sharing effect. In addition, the very slight restriction of the 3 to 1 boot actually helps to slightly increase the inlet signal seen by the carbs, and this benefits the precision of overall carburetion especially low rpm carburetion. For sure, the individual pod filters are very free breathing, but they offer none of the low speed pulse sharing benefits of the 3 into 1 boot, and do nothing at all to increase signal strength. Dyno tests showed that pods offered no benefit on our H1.
Our 3 to 1 boot did have some very excessive flash from the molding process that slightly restricted air to some runners, so we simply ground away that excess flash with a small dremel tool.
Because of the slightly change carb angle and inlet length, the 3 into 1 rubber boot will not reach the stock air box. For air filtration, we fitted with a 4 tall x 4.5 diameter K&N filter to our boot via an aluminum adaptor sleeve. This filter worked great, and made it much easier to move the boot away from the carburetors during carb removal.
 |
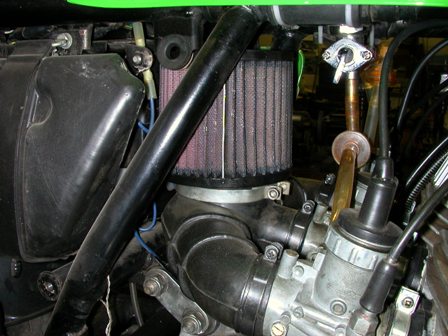 |
| The K&N filter with side covers on. | A better view of the K&N with the side cover off. |
About Pistons - There are several piston options for building an H1, and there are some important differences
Cast OEM Pistons - The stock oem Kawasaki cast pistons are very suitable choice for any H1 that will be ridden recreationally. Sadly, the number of true NOS pistons (and rings) are in very short supply, so they can be an impractical choice for racing or high output applications. As of this writing, we are not aware of any widely available aftermarket cast pistons for the H1, so we didn't bother to test with them.
Wiseco Forged Pistons - Wiseco was making pistons for the H1 in the early 70's. Sadly, during the 1970's the materials and design of the 70's era Wisecos left alot to be desired .... and they were a very poor choice. In the last 15 years, Wiseco has made huge changes in both their piston and ring alloys. It addition to this, Wiseco also made big development strides in their cam and taper designs. All these improvements have made the modern era Wiseco pistons an excellent choice for the H1. The forged material is very durable, and allows reliable racing performance with piston clearances of .0025. We strongly recommend the "new" Wiseco pistons, and we strongly discourage the use of the older "blue-box" Wisecos that often become available on Ebay.
Wossner Forged Pistons - While we did not run the Wossner pistons during our testing, we are familiar with their products, and consider them to be every bit as good as the Wisecos in wear and performance. There is, however, one importance difference in the Wossner Pistons. Their crown angle is measurably steeper than the crown angles of the OEM and Wiseco pistons. We presume this change was made to offer slightly higher compression. This crown angle difference is very important because when heads are re-cut for our 91-Octane Modification, we cut the head domes to closely fit the pistons that will be run. If we cut the heads to be run with Wossner pistons, that engine will always need to be fitted with Wossners. The same would apply to heads that are cut for use with Wiseco/oem crown pistons. If you later installed Wossners in such a motor, you would have insufficient squish clearance that could result in physical contact between the head dome and piston crown.
About Forged Piston Fables - There is much chatter about forged pistons needing unusually long warm-up times, needing much greater clearances, and being more prone to seizure .... ALL FALSE. However there is a very real reason for these false beliefs that is connected to break-in ... not piston material.
The Wiseco piston rings have a thin coating on them that is intended to allow for swifter sealing to the fresh bores..... and this coating must be given some time to literally wear away before the engine is put into hard service. If the rings are run "too hard too soon" they will expand to a diameter larger than the bore, and "seize" to the bore. To avoid this scenario, we have a very specific break-in regiment. We start the engine with fresh pistons & rings, then let it run at a high idle for 60 minutes with a fan blowing on the cylinder & heads. After this initial run in, we ride the bike, doing no extended high rpm operation for the first tank of gas. After that break-in process, the Wiseco rings are ready for serious service. Folks who fail to offer this important run in time will sometimes give the Forged pistons excessive setup clearance to "avert" this failure... but we believe that is doing two wrongs to make a right. We fit our Wisecos at .0025" clearance, and have never had a single seizure or scoring event.
Oil Injection and Pre-Mixing - We hate the term two-smokers . But very sadly, the stock H1 did a fine job of earning and solidifying this term. Few 2stroke street bikes had a reputation for belching more smoke than the H1. Its important to remember that the KMC engineers were saddled with the task of building a machine that was expected to have a warrantee . And also expected to deliver 12 second quarter-miles all night long. Given that, the engineers opted to err on the side of ample oil to the engine with no regard to smoking. However for our 21st century H1 we needed to be more mindful of exhaust smoke . And here is the background tech data for the approach we took.
Oil Migration 101 - Tests were conducted (not by us) to determine the amount of time it took an ounce of oil to migrate its way into and out of a running two stroke engine. An oil laced with a radioactive additive was used so the migration could be seen and measured with a Geiger counter. Setting aside all the lengthy boring details of this testing, the summary of the testing was this. An ounce of oil migrates much faster through a large displacement cylinder than a small displacement cylinder. In addition, oil migrates through any engine much faster at sustained high rpm, than at sustained low rpm.
To give this information some real world meaning, the engines that need the most oil in the premix would be large displacement singles being run at sustained peak rpm. The engines that would need the least amount of oil premix would be small displacement cylinders being run at very low rpms. However, as most of us know, most small displacement cylinders are revved very high, and most large displacement singles are revved very low, so they all tend to use the same range of premixes . Until you go to the extremes.
We road race Kawasaki 350 Bighorn singles that we hold at 8000+rpm full time. We race on a 20:1 premix that produces no visible smoke at all while we race. We experience very little smoking because the oil is migrating" through our 350cc engines at a very rapid rate. We ride the same 350cc Bighorns on the street using a 40:1 premix, and on that premix, the bikes never produce any visible smoke (but you can smell the bean oil we run).
While many H1 owners prefer to keep their oil injection, we dislike them for a few reasons. Firstly, despite the variable oil output of the injection system, there is no viable setting that generates acceptably low smoke levels under average street riding conditions. Secondly, when they fail, there is no warning other than a seized up engine. Lastly, we consider the oil fitting points to be potential air-leak risk points (if they loosen or break), and that was a risk we did not want to live with. To gain real control of our H1s oil diet, we eliminated the oil injection and simply ran premix.
When we road raced our H1, we started out running 20:1 premix (like our Bighorns), and there was plenty of visible smoke coming from the pipes at all times. When we put the same H1 on the street with a 40:1 premix, it billowed smoke non-stop especially during inner city riding. Why did our H1 billow clouds of smoke on exactly the same 40:1 mix that let our Bighorns run smokeless?? The answer is Oil Migration.
Mechanically speaking, the H1 is not a 500. It is actually three 166cc singles. When we toured our H1 around town at 3000-5000 rpm, the oil migration time was extremely long, and so the oil needed for ample lubrication was very minimal. For all of our racing we used Maxima 927 Castor oil, and for all of our street riding we ran Maxima Super M for premix (the Super M is arguably the cleanest and least smoky of all premium grade oils).
We began to cut back our oil premix in an effort to get acceptable smoke levels during street riding. This meant no visible smoke while cruising at 3000-5000rpm, and only a minor blue cloud while doing downshift acceleration passing. We used a 60 mile loop of varying road conditions to do the evaluation. After numerous loop rides, these were our results
|
|
Sustained 3-5k inner city riding |
7000+rpm Bursts in low gears |
7000+ rpm bursts in high gears |
Sustained 7000+ running |
|
4oz/3ga (96:1) |
Safe - low smoke |
Safe - low smoke |
Not recommended |
Not recommended |
|
4oz/2gal (64:1) |
Safe but smokey |
Safe but Smokey |
Safe - low smoke |
Not recommended |
|
4oz/1gal (32:1) |
Heavy smoke |
Heavy smoke |
Moderate smoke |
Low smoke |
A Few More Notes on Oil and Exhaust Smoke - We had the privilege to speak by phone with Tony Nicosia about his early experiences with the H1. Tony was employed, by Kawasaki, to do much of the early testing of the H1s, and he is arguably one of the most successful Kaw triple drag racers of the 70s. Tony quickly recalled the exhaust smoke difficulties he encountered. In the very early going of street testing, he received a ticket for excessive smoke from his H1 prototype test bike. His solution was to disconnect the oil injection pump cable (holding the pump in idle mode full time) .. and then added only one ounce of oil per gallon in premix along with that setting. Tony claimed that he made all of his drag racing passes with this oil setup. He also made numerous high speed road rides with the same mix . Including a few peak speed runs from Barstow California to Las Vegas 150miles (you could get away with that kind of stuff in 1970). These experiences speak volumes about how little oil the H1 can actually get by on.
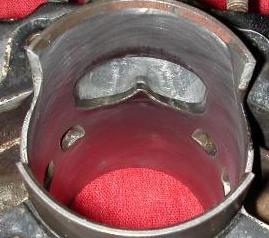
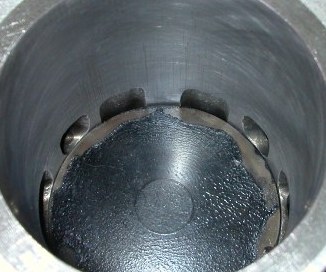
We did a few weekend poker runs in our local area where we knew there would be no riding over 60mph, and lots of biker traffic that looked down on smoking 2strokes. For that, we routinely ran a 102:1 mix (5oz to 4gallons). The bike emitted virtually no visible smoke during around town riding, and only a tiny blue cloud during a few downshift passing spurts. Later teardown inspections showed all the internal parts to be looking very good with no visible issues.
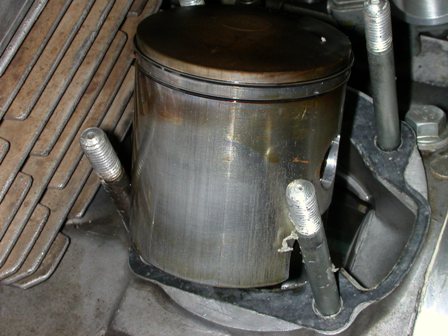 |
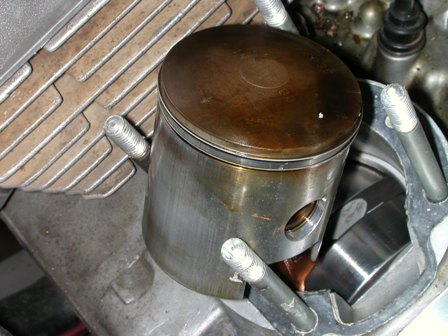 |
| These photos are of the left side piston after three very "spirited" 60 mile loop rides with a 96:1 premix of Maxima Super M and 91-octane fuel. While most of the riding time was spent at 4000-5000 rpm, there were numerous "passing spurts" beyond 7000rpm. | These photos were taken moments after the cylinder was removed. They show a very visible presence of oil on the piston skirt, and no scoring or scuffing of any kind. With this mix, we could easily run the recommended .035" plug gap with no fouling. |
Ignition and Timing - All modern 2stroke 3cylinder (watercraft and snowmobile) engines have cdi ignitions that are programmed with an advance-retard curve. On these ignitions, the timing is very retarded to allow for easy starting. As rpms increase from idle speeds, the timing advances sharply, to a max advance somewhere between 4000-6000 rpm. After that mid-range max, the ignition timing begins to retard progressively as rpms increase. An ignition curve like this offers excellent mid-range acceleration, along with peak rpm performance that has a very low detonation risk. Unfortunately, no one knew all this in 1971.
Our 1975 H1 test bike had the latest version of the H1 CDI ignition. This ignition maintains the same ignition timing from 0 rpm, up to 7000rpm. At 7000rpm, the ignition timing advances very slightly . This is exactly the opposite of what would be smart. Why the !!## would KMC engineers do this?.... Simple. Its important to remember that the H1 was built as a ¼ mile bike that was expected to be operated at peak rpm in high gear for only a few moments (on 100+ octane pump gas of the day) After just a few moments at peak rpm in high gear at the end of a drag race, the engine was then quickly shut down. Under this operational scenario, a small advance above 7000rpm is actually not a bad idea. Sadly, however, for extended operation above 7000rpm, this added advance a super bad idea. Add in the increased detonation risks afforded by today's oxygenated 91-octane pump gas, and sustained 7000+ operation is guaranteed to result in catastrophic levels of detonation ...... in less than 30 operating seconds
As the fleet of H1 500s aged, and pump-gas octanes plummeted, the poor head-dome designs and excessive squish clearances of stock H1s would swiftly generate lethal detonation, any time the bike was operated for a brief time over 7000rpm (usually resulting in a seized or holed piston) . And exactly the same applies to anyone riding an H1 today .. So what is an owner to do?
Octane Specific Riding - While running a stock H1 CDI ignition, it is impossible to build ANY high-performance H1 engine format that can be operated reliably at sustained 7000+rpm speeds on todays 91-octane fuel. .... it's never going to happen. This applies no matter what pipes or carbs you are running on your H1. That said, the lions share of "stock-pipe stock-carb" riding scenarios CAN be done with 91-octane, or 91-octane mixes. Here is the background.
During the development of our engine packages, we conducted dyno testing with our real-time detonation sensors hooked up to our H1. Using this deto-sensor on the dyno gave us a clear insight on the specific detonation risks. Our H1 showed virtually no signs of detonation at all until the 6000-6500rpm range. Above 6000 we began to see mild levels of deto on the center cylinder only. Above 6500, the rate of deto on the center cylinder increased visibly, and the ignition side cylinder began light deto. As soon as we passed the 7000rpm threshold where the ignition advanced slightly, the center cylinder went into high level deto, with both the left and right cylinders not far behind. Later tests (with staggered compression and jetting) helped to significantly reduce the deto levels of the center cylinder, however every time we exceeded 7000 rpm there was visible (but now non-lethal) deto taking place on all three cylinders. These dyno tests were all done running 110 octane race fuel. The same 7000+rpm passes on 91-octane would have certainly killed a piston.
After these dyno tests, we filled up with 110-octane, and took the bike to Bonneville where we ran 8100 rpm in high gear for the full 50 seconds of our peak speed pass. A few months later, we took the same setup to an AHRMA road race at Willow Springs Raceway (arguably the highest average speed track in the western USA). At Willow, the H1 was steadily running 7000+rpms in 4th & 5th gear for 80% of the 6 lap race. It is impossible to run an H1 harder than we ran this one at Willow Springs. After each event we removed the heads to check for any visible signs of destructive levels of detonation . There were none.
In between the racing, we ran numerous tests on the street running 91 octane fuel. As long as we never ran sustained rpms above 6000, the temperatures and detonation were very manageable. However if we did some aggressive riding that involved repeated 7000+rpm spurts in the higher gears, the 91 octane could no longer run deto safe. For this kind of riding, we ran a 50/50 mix of race gas and 91-octane to manage the detonation to safe limits. On a practical note, riding the H1 this aggressively on the street will likely get you thrown in jail in all 50 states . And we are strongly against racing of any kind on public highways. That said, everyone has a different definition of aggressive riding, so we did this testing to that end only.
For 90% of the street riding that most H1 owners will do, 91-octane in our engine packages will suit most riding applications. Here is another table to give our experiences more dimension.
|
|
Sustained 3-5k inner city riding |
7000+rpm Bursts in low gears |
7000+ rpm bursts in higher gears |
Sustained 7000+ running |
|
91 octane |
Safe |
Safe |
Not recommended |
Not recommended |
|
50/50 91 / 110oct |
safe |
Safe |
Safe |
Not recommended |
|
110 octane |
Safe |
Safe |
Safe |
Safe |
Early H1 Ignitions - Earlier H1s came with points, or the first generation CDI (the one that squeals). We have not tested the early CDI versions to see if they have the same 7000 advance feature, so we cannot speak to that. The points ignitions obviously have no advance feature. However the points ignitions are so wrought with technical problems and weaknesses, we would strongly recommend against building a points equipped machine for sustained high rpm operation.
Other Ignition Notes - The truth is that there is a modern advance-retard ignition available for the H1 from HPI in Belgium Horse Power Ignition . This ignition has a maximum advance at 4000rpm, then retards steadily as rpms increase. We have not had a chance to test this ignition on our H1, but we feel it could make a huge reduction in high-rpm deto that could very likely allow safe 7000+ operating on 91-octane. Sadly, this ignition has no charging system for the battery . Thats okay because the battery can carry a total loss stop light for quite a while during daylight riding . we dont ride our H1 very often at night anyway.
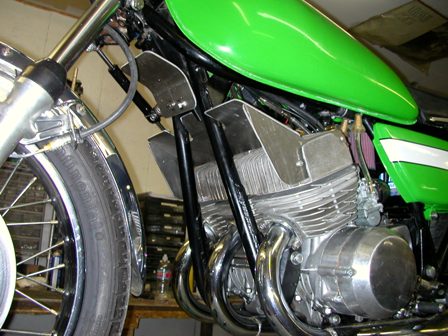
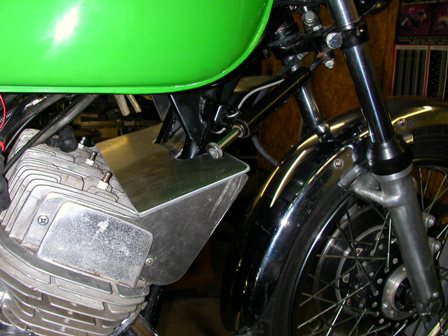
Temperature Reduction Accessories - We firmly believe that it's impossible to build in too much safety margin against detonation. To this end, we fabricated a simple head scoop to help direct more cooling air to the cylinder-heads of the H1. Since the scoop is so easy to fabricate from aluminum, we don't sell them .... but we invite owners to fabricate their own version.
For us the biggest goals of our head scoop was to direct air toward the "forward dome" area of the cylinder head. In addition, we hoped to direct as much air as possible to the "air-starved" center cylinder. To that end, we re-located the horn, and used those mount points to attach an aluminum plate that helped to deflect additional air to the center cylinder-head. Our tests with our deto-sensor showed that the scoop clearly offered a temperature reduction when cruising at highway speeds (and higher). Sadly, in 2012 AHRMA considered it a "performance enhancing air scoop".... and disallowed it's use in road racing. We still used it during all our street riding.
 |
 |
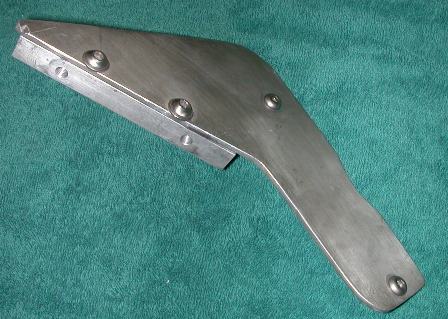 |
| The very simple 3-peice design of the scoop attached to the heads makes it very easy to fabricate and mount. Note the center of the top plate (between the frame tubes) is bent upward toward the smaller air guide plate. | This view of the scoop shows the top plate located in a way that directs air to the forward side of the dome in the heads. We felt that this was a very important feature. | The simple side panels use a .5"x.75" alloy bar with threaded 6mm holes to hold the top plate to the sides. All the plate were made from 1/8" aluminum. |
About Reed Valves - The AHRMA rules prohibit the addition of reed valves in Production Class ... and that was fine with us. While we did not test reed valves on our H1, we do know that a well executed reed valve conversion design can be an advantage. That said, We feel that the increased inlet signal, and added transfer area of our RIV cylinders nets a performance result that would be darn close to the performance of a reed conversion (on a machine with stock pipes). It's realistic to believe that a reed conversion could yield a much bigger power benefit if chambers are used, but (as mentioned before) we were not interested in developing a "chambers & carbs" package.
Transmission Modifications - For casual street riding, the stock H1 gearbox works fine. However for any machine that will be pressed in hard service (road racing or aggressive street riding), the stock transmission gears can be problematic. When the H1 trans is used aggressively, there is a dramatically increased likelihood of the transmission "jumping out of gear". The primary cause of this jumping out of gear is the shifting dogs of the gears being pushed away from each other from the sheer loads of hard acceleration. To be sure, a bent shift fork can also cause this same problem, but a transmission with perfectly straight shift forks can still jump out of gear.
To resolve this jumping out of gear, all the gears in the gearbox need to be "undercut". Undercutting is a machine process (typically done on a precision cutter grinder) that cuts an angled surface on the shifting dogs of the gears. This angled surface helps to actually draw engaged gears toward each other, thus dramatically reducing the occurrence of jumping out of gear. Undercutting of the transmission gears is a mandatory modification for an H1 that will be ridden aggressively.
At Klemm Vintage we do the gearbox undercutting, and we offer two different levels of undercutting .... street and track. In short, the street cut is very effective, but it is a relatively milder angled undercut that allows for easier and smoother shifting. The track cut is better suited for high powered H1s that with be run (and shifted) aggressively. Shifting with the race cut requires a bit more foot shifting force than the street cut, but the gear engagement of the race cut is very "certain".
We can effectively undercut gears that have experienced occasional jumping out of gear events. However, repeated jumping out of gear events can damage the gear to a point where undercutting cannot be done. There is no set specification for evaluating good and bad candidate gears, so all gears are evaluated in our shop on a one by one basis.
Chassis Preparation and Setup
Frame Rigidity and Straightness - During our initial road testing of our H1, virtually every motorcyclist we encountered told us a horror story about the foul handling and high speed wobbles of "their buddy's" H1 back in the day. The only "take-away" we got from all those stories was that any motorcycle can be turned into an evil handling bike if it is assembled and adjusted poorly enough. For our H1, we approached the handling issues from two separate angles. The first was to make the existing chassis and components as ridged as possible, and the second was to address the actual suspension hydraulic components. As mentioned above, this resulted in a bike that handled very predictably and securely at all speeds .... it was a widow-maker no more. Below are the details of how we prepared our chassis.
About Front End Inspection
Getting good handling from your H1 starts with closely inspecting all your front end parts. Here is the best approach.
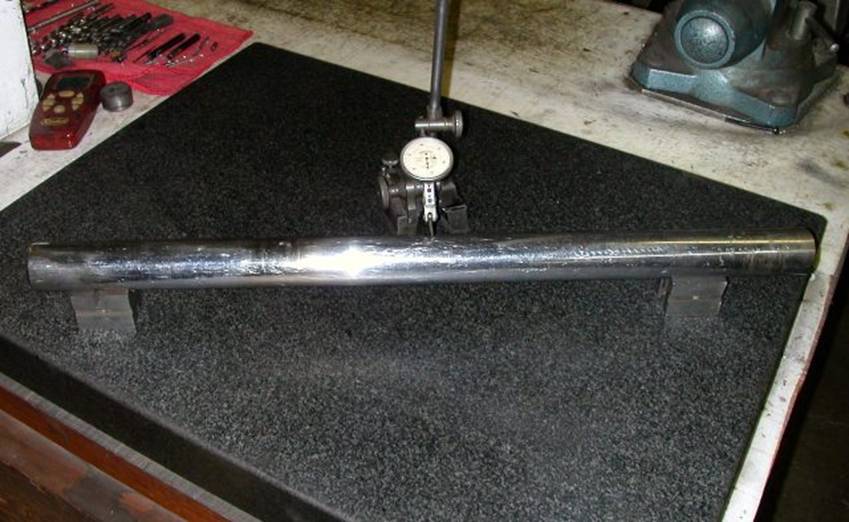
Besides the fork legs being perfectly straight, the surfaces covered by the fork seals should be completely free of any rust or surface dents. No matter how straight your fork legs look, we consider it mandatory to inspect the straightness with an indicator and V blocks on a granite surface plate. Total run-out with the leg supported on each end should not exceed .005. If yours are worse than that, they should be straightened by someone with (a lot of) experience doing the job. This is a service that Klemm Vintage offers.
|
|
This is the basic setup to inspect the straightness of your H1 fork legs. If straightening is required, it should be done by someone that has the tooling and experience to do the straightening without leaving any "flat-spots on the leg faces. |
Lower Triple Clamp - The stock lower triple clamp is largely responsible for holding the forks rigid . And it does. However the lower clamp is made from relatively soft cast steel that can easily be bent in a moderate crash event. The good news is that a bent lower clamp can be straightened to racing quality.
The clamp can be checked for straightness by fitting the two (perfectly straight) fork legs in each side, tightening the clamps on the legs, and then inspecting the perfect parallel-ness of the two legs on a granite surface plate. If the two legs are not perfectly parallel, the legs should be removed to physically bend the lower clamp until perfectly parallel legs are achieved. This whole process sounds like a big pain in the butt to do . But it pays huge dividends in high speed handling stability. We consider this mandatory for any owner that plans to ride at high speeds.. Klemm Vintage offers fork leg straightening, and lower clamp straightening services for owners who do not have the equipment.
Steering Head Bearings - The stock "ball-bearing" steering head bearings are adequate for casual low speed riding, but they do not offer the rigidity needed for aggressive street or track riding. The stock steering head bearings should be replaced with "tapered-roller" bearings (aka Timken bearings). These tapered roller bearing kits are commonly available from several sources (most popularly from Sudco International). Installing this bearing kit does require the full removal of the entire fork assembly, but all the front end parts should be removed anyway for inspection of straightness.
Swing Arm Bearings - The stock H1 swing arm pivots o steel bushings. Again, these can work fine for an H1 that will be ridden casually. However for an H1 that will be run aggressively, it is mandatory to replace the steel swing arm bushings with needle bearings. In addition, there should be radial needle bearings installed on each side of the swing-arm to allow for smooth movement with zero side to side movement (this it common on modern dirt bikes). There is no purpose made needle bearing kit like this for the H1, but there are some dirt bike kits that can be easily adapted (with some simple machine work). We opted to start out with a kit offered by Pivotworks made for the 1987 Yamaha YZ125
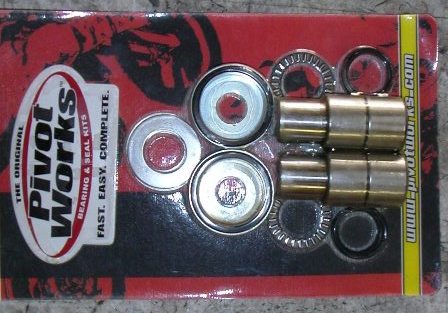 |
This Pivot Works swing-arm
needle-bearing kit (PWSAK-Y03-001) contains all the hardware needed for
the swing-arm needle bearing conversion. The two needle bearings
press nicely in to each side of the stock H1 swing arm. However
the inner steel sleeves are too long for the H1 application, and must be
shortened. This photo also shows the radial needle-bearings intended to be used on each side of the swing arm. Cutting the inner pivot sleeve to the "exact" correct length is essential. If they are cut too long, the swing-arm will have side to side play when the swing-arm bolt is tightened. If the inner sleeves are cut too short, the radial bearings will be bound when the swing arm bolt is tightened. To be sure it is tedious work, but the end result is well worth the effort. |
About Swing Arm Shimming - The stock H1 frame is often 2-3 mm wider than the total width of the swing-arm assembly. Most folks simply put the swing arm in position, an use the swing arm bolt to "pull" the frame down on to the narrower swing-arm .... but we didn't do that.
Instead, we added shims on each side of the swing-arm so that the swing-arm assembly was only.2-.4mm narrower than the frame. By doing so, the chassis is being far less stressed by the tightening of the swing-arm bolt. It's a pain in the butt to do this, but it's small detail that can help handling.
Engine Rubber Mounts - The early H1s were made with solid mounted engines. The 73-75 H1s were made with rubber mounting in an effort to reduce the vibration experienced by the rider. Over time, the stock rubber material of these rubber engine mounts begins to deteriorate to allow excessive engine movement under the loads of aggressive acceleration.
We have very mixed feelings about how much vibration these rubber mounts really improved rider comfort. However we had no doubts about the addition movement of the engine in the chassis as the stock rubber material deteriorated.
Our test bike was a 1975 model with the rubber mounting, and all the rubber cushions were badly deteriorated. We decided to replace the stock rubber material with a more dense and stiffer rubber compound. The material we chose was a Buna-N rubber material from McMaster Car (part# 86975K62). This 1" diameter material has a 75A rating on the Durometer scale (the Durometer scale is the international standard scale for rating the hardness of rubber). The stock H1 rubber mount material is about 40-50 on this same scale. We simply removed the stock rubber material from the motor mount sleeves (with a wire wheel), and drilled our new material to fit. The 1" diameter Buna-N material drills nicely (in a lathe), and when drilled for a very tight fit on the sleeve, it expands to exactly the correct diameter to fit in to the H1 cases.
Engine Shimming - Like the swing-arm, the H1 engine is considerably narrower than the bolt mounting-points on the chassis. Like the swing-arm, we decided to "shim" all our motor mount sleeves so that they were almost exactly the full width of the chassis at every mount point. Again, this would assure that the chassis would only be stressed minutely when tightening each engine bolt.
We accomplished this shimming, by adding shim washers between the rubber cushion inner sleeves (that meant the shim washers were at the center-point of the crankcases at each engine mount point). It bears noting that after we did this shimming, it was clear that our new Buna-N rubber cushions would have to be cut to a "longer than stock" length to securely hold the cases from moving left to right on the rubber sleeve diameters. The entire process was tedious, and took some time. However the end result was a rubber mounted engine that fit perfectly into the chassis with minimum "draw-down" stress with the tightening of the motor-mount bolts.
Front Forks - The AHRMA rules specify that the stock forks must be used... so we were stuck with them. The stock H1 fork hydraulics and springs are not "ideal" by any standard, but they certainly can be made to work pretty darn good. The two biggest problems these forks have is, not enough compression dampening for aggressive riding, and too much fork compression when braking heavily. This excessive fork compression is a big problem because it significantly changes steering angles while entering a turn at high speed.
We originally contacted Race Tech (who specializes in vintage suspension), but they had no kits or mods for our H1 forks. With that, contacted the folks at Pro Valve in Costa Mesa California. Pro Valve works with many different kinds of motorcycle suspension, and they felt that they could offer some solutions to our fork issues.
The Pro Valve mod was focused on changing the dampening characteristics with modifications to the dampening rods. As it turned our, with these mods, the stock fork springs actually worked pretty good.. Pro Valve modified the hydraulic action of the forks to offer much stronger compression dampening in situations where the forks were very suddenly compressed (like braking into a high speed turn). This added compression damping helped high speed turning stability "allot". The modification cost $220, and was well worth the price for a machine that will be ridden aggressively. The Contact info is Pro-Valve 714 708-2583 , [email protected] .
Shock Absorbers - The stock H1 shocks are 12.5" center to center, and offer dampening that is far below the needs of aggressive riding. Going to another shock was a given, however we hoped to address more than one problem when replacing the stock shocks. Anyone that has ever ridden an H1 aggressively in turns, quickly realizes that the pipes will drag long before the tires start loosing grip. To help relieve this problem, we fitted a pair of 13.0" Series-12 Progressive shocks with 1394 springs. The extra half inch of shock length helped greatly to increase ground clearance of the pipes in high speed turns. At the same time, the springs on these shocks were clearly stiffer than the stock springs, and so they compressed less during those same high speed turns. These shocks offered a ride that was "very firm", and admittedly not very comfortable on rough road surfaces .... but the high speed handling characteristics were excellent. The only down side to the longer shocks was that we had to increase the size of the clearance dents for the swing arm on the center muffler.
For our Bonneville record runs, we wanted to lower the profile of our H1 to (hopefully) reduce wind resistance. For those runs, we fitted a pair of the same 12-Series Progressive shocks, in a 12.0" center to center length. Progressive makes no springs for the 12.0" shocks, so we had to use the lightest spring made fore the 13.0" units (#1367). We rode this same set of shocks on our 102 mile road ride from Bonneville to Miller Motorsports. The ride was a bit firm, but still very comfortable on the smooth highways of Utah. To be sure, these shocks would not offer good ground clearance of the pipes in high speed turns. However for general highway cruising and/or drag racing, they would be a very viable choice .... especially for riders with very short inseams.
Wheels and Tires - The AHRMA mandate that the stock rim sizes and materials be retained. Given that, we just kept our stock width 18" rear, and 19" front rims. We installed new sealed wheel bearings in both hubs. We also spent plenty of time getting the stock rims to run as true as possible before mounting tires. After the tires were mounted and seated, we balanced both wheels using brass bolt on spoke weights that we found on Ebay.....they worked great.
For our initial testing, and first few road race outings, we ran Avon Road Riders (130/70-18 rear, 100/90-19 front). These tires offered excellent grip both on and off the track. We raced the H1 at Chuckwalla Raceway in Southern California (2.5miles 19 turns). We were easily able to drag the pipes (with 13' shocks) before we felt any loss of grip. Since the corner-speed of Willow springs would be much higher, we opted for Racing compound Avons (rear 130/650-18 AM23, front 100/90-19 AM18). The grip of these non-DOT tires is excellent, and suitable for any road racing application.
Wheel Alignment - By far, the number one item of importance for secure handling of the H1 is perfect alignment of the wheels. Over the last 40 years, we have seen and tried many different approaches to alignment, and the one outlined below is the one that offered us the most consistent and precise results. You'll need two 8' lengths of 3" 90' angled aluminum extrusion, four equal sized platforms to lay the extrusions on, a wood clamp, and dial calipers.
A) Remove exhaust pipes, and place bike on box stand that permits alignment rails to pass through. Place 2x6 wood under front wheel to get a level bike attitude.
B) Place 8' rails on top of your platforms on each side of the front and rear wheel
C) Use a large wood-working clamp to gently hold the rails against both sides of the rear tire.
D) Use dial calipers to confirm that you have exactly the same distance between the rails at front and rear.
E) Slowly adjust the rear axle adjusters until the front tire is perfectly centered between the rails at the fore & aft sides of the front tire.
 |
While it doesn't look very high tech, we have
aligned numerous motorcycles in this way, and eliminated the high speed
head shake of every single bike.
Once we have the perfect alignment, we put a notch in the top flat of both axle adjuster bolts. Doing so allows us to easily see that we are turning both sides to the exact same rotational spot during future chain adjustments. As a test, we intentionally mis-adjusted one axle adjuster 1/2 turn from our perfect setting, and then rode the bike. That mis-adjustment induced a noticeable head shake at speeds above 90mph. We brought the bike back and re-set it to the perfect setting....it then ran 110+ with no head shake at all. DO NOT believe the adjuster marks on the swing arm... they are NEVER correct. |
PRICE LIST
|
BASIC SERVICES |
|
|
Cylinder Boring, honing, and Chamfer |
180. |
|
Glass bead 3 cyls & 3 heads |
150. |
|
Helicoil Spark Plug Hole |
35. |
|
Carb Rebuild Labor |
180. |
|
Carb rebuild kit (40) |
120. |
|
|
|
|
91-Octane Head & Cylinder Modification Includes re-cutting all 3 head domes, and top & bottom decking of the cylinders |
490.00 |
|
|
|
|
Cylinder Inlet Spigot Modification Includes installation of alloy adaptor plate and rubber spigot manifolds, and inlet port matching of both. |
342.00 |
|
|
|
|
Carb Spigot Modification Includes machining stock carbs to accept spigot sleeve, and spigot sleeve installation |
210.00 |
|
Disassemble and reassemble Carburetors (optional) |
60. |
|
|
|
|
Cylinder Porting |
|
|
Stage 1 Porting Includes port blueprinting and passage finishing |
290. |
|
|
|
|
Stage 2 Porting Includes increases in port heights and widths, installing boost ports, and drilling pistons for boost ports |
540. |
|
|
|
|
RIV Cylinder Re-sleeving and Porting Includes cylinder sleeving, boring, porting, and piston machining (pistons not included) |
1450. |
|
|
|
|
Wiseco Pistons (one piston, rings, pin, & clips) 60.5 & 61.0mm |
135.00 each |
|
Wiseco Pistons (one piston, rings, pin, & clips) 61.5 & 62.0mm |
149.00 each |
|
|
|
|
Transmission Gear Undercutting - (specify street or race cut) |
420.00 |
|
|
|