Mikuni Carburetor Tuning for Vintage 2-strokes
Overview
- There are many manuals and resources that offer tuning info for Mikuni
“Round-slide” carbs, but most lack “real world” explanations of how to do the
proper preparation along with that tuning. During the 1970s, we were the techs
responsible for the jetting of countless aftermarket carbs for much of the
off-road (and road) aftermarket. This tuning guide is written with the
background and experience of that development and tuning work.
This document contains alot of “before you start jetting” information that seems
tedious. However if you follow the outline, the actual tuning process will go
relatively quickly, and with a minimum amount of drama.
Fine Tuning Vs Jetting from Scratch
- Fine tuning of stock carbs is generally not too difficult because so much of
the basic tuning choices (needle taper and needle-jet) are already done.
Tuning “from scratch” is much more time consuming because of the infinite number
of needle-taper / needle-jet combinations that should be tested.
About Jet Needle Tapers
- Needle tapers deserve mentioning before any other jetting subject. Mikuni
needles are made in several different lengths to suit the various different
sized carburetor bodies. In addition to that, the needles are made in countless
single and double taper angles, as well as differing starting diameters for
those tapers. OEM manufacturers conducted weeks of testing to isolate the
ideal needle taper for each particular model of bike. Sadly, there is no way to
calculate or predict which particular taper will work best for any given engine,
so the only way to know it to try them. An added complication is that every
different tapered needle will need to have a different
pilot-jet/slide/needle-jet combination to yield it’s best results …. And there
is no way to calculate those variables either. If you are fine tuning carbs on
a “close to stock” engine setup, it is best to stick with the stock needle
taper. However if you are starting from scratch, you could have a world of work
in front of you.
Jetting From Scratch
- An Example of the way it was done in the day
- Many 70’s off-road bikes were equipped with tiny carbs, and racing versions
of those machines needed much bigger carbs. In most cases, the needle from the
stock carb was too short to be used in the new larger racing carb. This meant
that aftermarket race shops had to calibrate all the jetting specifications in
the larger carb to a new needle taper.
In a typical development project, we would gather six or more carbs that were
all identical except for having a different needle-taper. We would then spend a
few hours tuning with each individual carb, to get the best possible overall
response and acceleration that we could get with that particular needle taper.
We would then set that finished carb aside, and repeat the tuning process with
each of the other 6+ different needle-taper carbs in the test. We learned that
each carb had a very different combination of pilot-jet, slide, and needle-jet
that worked perfectly with each particular needle. We called these varying
combinations “jetting spectrums”. Once we had found the ideal jetting spectrum
for all of the different carbs, we then conducted a series of back-to-back track
tests with all these carbs to determine which needle taper/jetting-spectrum gave
the best acceleration and throttle control. The differences were sometimes
subtle, but in every test there always was one clear winner. This entire
process for one bike took about a week, but it was time well spent for an
off-road model that would sell 300-500 pre-jetted carbs in a year.
Back to the real world of today, very few people have the time (and carburetors)
for this kind of testing. Knowing this, if you are jetting from scratch, it
would be well worth the time to try to learn what the most popular needle taper
has been for the particular bike and carb size you will be working with. In
most cases, the data is out there.
How
“Signal” Affects Jetting
- The subject of inlet signal can be very lengthy and complex, so we will stay
with an abbreviated version as it relates to your jetting.
Many folks believe that air entering the mouth of the carb is what picks up the
fuel from the jetting circuits … and that is false. In truth, the crankcase of
your 2-stroke sends a negative pressure wave (aka “signal”) up the inlet port
from the crankcase, and that negative pressure wave literally draws fuel from
the jetting circuits, as well as air in through the carb mouth. While it sounds
like two different ways of saying the same thing, the difference becomes
important. For instance, if you install an aftermarket inlet manifold that has
a much larger internal volume, the “signal” is very much weakened by that added
volume. Weaker signal results in ideal carb settings that will change alot with
changes in altitude and temperature (as well as much harder starting). An inlet
with “strong signal” offers much easier starting, and can easily accommodate big
changes in altitude and temperature with no need for jetting changes. The table
below explains more.
|
Increases Inlet Signal (good) |
Decreases Inlet Signal (bad) |
|
Smaller Carb Throat |
Excessively Large Carb Throat |
|
More Restrictive Air Filter |
Less Restrictive Air Filter |
|
Pod Filter on Rubber Inlet Tube |
Pod Filter on Carburetor |
|
Decreased Inlet Tract Volume |
Increased Inlet Tract Volume |
|
Proper Fitting Carb Slide |
Loose Fitting Carb Slide |
|
Tight Sealing Reeds |
Fractured or Poor Sealing Reeds |
|
Reed Cage Stuffer |
Reed “Spacer” |
The
point of all this, is to show that many “non-carb” related items can make it
much harder to tune your carb perfectly. A 125 that is fitted with a new large
inlet manifold and a 36mm carb will be very hard to jet properly because the
inlet signal from the crankcase has been so badly weakened by the added volume.
It is often wiser to increase to just a 32mm carb, and the smaller volume
manifold used for the 32. The 36mm carb can be made to work on a 125, but it
will need constant fine tuning for changing air conditions. The 32mm will tune
much easier, and require far less future tuning.
|
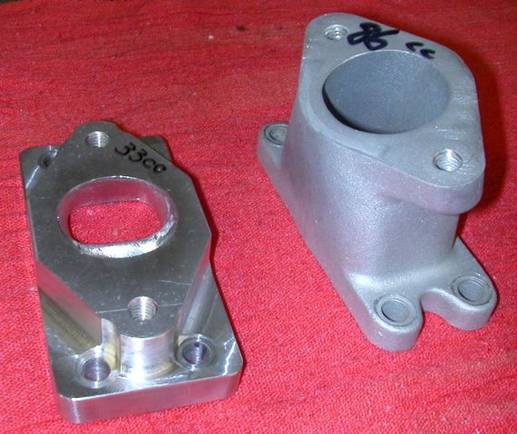 |
The two manifolds on the left are both for a CZ400 motocrosser. The
cast manifold on the right was made very long so the carb would reach
nicely to the airbox with a short rubber tube, but that added
inlet-tract length significantly increased the internal volume … and
that added inlet-tract volume significantly weakens inlet signal. The
billet manifold on the left has a much smaller internal volume that
strengthens inlet signal. The two manifolds are marked with their
respective internal volumes (in cubic-centimeters). Reducing that
volume by 53cc will make for a huge improvement in overall throttle
response as well as much easier starting.
Increasing inlet volume to make for a closer fit to the airbox is much
like putting shorter shocks on an MX bike so your feet more easily reach
the ground … Both “sound” like a good idea, but functionally-speaking,
both are a very bad idea. The designer of this large cast manifold
certainly had the best of intentions ... but sadly, not much of an
understanding of the importance of inlet signal.
|
|
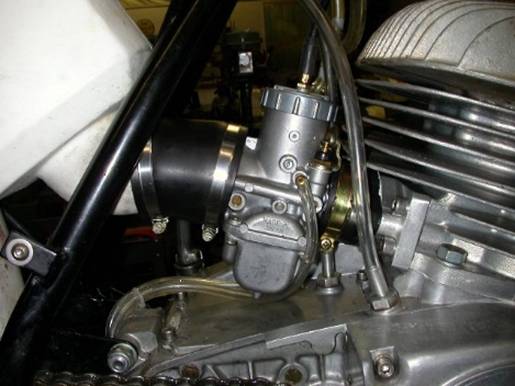 |
The photo on the left shows the carb mounted on the short billet
manifold. The reduced inlet volume resulted in easier starting, quicker
throttle response, and much better overall carburetion. A slightly
longer air boot was needed to reach the airbox, but that length does not
harm performance in any way. |
Important Jetting Protocols
– These tools will help to decrease tuning time, and offer clear indicators to
tell if you are going in the right or wrong direction.
Find a Hill
- By far the best place to do 0-60%-throttle jetting is on a long straight road
with an uphill grade. The added load of heading up a grade will more vividly
show the acceleration differences in low speed carb adjustments.
Notch the Throttle Grip
- While it sounds like a back-woods thing to do, it can be very helpful to
notch the large flange of the throttle grip to allow you to clearly see the 0%,
25%, 50%, 100% throttle settings. A corresponding mark can be made on the
throttle body, so at a glance you can see exactly where in the throttle range
you are. This is particularly helpful for tuning in the 0-50% ranges.
Digital Tachometer
- Evaluating the best main jet size by seat-of-the-pants testing is both
inaccurate and darn risky. Whether you are testing on the road, or on a dyno,
the “only” way to perfectly evaluate the ideal main jet size is by viewing the
peak digital tach numbers in high gear. For off road bikes, taller gearing may
be needed to properly load the engine for this testing. We consider analog
(needle) tachs to be very poor tools because they do not display rpm increase
and decrease “trends” with near the accuracy that a good digital tach does. The
most effective and affordable digital tach is the “Tiny Tach” commercial model.
This tach installs quickly and offers very accurate data (updates every half
second). Avoid digital tachs with longer update times (there are plenty).
Warm Engine
– Whenever you begin any meaningful carb tuning, the engine must be fully warmed
up (and ideally “cleaned out”). Attempting to do carb fine tuning on an engine
that has not been fully warmed up and cleaned out, is waste of time.
About “Plug Reading”
- In the 1970s spark plug “reading” was a very commonly used means of fine
tuning race engines. Sadly, this method was only valid for main-jet setting,
and it required that the rider get a clean “plug-chop” (simultaneously shutting
off from full-throttle, and hitting the kill button while at peak rpms in high
gear). If you do not have a clean plug chop, the plug reading is useless. In
later years, the real time deto-sensors introduced in the 1990s made plug
reading a Neanderthal means of fine tuning, and no professionals do it anymore.
It also bears noting that today’s pump gasolines (laden with oxygenates and
varying ethanol percentages) do not “color” spark plugs nearly as quickly as
race gas (or 1970’s pump gas). The long time it takes today’s pump gas to
properly color a plug is even more reason to not bother with reading plugs.
There is certainly validity to looking at the spark plugs on a regular basis
just to confirm the there are no internal catastrophes in progress. But for
fine tuning, plug reading is a process that takes up so much time and offers
such questionable precision, no professional tuners rely on it anymore.
Another tuning fable that still surfaces occasionally is that different areas
of the spark plug tip/electrode are indicators of various low speed jetting
ranges. This is absolutely untrue, and it always has been untrue.
Use
Race Gas for Tuning
- We strongly recommend to use race gas for initial tuning, even on engines
that will be run pump gas … here is why. The great fear of testing high speed
jetting is the risk of seizing a piston with a jet that is too lean. The truth
is that 99% of these seizures are not caused by the lean mixture, but rather by
a high-percentile of detonation strikes that overheat the piston. If you tune
with 110+ octane race gas, the risk of experiencing any detonation at all is
very remote. If you install a main jet that is too lean (while running race
gas) the digital tachometer will show a significant loss in peak rpms long
before the engine will experience any dangerous detonation. It is a false fable
that engines will perform their best at the brink of being too lean. All
professional tuners know that the ideal main jet always offers the best
horsepower (and best peak tach numbers). Any jet that is leaner than ideal will
always show a loss of peak tach numbers.
Carb Inspections Before Tuning
- Needless to say, the carb(s) float bowls should be clean of any debris, and a
fresh in-line fuel filter should be installed to avoid future debris. It is
also a good idea to confirm that the pilot and main jet both have clear orifice
openings. Lastly, the float level should be checked, and the sealing of needle
& seat should be confirmed. A leaking needle & seat, or a ”too-high” float
level will cause an erratic low-speed rich condition that you will not be able
to tune away.
Engine Inspection Before Tuning
– By far the most important engine inspection is to confirm that the engine has
no air-leaks. We have a document on our site that outlines how to pressure test
your engine ….it is absolutely mandatory. Doing carburetor fine-tuning on an
engine that has any air-leak at all, is a complete and total waste of time. An
engine with an air-leak will be hard starting, idle erratically, and be at high
risk to score a piston skirt.
About Tuning 2 and 3 Cylinder Engines
- By far the most important preparation for tuning 2stroke twins and triples is
to first confirm perfect carburetor synchronization. By synchronization, we
mean that the slides are being lifted away from the full-closed (not idle speed)
position at the exact same moment. Later twins (like the RD400) have removable
“sight plugs” that allow for quick and easy visual synchronization. However
earlier twins and triples have to be done “by hand”. That is, holding two
fingers up against the slides as they sit in the full closed position, then
slowly turn the throttle to confirm that both slides are being lifted at the
exact same moment. If not, the cable adjusters on the carb tops should be
adjusted to achieve perfect synchronization.
Tuning Vocabulary
– If you are planning (at some point) to get advice from an experienced tuner,
it’s important that you use the right terms to describe the symptom you are
trying to resolve. Terms like hiccup, stall, die out, etc. don’t offer any
useful diagnostic information. Below is a list of useful and commonly used
terms.
Bog
or Hesitation
– These two terms are common, and they usually describe a slight
partial-throttle lean condition in a particular throttle opening range. It is
wise to see if the bog (or hesitation) disappears with a smaller or larger
throttle opening, however it is unwise to steadily hold the throttle at a
setting that is causing a bog or hesitation.
Loading Up
- This term describes a rich condition, and describes how the spark plug is
being overloaded with fuel. If the throttle is steadily held at a throttle
position that “loads up”, the spark plug will eventually be unable to spark
through the excess fuel/oil mixture … referred to as “fouling” the spark plug.
Once a spark plug is fouled, it should be replaced.
Stutter
- This describes a very slight rich condition in a partial throttle range, that
can cause the engine to run roughly, but not quite load-up. Some tuners also
use the term “four-stroking” to describe this condition.
Cleaning out
– Describes when the throttle is opened to a clean running rpm range, after
being held at a lower setting that causes a stutter (or loading up). Very
literally, the excess fuel on the spark plug is being “cleaned out” of the
combustion chamber, and the engine suddenly runs very smooth.
Hitting the Power-band
- On many high-performance 2stroke engines, there is one particular rpm when
the engine very suddenly enters the strongest part of the power-band, referred
to “hitting” the power-band. Carb fine-tuning can sometimes reduce the
intensity of this “hit”, however there is no jetting that can eliminate the hit
altogether.
“Laying Down” or “Nosing In”
- Describes when the engine is already in it’s power-band, and a sudden
application of full throttle causes the engine to stop accelerating, or even
slow down. This symptom usually indicates a full throttle lean condition caused
by either a very lean main jet, or a blockage of the fuel supply. If this
happens, shut the throttle off quickly to avoid possible piston scoring, and
increase the main jet size or fuel flow abilities.
The
Fuel Circuit Ranges
– Each of the changeable jets in Mikuni VM round-slide carburetors has one
particular range where it has the strongest effect on fuel mixture. Each of
these jets also has a “range of effect”, but the measure of that effect tapers
off as the throttle opening moves away from the point of strongest effect. The
table below outlines these ranges.
|
|
Pilot Air Screw |
Pilot Jet |
Slide |
Needle Jet |
Needle |
Air Jet |
Main Jet |
|
Strongest Effect |
Idle |
Idle |
20% |
40% |
50% |
100% |
100% |
|
Range of Effect |
0-20% |
0-100% |
15-50% |
20-60% |
25-75% |
80-100% |
70-100% |
The
most important point of this table is to show that many of these jets have
“over-lapping” ranges that can have an effect on one another. Dealing with the
small nuances of these overlapping ranges is what “fine tuning” is all about.
An ideally jetted carb offers easy starting, smooth idling, no hesitations, no
loading up, and clean carburetion at every rpm in the entire range…. That is the
goal. The text below describes the step by step process to get there. One
important rule is to keep the same needle taper for the entire process, because
you will be tuning to find the best possible “jetting spectrum” for that
particular needle taper. It bears noting that on twins and triples, all
adjustments and jetting changes should be applied to each carb equally.
About the Choke
and Starting - Virtually all 2strokes require an exceptionally
rich fuel mixture to allow an easy "cold-engine start" Applying the choke
(aka "enrichener") for the first 10-30 seconds of engine operation is typically
enough enrichment for an easy and steady start-up. After this initial
start-up (and warm up) the choke should not be needed at all for future
"warm-engine" starting. If the choke is needed for warm engine re-starts,
you have an engine or jetting problem. It bears noting that on all round
slide Mikuni carbs, the choke works better as the slide get closer to the full
closed throttle position. Opening the slide to 15-25+% throttle opening
(during a cold start) makes the enrichening ability of the choke nearly
non-functional. On a carb with a perfectly setup idle speed circuit,
steady idling is always achieved with a slide opening that is just barely off of
full-closed. With an idle slide position like this, you should always
experience "one kick" starting with a fully closed throttle (choke-on cold ...
choke-off warm).
It often
happens that a carb with an incorrect size pilot jet (whether too rich or too
lean) will require the idle speed screw (that adjusts slide height) to be turned
in excessively ... thus raising the slide much more than is ideal. Because
the slide is open excessively at the idle position, both cold starting and warm
starting of this engine will be very difficult. The correct setup would be
to reduce the idle slide height, and find the pilot-jet / air-screw combination
that offers steady idling with a lower slide opening. The text below about
idle circuit setting is not just important to idling and low speed acceleration.
It is also fundamental to easy "one-kick" starting.
Idle speed
- The fuel supplied by the pilot jet, and the air allowed in by the pilot air
screw, work together to deliver the ideal mixture for idling and warm engine
re-starts. The full adjustment range of the pilot-air screw is 3 turns out from
bottomed out. At settings beyond 3 turns, it is not allowing more air.
After warming up the engine, set the engine idle speed with the idle adjuster
(that makes physical contact with the slide). With the engine idling, adjust
the pilot-air mixture screw in and out in 1/4 turn increments. As you get
closer to the ideal setting, the idle speed of the engine will increase
noticeably. When this happens, adjust the engine idle speed back down, and
repeat the ¼ turn fine tuning process until you achieve the smoothest and most
steady idling. Ideally, the air screw should end up at a setting somewhere
between ¾ - 2.0 turns out. If you find that the best idling comes with a
setting under 3/4 turns out, it is wise to install a slightly larger pilot jet.
If you find that your best setting is beyond 2.0 turns out, it is wise to
install a slightly leaner pilot jet. Keep in mind that Mikuni makes several
different designs of pilot jets for their various carbs, so you want to be sure
you are purchasing the correct pilot jets for your particular model. After
changing the pilot jet, repeat the process of ¼ turn adjustments to get to your
ideal idle speed setting.
Initial Throttle Opening
– The slide cutaway has a strong effect on the fuel mixture when the throttle is
just above idle. The cutaway number is stamped on the bottom of the slide. The
numbers from richest to leanest are .5, 1.0, 1.5, 2.0, 2.5, 3.0, 3.5. Since the
pilot jet and needle-jet ranges overlap so strongly on the slide range, it’s
wise to test with different slide cutaways after you are already comfortable
with the pilot jet and needle-jet setting. The only exception to this, is if
you find the slide to be so lean that the engine nearly dies (from a lean
condition) when the throttle is just cracked open.
Mid-Range Jetting
- The mid-range metering is most strongly affected by the combination of the
brass needle-jet and tapered needle. Most Mikuni needles have five different
clip grooves that allow the needle to be raised for a richer setting, and
lowered for a leaner setting. To avoid confusion, many tuners refer to the 5
grooves by number. #1 (closest to the top of the needle) is the leanest
setting, and #5 (closest to the tapered part of the needle) is the richest
setting.
The
best approach is to first try a richer needle setting and do test runs of steady
30%-60% throttle riding, looking for any signs of stuttering or loading up.
This is the time when you will find your long straight uphill, and digital
tachometer to be most helpful. Another effective road test is get under way at
a low rpm (about 2000rpm), and then roll the throttle on to the 50% position on
your grip. Different needle settings will offer very different rates of
acceleration under this test. If you find that the needle can be raised to the
richest position without inducing any loading-up or stuttering, you will want to
consider installing a richer needle jet. If you find that you have mid-range
loading-up or stuttering with the needle in the leanest position, then you will
want to consider installing a leaner needle jet.
 |
 |
 |
 |
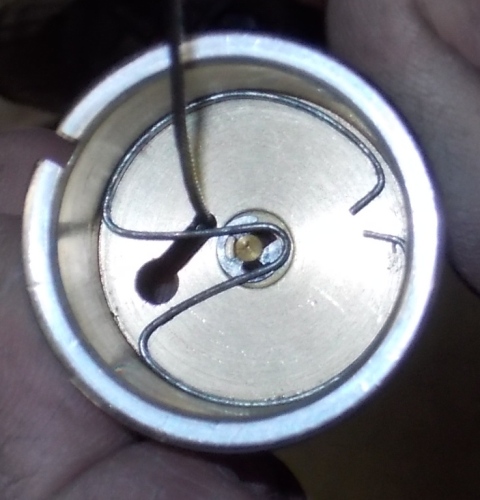 |
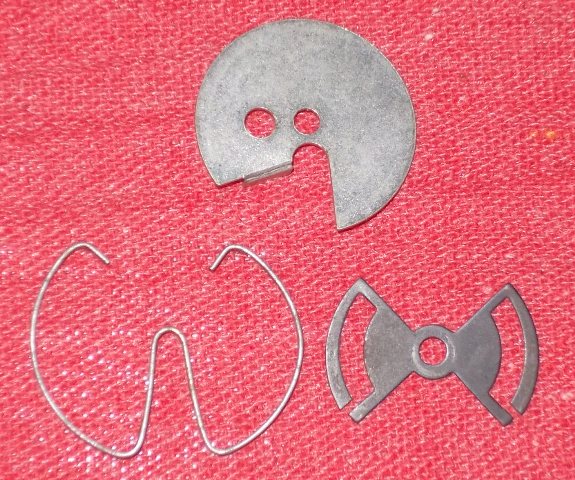
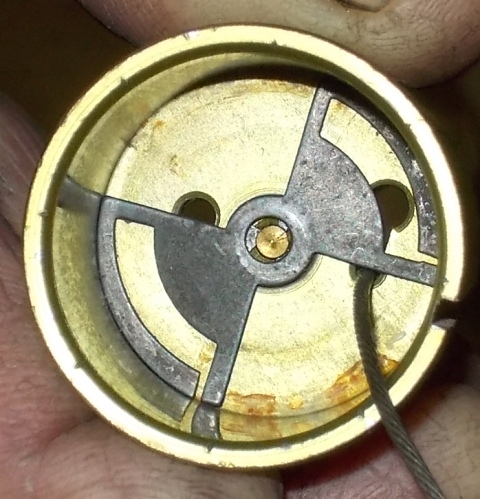
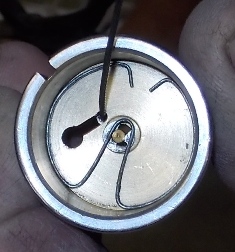
| The 3 kinds of needle retaining clips
used in early Mikuni carbs. |
WRONG!! This clip
position can let the cable end jump out. |
RIGHT- This clip position
holds the cable end in. |
WRONG!! This clip
position can let the cable end jump out. |
RIGHT- This clip position holds the cable
end in. |
The
brass needle-jets are manufactured in several different size series to fit the
different size Mikuni carb bodies. The 3-digit series number is stamped on each
brass needle-jet. Along with the series number, there is a letter/number code
that designates orifice size. From leanest to richest, the sizes are N-0, N-2,
N-4, N-8, O-0, O-2, O-4, O-6, etc. continuing up to the richest R-8. Needle
jets are not cheap, and they are not easy to change. That said, it’s best to do
the full gambit of needle adjustment testing to see if you can get by with the
brass needle-jet you have. It bears noting that the actual diameter increments
are very tiny and precise. It is very unwise to try to drill your own needle
jets … just buy em. If you do change the brass needle-jet, you will need to
revisit the different settings of the tapered needle.
|
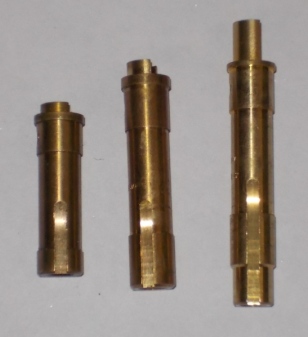 |
The three needle jets to the left are all the same orifice size, but
they are all different “series” made to fit in different size carburetor
bodies. It also bears noting that different needle jets can have
varying height "atomizer stems". These atomizer stems protrude into the
throat of the carb, but have different heights that accommodate slides
with different base reliefs. Also note that the main-jet threads in the
bottom of the needle-jet will be different between hex-type main-jets
and round-type main-jets.
Some
tuners refer to the brass needle-jet as the "spray-bar". |
High Speed Jetting
– High speed jetting is best done on a flat road instead of a hill or grade.
High-speed road testing MUST be done in high gear at full throttle, and
preferably done with race gas. For larger street machines that run at very high
speeds, it is usually best to do high speed jet testing on a dynamometer. High
quality dyno facilities are very common in today’s motorcycle shops, and buying
dyno time is money well spent.
Main-Jet
- It is always best to start out with a slightly rich main-jet, and slowly move
toward leaner main-jet sizes. Under this test, the reading on the digital
tachometer is the final word as far as best setting. In dyno testing, the dyno
will also show an increase in HP numbers as you get closer to the ideal main-jet
size. As mentioned above, if you go one size leaner than optimum, the
tachometer will quickly show the peak rpm loss.
Air-Jet
– The air jet (at the 6-oclck position in the carb bell-mouth) is often
overlooked because it has a specialized function. The sizes (rich to lean) are
.5, 1.0, 1.5, 2.0, . Since it covers the same range as the main jet, it is
often ignored, and in very many cases it is removed all together. The air-jet
has it’s greatest effect in carb setups that are running (long hex) main jets in
the 400+ range. Carbs that run these huge main-jets are very often setups that
have very poor signal, and throat sizes of 38mm or more. On such setups,
installing a richer air jet can reduce the need for such large main-jets. There
are also some specialized racing applications where the engine is held at peak
rpm, and the throttle is then released just slightly (to 80% opening) to set up
for a turn. In some cases there can be a dangerous lean spot at this 80%
setting that can cause a sudden scored piston. Installing a richer air jet
resolves this lean spot, and reduces the scoring risk.
Final Review
- Once you have the carb as good as you feel it can be, we recommend
experimenting with a “one-size” richer brass needle-jet. Since so many other
jetting parts have ranges that overlap into the needle-jets range, a slightly
lean needle-jet can easily be “cloaked” by the other jets. It is an important
test because a lean condition in the needle-jet range can so seriously harm low
range acceleration. The same rule applies to slide cutaways. The other
circuits can easily “cloak” a slide that is one size off. In the case of both
the needle-jet and slide, the best evaluation test is a set of “roll-on”
acceleration tests on your road-test hill.
Jetting for 21st Century Fuels
- Across the USA, current pump gasolines are being blended with varying amounts
of ethanol. Besides the carburetor maintenance issues that the ethanol can
cause, there are fuel metering issues as well. Ethanol has a significantly
lower specific gravity than gasoline. When blended in the gasoline, the ethanol
will change perfect jetting into jetting that is slightly lean across the entire
range. Fortunately, Mikuni carbs offer an easy way to contend with this
problem. As mentioned above, increasing the size of the pilot jet will increase
the fuel delivery by that increased margin from 0-100%. In most cases,
increasing by just #2.5 will cover the specific gravity change in stock
carburetors (ie. Going from a #25 to a #27.5). In some areas of the country
that are blending higher percentages of ethanol, increasing by #5 may be
needed. Remember that after the pilot jet change, you will likely need to
review the air screw setting to assure a perfect idle.
About Running 91-Octane Fuel
- Once you have finished your high-speed tuning on race gas, you are safe to
convert back to 91-octane pump gas … with limitations. The 91-octane can work
fine for most recreational and casual types of riding. However, if you want to
do extended high-rpm operation, you will need to make some non-carburetion
related adjustments. The fuel/air mixture that offered the best rpm on race
gas, will virtually always yield the best peak rpm on 91-octane pump gas.
Unfortunately, the 91-octane pump gas does not have enough octane to resist
detonation during an extended peak rpm, high gear run….. and installing richer
jetting WILL NOT fix the problem. Installing a richer main- jet can “slightly”
reduce temperatures. However it will also reduce peak rpm ability as well as
increase the occurrence of plug fouling. The truth is that a perfectly jetted
vintage engine, being run at peak load, will experience dangerous levels of
detonation if it is run on 91-octane fuel. This underlines that perfect
jetting, and detonation risk are two completely separate technical issues….. and
over-rich jetting cannot fix detonation risk.
It
bears noting that early 1970’s gasoline was 100+ research octane, and most
2-strokes of the day were intended to run on that fuel. Most vintage 2-strokes
of that era had combustion chambers that operated detonation free on 100 octane,
however those same combustion chamber designs are much more detonation prone
when run on today’s 91-octane fuel. Catastrophic percentage rates of
detonation can easily blow a hole in a piston crown. However the more common
low/medium percentage levels of detonation, will simply overheat the piston
until a piston scoring event takes place. Such piston scoring is often referred
to as a “four corner seizure” because there is piston scoring in a square
pattern on both sides of the wrist pin ends. After such a seizure, some owners
assume that lean jetting is the cause, when in fact the true cause is the poor
combustion chamber design, combined with the low octane fuel.
The
high detonation risk of extended high-rpm operation can be addressed by either
running 100+ octane fuel, or by redesigning the shape of the combustion chamber
to a less detonation-prone 91-Octane updated design. This 91-Octane updating is
a modification that Klemm Vintage offers for many vintage 2-strokes. You can
learn more at www.klemmvintage.com/91oct.htm