Kawasaki Bighorn
350 Street Fighter / Road Racer Build-Up
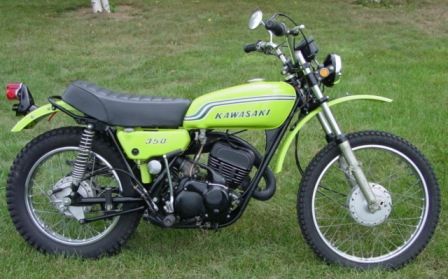
Overview The Kawasaki 350 Bighorn is a rotary-valve 350cc 2-stroke single Enduro (aka dual purpose) bike built from 1970 to 1975. In the day, a few brave souls raced the 350 Bighorn in motocross and desert racing with occasional success, but in general it was a horrible off road motorcycle. That said, the Bighorn was a very successful platform in dirt oval racing and road racing (where long travel suspension was not needed). Today, the 350 Bighorn is easily one of the most under-rated and overlooked high-performance vintage machines around. The rotary-valve engine design gave the Bighorn a huge horsepower advantage over other two-strokes of the day, and Bighorns often ran just as fast as 4stroke machines twice their displacement. From the riders standpoint the Bighorn is a unique vintage candidate because it is uncommonly well suited for taller and heavier riders. The chassis offers excellent high speed handling characteristics, and the motor has the power to satisfy any vintage sport riders needs.
The large production run of the Bighorns from 1970-1975 has resulted in a plentiful supply of affordable restoration candidates. In addition, there is an abundance of affordable spare parts available on Ebay and other sites. The Bighorn easily offers more high-performance bang for the buck than any other lightweight vintage two-stroke platform.
 |
 |
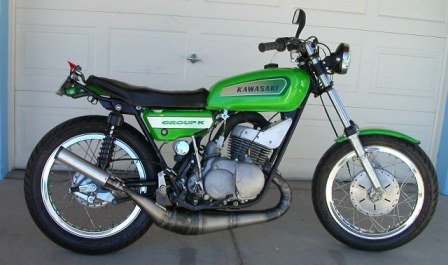 |
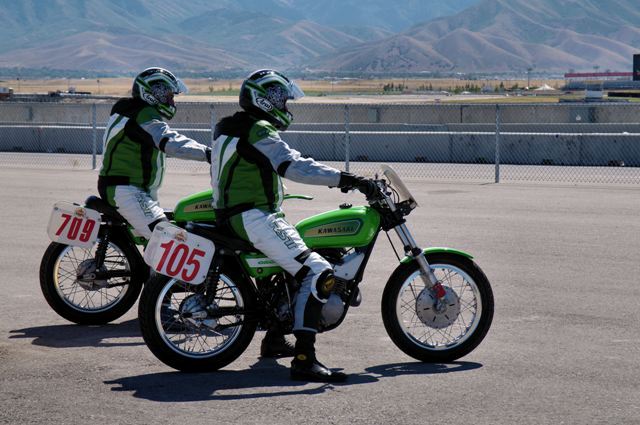
| A stock 350 Bighorn F9 | The undefeated Elite Production Racer | The GP Bighorn fitted for "street fighting" |
Our History - In the early 70s, we road raced both production class and GP class 350 Bighorns with great success in the So-Cal club circuit. With this background experience, we decided to develop and build a 21st century 350 Bighorn resto-mod dual purpose machine . With a twist. Our 350 Bighorns would be built to excel at high performance street riding and Vintage Class road racing. We spent almost a year testing and developing the prototype, and then built two identical machines for street and racing use. Our goal was to have a fast, affordable, low maintenance, machine that offers secure handling at all speeds. While these machines would need 110 octane race fuel for the sustained high rpm use of road racing, we developed them to run reliably on 91-octane during street use.
We had been away from road racing for 35 years when we went to our first AHRMA race. All our competitors were younger (a lot), lighter (a lot), and better skilled than us. Despite that, our Bighorns were never once beaten (in 2 years of racing) by any other machine in the class. We never experienced one mechanical failure, and even won both days of racing after a practice day crash event.
In 2011 we took the Bighorns to the 4300ft. altitude Bonneville Salt Flats and set the AHRMA classification records for Lightweight Production (97mph), and Open Sportsman MX (109mph). While we were not road racing the Bighorns, we regularly rode them on weekends and at classic bike events . In our eyes, all of that meets our definition of mission accomplished.
 |
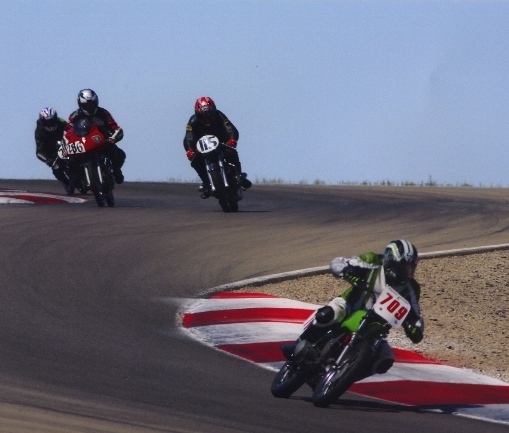 |
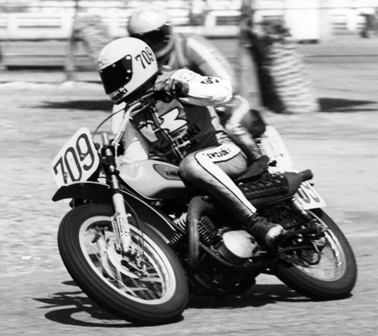
| Leading AFM Lightweight Production at OCIR 1974 | Leading AHRMA Lightweight Production Miller Motorsports 2011 |
 |
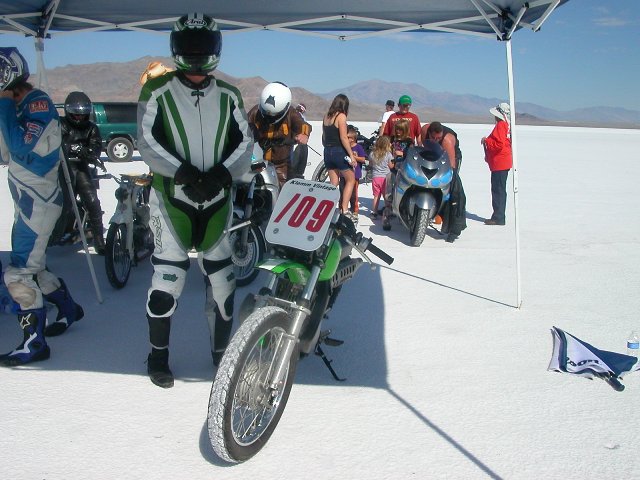 |
| AHRMA Miller Motorsports Park 2010 : 1st & 2nd both days | Bonneville 2011, prepared for 97mph pass for the AHRMA Lightweight Production Class record. |
It is the purpose of this document to outline the buildup of these 21st century 350 Bighorns. We decided to develop four different levels of modification that can suit the full gambit of owners budgets .. and the varying needs for speed. All these versions can be reliable street bikes, but they do have different racing abilities. Our terms for these different level machines are as follows:
Stage 1 - Casual Recreation This machine is a stock appearing Bighorn that offers exceptionally easy starting, smooth idling, and much better than stock overall power. It runs reliably on 91 octane unleaded fuel, and is well suited for commuting as well as general sport riding.
Stage 2 - Sport Cafe - This is a reliable high-performance sport-bike that runs the stock pipe and carb, yet yields the speeds and acceleration that can be competitive in AHRMA Production class racing. While race fuel is needed for road racing use, it can easily run on 91 octane for day to day riding.
Stage 3 - Elite Production racer - This version is the very best that a stock-pipe, stock-carb Bighorn can be. It offers strong high range power to speeds just over 100mph, as well as stable and secure high speed handling characteristics. Like the sport-cafe, it runs high-octane for racing, and 91-octane for street use.
Stage 4 - GP Class - This version is a 120mph+ road weapon that offers handling that matches its speed. The GP version is also suitable as a very competitive platform for WERA 500GP vintage class racing. While it can be run on 91-octane fuel for casual street outings, it does require higher octane fuels for more aggressive street-riding and road racing situations.
About engine Setups - As mentioned above, we do our best to offer setups that suit every budget and speed preference. With respect to the engines, here are the general tech parameters.
|
|
Street octane |
Racing Octane |
Peak RPM |
Peak Speed |
Ignition |
Gearbox |
Carb size |
Exhaust Pipe |
Premix |
|
Recreation |
91 |
-- |
7000+ |
80 |
oem |
oem |
30mm |
oem |
50:1 |
|
Sport Cafe |
91 |
100 |
7500+ |
90 |
Oem/race |
oem |
30mm |
Oem |
40/20:1 |
|
Elite Prod |
91 |
105+ |
8200+ |
100+ |
Adv/rtrd |
Cls ratio |
30/34mm |
Oem |
40/20:1 |
|
GP |
91 |
110 |
9000+ |
120+ |
Adv/rtrd |
Cls ratio |
38mm |
Race |
40/20:1 |
A Note about Pipes and Carbs - We have been building racing 2stroke for 40 years, and we are well aware of the power that can come from expansion chamber exhausts and larger carbs. We are also well aware of the shortened engine life caused by high-rpm chambers, and the heavy fuel consumption of bigger carbs. If we were building these Bighorn setups to win national championship pro races, they would be built very differently. However, our goals for these Bighorn setups is to make them only as fast as they need to be to kick the butts of other vintage bikes. That is a much easier standard to meet . And one that often does not require expansion chambers nor big carbs.
Our Elite Production Bighorn can run 104mph at sea-level with a 220lb. (fully dressed) rider. With a 150lb rider it could likely run 110mph. If you plan to spend lots of time riding your Bighorn at speeds over 110mph . You will need a chamber and a bigger carb and lots or race gas. But if you dont plan to regularly run those speeds, you can easily hand the vintage boys their asses with a reliable stock-pipe stock-carb Bighorn . We did and were old fat guys.
While we originally configured our Bighorns for AHRMA Lightweight Production class racing, its worth mentioning that the Bighorns outlined in this document are an excellent fit into the vintage classes of numerous other racing associations all over North America. Below is a list of the most prominent:
|
Assn. |
Class Name |
Year Cutoff |
Allowed cc single |
Allowed cc twins |
Brakes Allowed |
Wheels Allowed |
Carb |
Pipe |
|
WERA |
500GP |
1971 |
360 |
250 DS7 |
Drum |
18 |
Any |
Any |
|
|
V1 |
1973 |
360 |
250 |
Disc |
18 |
|
|
|
CCS |
Ltwt Vintage |
1978 |
360 |
250 |
Disc |
18 mag |
Any |
Any |
|
|
Mdlwt Vintg |
1978 |
400 |
380 |
Disc |
18 mag |
Any |
Any |
|
VRRA |
Period 2 Super Vntg |
1972 |
360 |
250 |
|
18 |
Any |
Any |
|
|
Period 2 Mdlwt Prod |
1976 |
400 |
500 (no 3cyls) |
|
17/18 |
Any |
Any |
|
USCRA |
Period 2 Ltwt Super Vintg |
1972 |
360 |
|
Drum |
17 spoke |
Any |
Any |
|
|
Period 3 Midlwt Prod |
1976 |
400 any carb |
400 oem carbs |
disc |
17 any |
Any |
Any |
|
AHRMA |
Ltwt Prod |
1972 |
350+.080 |
250/350 |
Only OE |
OE size&material |
oem |
oem |
|
|
Formula 250 |
1972 |
350+.080 |
250 |
Disc |
18 spoke |
Any |
Any |
|
|
Snd o Singls 2-stroke |
Any |
Any |
---------- |
Any |
Any |
Any |
Any |
|
AFM |
FrmlaVnt dot |
1974 |
Any |
|
Any |
Any - DOT tires |
Any |
Any |
|
SMRI |
Ltwt Vintage |
1978 |
360 |
250 |
Disk |
Disc |
Any |
Any |
Candidate and Donor bikes - The various vintage class rulebooks in North America require varying machine cutoff dates from 1971-1978. Like most other Assn rule books, the AHRMA rule book allows machines that are built and sold before Dec 31st 1972 . OR LIKE MODELS. In the case of the Bighorn, the like models are:
|
Model |
Bore Strk |
Ignition |
OE Carb |
OE Exhaust |
OE Rims |
OE Forks |
|
1970 F5 |
80.5 x 68 |
CDI |
Small 30 |
Short exit |
Alloy 21/18 |
Hatta 3 position |
|
1971 F5 |
80.5 x 68 |
CDI |
Small 30 |
Short exit |
Steel 21/18 |
Hatta 3 position |
|
1971-2 F8 |
68 x 68 |
Points |
Large 30 |
Short exit |
Steel 19/18 |
Hatta 3 position |
|
1972-4 F9 |
80.5 x 68 |
CDI |
Small 30 |
Long exit |
Steel 21/18 |
Hatta 3 position |
|
1975 F9 |
80.5 x 68 |
CDI |
Small 30 |
Long exit |
Steel 21/18 |
Std w/preload adjust |
Buying Your Bighorn - It bears noting that no matter what machine you buy to build up your 350 Bighorn, you should expect to completely teardown the entire chassis and engine for a race quality assembly. Given this, its not really important to find a perfect donor bike . But it is important to find one that has endured the least amount of hard use and molestation. Its everyones dream to find a perfectly preserved low mileage barn-find bike but there are few of those left (at a reasonable price). If you can find a low-mileage barn-find .buy it.
The more common (and practical) approach is to buy two or more very rough machines so that you can pick the best parts of the lot to build your Bighorn. We purchased 4 non-running Ebay bikes to build our two race bikes. After building up our bikes from the best parts, we still had plenty of useful spare parts that we could take along to the races with us. The rest of the hardware that was of no use to us .we just sold on Ebay
In this genre of motorcycle shopping, its very common to find not running/ no title bikes for sale.
Such bikes are worth $400-500 so long as they pass the basic priority tests. The items you NEED NOT be concerned about are engine compression, lighting electrics, fork seals sealing, tires & tubes, front wheel condition, ignition components, seat padding or seat cover condition, air cleaner box, instruments, instrument cables/drives, oil injection pump.
The priority items YOU DO look for when purchasing your Bighorn are:
Frame- no serious flat spots on underneath cradle or down tubes no rewelded frame joints .no frame tube fractures or fractured paint on frame welds or gussets.
Forks Hatta 3 axle position type forks are preferred...reasonably smooth up and down fork movement no rust on fork leg area covered by fork seals .no big dents in fork sliders even steering stops in both directions. Also spin the wheels looking for rim flat spots and notable sideways bends.
Engine Spin thru engine with kick-starter to confirm starter gear operation and a free engine (good compression is nice, but not really important). Lift the rear wheel from the ground to confirm shifting into all 5 gears and neutral . No visible fractures in the aluminum clutch cover, ignition cover, or sprocket covers no broken cylinder or head fins, no big dents or fractures in exhaust pipe (the longer behind-shock exhaust exit pipe is preferable to the forward of shock exit pipe). Confirm that the shift shaft is not bent (badly).
If a non-running no-title bike cannot pass these tests, it is not a not a bike it is just parts, and should be priced accordingly.
Assumed Replacements - Unless you found a bike that had a recent full-frame-off restoration, there are a number of items that you SHOULD EXPECT TO REPLACE.
Those items are divided into two categories A) Chassis, and B) Engine
Chassis
Replace plastic swing-arm bushings with needle bearings
Replace steering head ball bearings with tapered roller bearings
Replace front and rear brake shoes
Replace front and rear wheel bearings, tires and tubes
Replace Fork seals
Replace Front Brake cable
Replace Handlebars (with lower & narrower bars)
Engine
All engine seals gaskets and O rings
All engine Ball Bearings
Connecting Rod Kit (with Yamaha rod kit)
Piston kit (with Wiseco Piston Kit)
Entire ignition system (with light flywheel ignition)
Clutch Plates
525 Chain & both Sprockets
Crankcase and side case cover Phillips bolts replaced with Allen bolts
Starting The teardown - If your donor bike is badly caked with grease, mud, dirt, etc .Its worth your while to try to get as much of the grime as possible off at a high pressure car wash before your teardown. With that done, its time to just tear the entire bike down to the last nut and bolt. Its wise to assemble as many loose bolts and parts as possible onto subassemblies, i.e. put rear axle, spacers and chain adjusters on rear hub, swing arm bolt and bushings back in swing-arm, etc .. the fewer loose bolts and parts you have, the better. For the bolts and parts you cannot put on sub-assemblies, its wise to have a box of zip-lock bags on hand so you can bag bolt groups together (fender bolts, engine case cover bolts, etc).
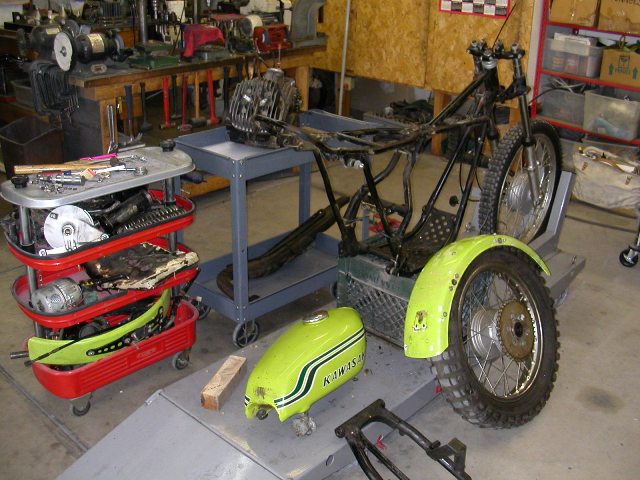 |
The initial teardown is never a pretty thing. Do your best to keep things together in one place, and quickly separate away all "non-candidate" parts that will not be part of the final build. |
Engine Format Choices - There are two big technical choices each owner needs to make that will forecast the direction of their 350 Bighorn build. Gearbox gearing, and ignition system.
Gearbox gearing - All F5, F8, and F9 engines come with the same lower end, clutch, and gearbox. This stock gearbox has a very wide ratio gap between 4th and 5th gear. This stock gearbox will require an engine (and cylinder porting) that offers an exceptionally wide powerband to allow for strong acceleration to pull the 4th to 5th gear shift. The Klemm Vintage Sport Café spec porting offers competitive peak ground speeds along with the powerband needed to pull this 4th to 5th gap. Our Elite Porting also has the ability to pull this 4th to 5th gap for riders under 160lb. However 200+lb riders wanting to run 100mph speeds will struggle to cover that gap. These riders may want to consider an elite gearbox.
Elite Gearboxes - In 1971, Kawasaki sold the F81M 250 that was a special off-road model built specifically for racing. The two items that made the F81m truly special where the lightweight-flywheel points ignition, and a close-ratio gearbox both of which could fit into any 350 Bighorn motor. In truth, only the 2nd through 5th gears of the F81m gearbox were different. The 1st gear, transmission shafts, shift forks, and shift drum were all identical to the F5, F8, & F9 models. A further truth was that the F81M second gear set was inherently weak (prone to breakage) so most racers of the day used only the 3rd, 4th, & 5th F81M gear sets. The closer ratios of these F81M gears allowed for a slightly narrower powerband (ie. higher port timings) that yielded better peak speeds. Sadly, it is tough to find an F81M gearbox . Or the 3rd 5th gear-sets . But they are still out there.
Another option is to install a Kaw H1 500 5th gear set into the Bighorn Transmission (it fits right in). The only down side is that the H1 5th gear countershaft will not mesh with the F5 gear next to it. The solution is to custom make a replacement for this F5 gear that meshes with the H1 5th gear. While it is a bit of work, this results in 4th and 5th gear ratios that are close enough together to allow for the more aggressively ported Elite/GP cylinder. As of this writing, Klemm Vintage does not yet offer this special made gear . But it is in the works. Either way, an Elite or GP Bighorn would have to use the F81m 3rd-5th gear-sets, or the H1 5th gear conversion.
Ignition Choices The stock cdi ignition electrics of the F5/F9 350 Bighorns were often problematic and prone to failure when pressed into sustained high-rpm usage. In addition, the stock Bighorn ignition flywheel was incredibly heavy (a whopping 4 lb). For a high performance 350 Bighorn, a more modern, lightweight flywheel (under 2lb) ignition needs to be fitted for the purposes of sheer reliability, and improved acceleration.
The most affordable option would be to find a genuine F81M points-operated ignition with its light ignition rotor (20oz). The F81m ignition bolts right on and works nicely as long as the points and condenser are kept in good repair. The F81M ignition would be a great choice for a sport-cafe machine, however it lacks the advance/retard curve that would be desired for an elite or GP build. (read about advance-retard ignitions here).
The next best ignition option would be to install a Penton Racing ignition. Penton offers two different ignitions for the Bighorn. The MZB model that has a very light flywheel and a charging coil, but it is a straight-firing ignition (no advance/retard curve). This straight firing model would be suitable for a recreational or sport build, but not an elite or GP build. Penton also manufactures the PVL model ignition that has a very light flywheel and an advance /retard curve . But no charging coil .This is an excellent choice for an elite or GP build. While these Penton ignitions are a bit expensive on the outset, they are much more reliable that stock F5 electrics, and still cheaper than trying to buy soon to fail NOS 1975 cdi boxes and stators for the stock Bighorn ignition. http://www.pentonracingproducts.com/
The final ignition option is to custom fit a 2000+ KX 250 ignition. These very reliable ignitions have a light flywheel (18oz), a nice advance/retard curve, and are often very inexpensive on Ebay. The only down side is that they require custom machining of the crankshaft taper and a backing plate adaptor to fit on the Bighorn cases. Klemm Vintage will do the custom machining to fit your KX250 ignition to your Bighorn motor, but this custom machining is a bit expensive. (see price list below below)
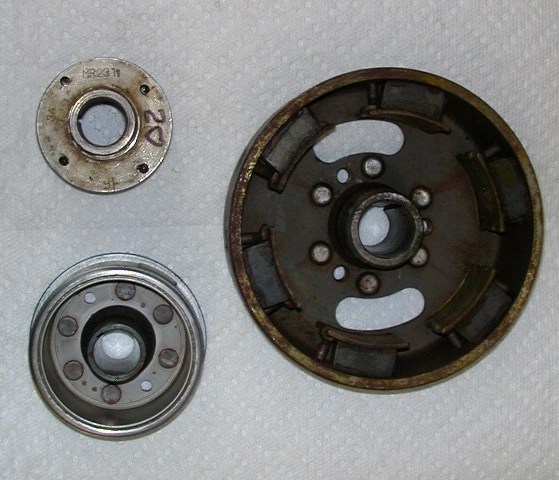 |
Top left is the 20oz. ignition flywheel
of a genuine F81M "button mag" points ignition. Bottom left is the 18oz. flywheel from the 2000 KX 250 ignition. Besides the very light flywheel, this ignition also has a very desirable "advance-retard" ignition curve feature. Right is the stock Bighorn flywheel that weight in at 4lb (64oz). The weight of this flywheel yields slow engine acceleration, as well as rapid left side crank bearing wear. |
A Note About Ignitions and Starting - While the heavy stock ignition flywheel is horrible for high-performance and competition use, it does make for very easy starting of the big single. The inertia of the stock 4 pound flywheel helps the rider to spin the engine through a kick-start, and greatly reduces the occurrence of any kind of "kickback". Converting to a light flywheel ignition reduces this flywheel assistance, and so requires the rider to deliver a stronger and swifter kick for starting. This is not a difficulty on the Recreation, and GP versions because their compression ratios and ignition timings are relatively conservative. However the stock-pipe Sport and Elite versions have much stronger compression, as well as more advanced ignition timings (in race spec settings). These Sport and Elite racing setups can exhibit some mild kickback in race spec, but very little kickback with the 4' retarded timing used for street spec riding.
The natural answer for most riders would be to simply push start the bike .... but not with a road-going Bighorn. The combination of tall gearing and high compression of all these setups insure that only an 200+lb Olympic sprinter, or the steep down-hills of San Francisco, could "bump start" these bikes. Fortunately, AHRMA rules (and most others) permit the use of kick starters so long as there is a retaining device to hold the start lever folded in (we use a rubber strap attached to the frame). The only other starting option is a battery driven track starter. We never used such a starter, because you can't take one on a road ride with you. We felt it was stupid to develop a road bike that you can't easily start "on the road".
Engine Build Objectives - Our build objectives for every level engine package are A) Long Term Reliability B) Affordability C) Competitive racing speeds. At the same time, we do our best to attend to the Bighorn engines known weakness areas. The 350 Bighorn engine had a long reputation (from back in the day) as an engine that experiences frequent piston seizures and this reputation has some footing in truth. However resolving the causes of these past seizures is not difficult at all. With all of our Bighorn builds, our first order of business is to attend to all the weakness areas that resulted in the poor reliability reputation that 350 Bighorn had back in the day.
The Mechanical Weakness Areas
Air-leaks - By far the number one cause of Bighorn engine failures is/was air-leaks. There has long been an assumption among careless mechanics that a freshly rebuilt engine will be free of air-leaks . And nothing could be farther from the truth. At Klemm Vintage, we pressure test every engine we rebuild, and find that about 80% of them still have very big (and lethal) air-leaks in odd places that no one would never suspect. The oddity of these air leaks is not important. What is important is that ANY air leak can (and will) result in poor carburetion at low speeds, and a scored piston at high speeds. There is no such thing as an acceptable air-leak . Any leak must be fixed. For more detailed info on how to test for air-leaks click here.
Head Dome Design - The design of a 2stroke cylinder-head dome has a big effect on the engines operating temperatures, and detonation risks. The dome of the stock 350 Bighorn is easily one of the most detonation prone designs that we have ever seen (who knows why they made it that way). The good news is that this poorly designed dome can be modified, and/or filled in with weld, and the head-dome can be re-shaped to have a very detonation resistant and cool operating design. This head dome modification is a service that Klemm Vintage offers (see price list below). For more detailed info on detonation risks click here.
About Spark Plugs - The stock Bighorn head accommodates a short reach spark plug, and Kawasaki recommends an NGK B10 heat range plug (which is a very cold plug that fouls easily) For our high rpm Elite and GP setups, we welded additional aluminum material onto the head so we could cut a more deto resistant dome design, as well as use a long reach (3/4") spark plug. We use the long reach plug because it has more thread surface contact area with the head, which helps it to exchange it's heat away to the cylinder head. This improved heat exchange allows for the use of a hotter heat range spark plug that is more resistant to fouling. To further improve spark plug heat transfer, we also removed the stock spark plug washers and ran only solid copper spark plug washers (to get better heat transfer from the plug seat to the cylinder head (every little bit helps). With this long reach design and the copper washer, we could safely run a hotter NGK B9EV heat range plug during sustained high rpm road racing, and a B8ES/B7ES during our street riding. With these hotter heat range spark plugs, the bike started easier, had better throttle response, and never once fouled a spark plug during racing or street riding.
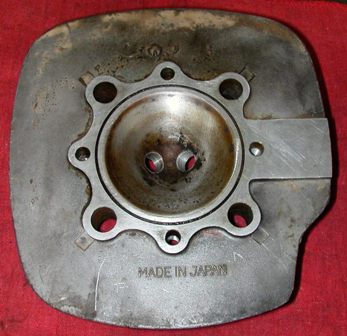 |
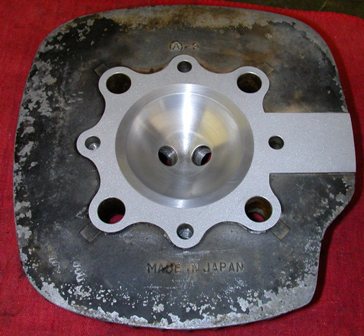 |
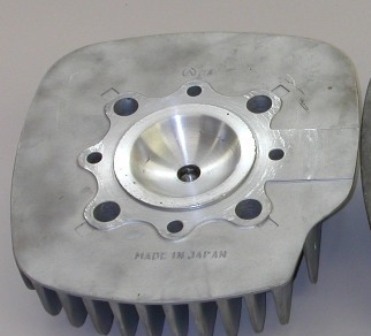 |
| This is the stock F5/F9 Bighorn head dome. It's conical shape and absence of a squish band made it very easily prone to detonation even on the 98 octane premium fuel of the day .... and worse yet on today's 91-octane premium. | This is our "Recreational" Head modification that offers a reshaped dome with a squish band. Even though the squish band is narrow, it helps greatly in reducing detonation. This head mod also includes a slight increase in compression ratio over the stock head. | This is the "Elite" head mod that features a center mounted long reach spark plug, and a wider squish band. This design offers the excellent detonation resistance and improved spark plug cooling that is needed for sustained high-rpm applications |
Oil Injection - While the oil injection can be a great convenience to recreational riders on stock machines, it holds a very big reliability risk for any engine that will turn sustained high rpms, or higher than stock (6000) rpms. Removing the oil injection and converting to premixed fuel will yield a big reduction of failure risk, as well as a big reduction in air-leak risk.
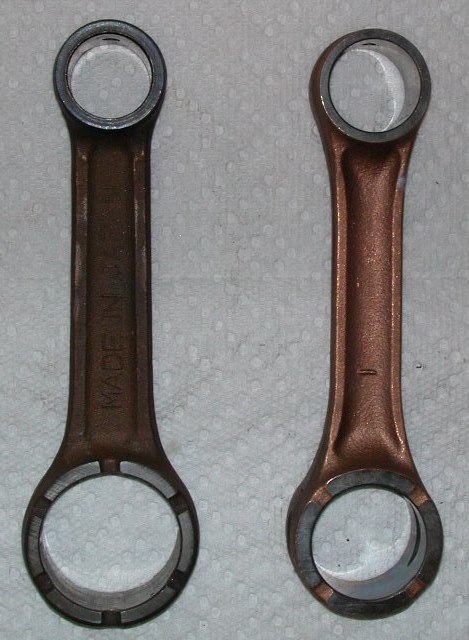
Connecting Rod and Crankpin - The stock 350 Bighorn uses a stepped crankpin with a very large diameter lower rod bearing. This large bearing works fine in low-rpm Bighorn motors, but it is a big failure risk in a high rpm competition engine. The standard fix for this problem is to replace the rod kit with a particular Yamaha rod & bearing set that is far more reliable than the stock Bighorn Parts (see price list below). This Yamaha rod has exactly the same center to center length as the stock rod, but it has different diameters at each end. Even so, it fits perfectly with the modified forged pistons we use in our Bighorn engines.
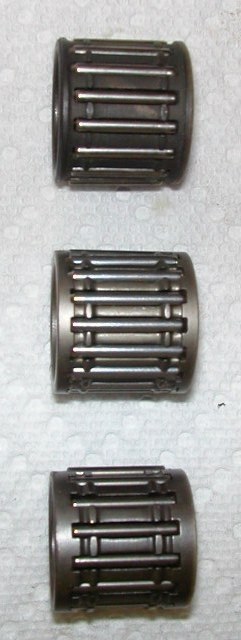
Small End Rod Bearing - The small end rod bearing in a 8000+rpm Bighorn engine has a very hard life. It helps that our Yamaha rod conversion replaces the stock 18mm bearing with a 20mm bearing. However, not all 20mm bearings are created equal. We opted to use a special high load bear that has more needles, and longer needles than any conventional 20mm bearing. We consider the high-load bearing to be mandatory for Elite and GP Bighorn engines.
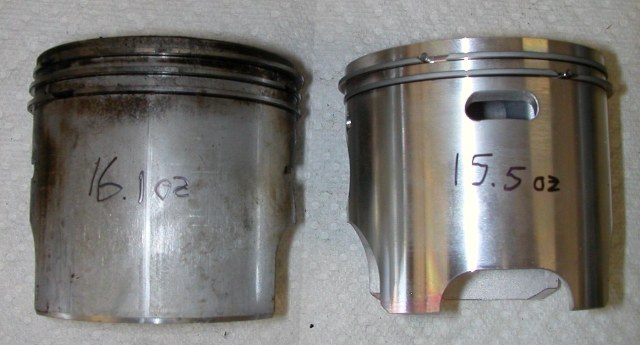
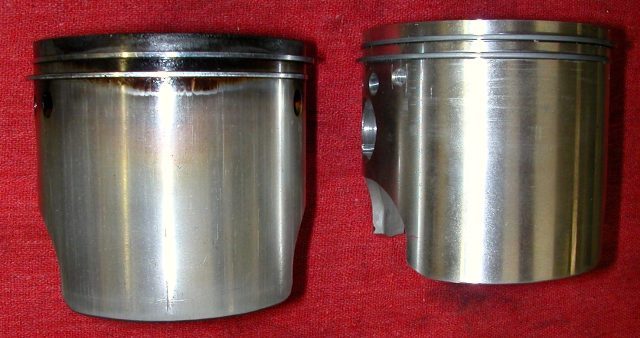
Piston - The stock Bighorn piston is a very heavy part that uses 3 piston rings. For a low-rpm stock Bighorn, this stock piston offers great torque and good long term wear. However in a higher rpm engine, the three rings of this cast piston sap off acceleration ability as well as high rpm ability. Back in the day, Kawasaki offered a lightweight forged 2-ring piston for the 350 Bighorns but the supply of those pistons vaporized many years ago.
More recently, we have found another 2-ring forged piston from a current model two-stroke that fits perfectly into the Bighorn engine (fitted with the Yamaha rod), and offers excellent long term service. We strongly recommend to upgrade to this more modern forged 2-ring piston that is lighter, easier to find, and available in numerous sizes. Converting to this piston does mandate cylinder-head machining . But the effort and expense are well worth it.
Attending to these pivotal areas of the Bighorn engine, results in a motor that has excellent long term reliability, even under the most extreme high-rpm racing usages.
 |
 |
 |
|
Left- Stock F9 3-ring Piston Right:- Modified forged two ring piston Note : weights are piston, rings ,and wrist pin |
Left: Stock Kawasaki F9 Rod Right: Yamaha Rod |
High-Load wrist pin bearing in Center |
Preparing a Reliable High RPM 350 Bighorn motor
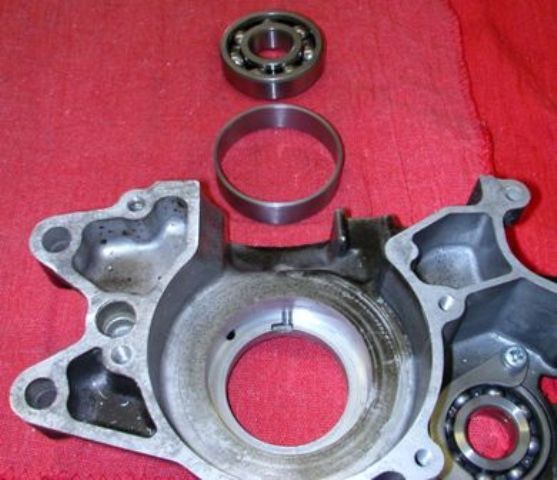
About Crankcase Preparation - The crankcases of the 350 Bighorn engine have a few areas that need to be scrutinized and attended to. Most important of these, is the press fit of the crankshaft bearings in to the cases, and the flatness of the base gasket surfaces.
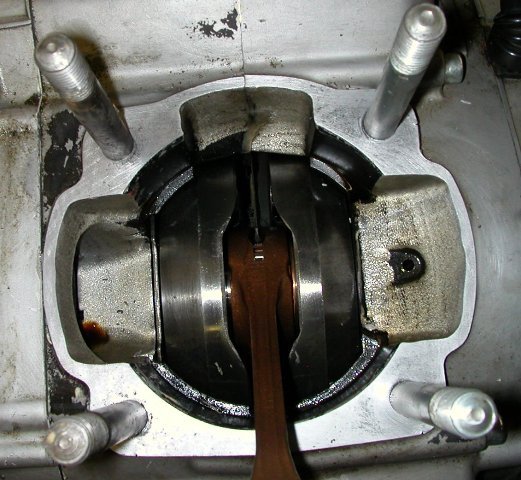
Crank Bearing Fit Both of the crank bearings of the Bighorn should be a gentle press fit into the crank cases. Unfortunately, over long term abusive operation, the ignition side bearing can become loose in the case as a result of loads from the excessively heavy ignition flywheel. At the same time, the drive side bearing sometimes becomes loose from the sheer loads of delivering power to the primary gears. This bearing fit problem is compounded by the somewhat soft steel bearing holders that are cast into the crankcases. If these loose fit bearings are not tightened, the result will be very significant vibration at higher rpms.
The fit between the loose cases and these bearings can easily be restored by re-sleeving the cases (for more info click here). We strongly recommend that any loose crank bearings in the cases be attended to by this resleeving process.
Base Gasket Surface - In the 1970s, it was very common for manufactures to make crankcase halves as individual parts, not as matched pairs. Given this, there were often significant variations in base gasket surface height between the left and right case halves. This difference in heights results in the cylinder not sitting square on the cases, not to mention significant airleak risks at the case center joint. To resolve these problems, we assemble the two empty case halves together, and mount them in a mill to cut the base gasket surface perfectly flat, and square to the crankshaft. Of the four running machines we bought for our project, all four has significantly mis-matched base gasket surfaces. This service included as part of our Engine Blueprint Assembly, or can be done as a separate machining operation.
 |
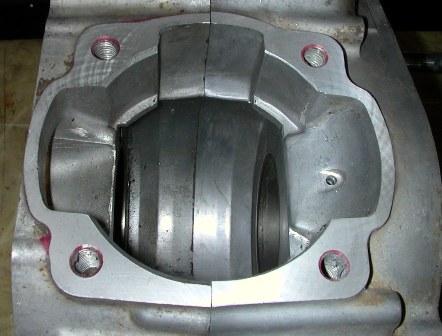 |
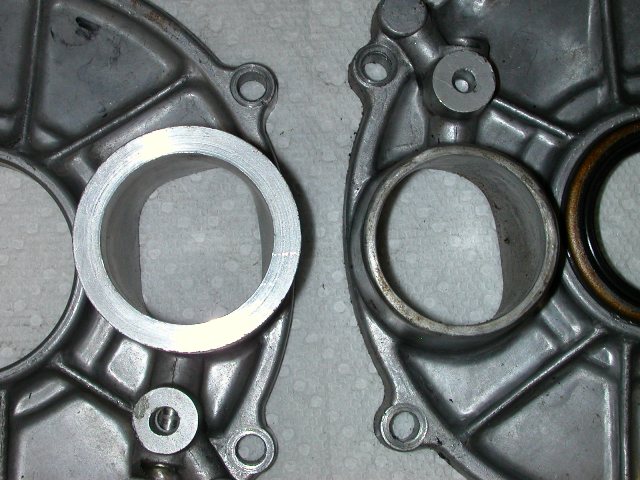
| Above is a bored crankcase & new bearing sleeve ready to be pressed in. | These cases (from a running engine) had a replaced left case whose base gasket surface mismatched .008" and air-leaked badly. They are now even and square. |
About Crankshaft Preparation A stock, low rpm, recreational Bighorn can easily offer good long term reliability with the stock Bighorn crank and connecting rod. However (as mentioned above), we strongly recommend the installation of the Yamaha rod kit in any high performance 350 Bighorn platform. Beyond the installation of the Yamaha rod, there is another modification we offer for the Elite and GP level Bighorn engines . a Top Located Rod Modification here is why its better.
A stock Bighorn crank has a thrush washer on each side of the lower end of the connecting rod. These copper thrust washers locate the rod on the center of the crankpin. While this Bottom Located Rod setup works great on a low rpm recreational engine, it does have a performance down-side. As the engine spins up to higher rpms, there is significant amount of rotational friction resistance between the connecting rod and these thrust washers . As well as between the thrust washers and the crank flywheel halves. To address this power loss, we cut down the thrust washers (and crank flywheel halves) so that the rod cannot make contact with the thrust washers or flywheels. We then install some custom fabricated stainless steel centering washers to fit between the piston and the top end of the rod. Since the rotational surface resistance at the top of the rod is far less than the bottom of the rod, this top Located rod setup offers noticeably quicker acceleration and throttle response, as well as much better big-end rod oiling. The only down side to the top shimming setup is that the top end rod bearing runs considerably warmer. To attend to this, we replaced the top end rod bearing every 40 operating hours (we have a digital tachometer/hour meter mounted on our Bighorns).
About the First-Year F5 and F8 Cranks - There are some minor differences in the engines of the first-year 1970 f5 / 1971 F8, and all the other later models of the 250 and 350. By far the most meaningful difference is in the crankpin and crankshaft flywheels. All F5/F8/F9 engines use a stepped crankpin whose diameter is larger in the center where the big end rod bearing rides. However the first-year cranks used a crankpin that had a center bearing surface that is 2mm narrower than all the later cranks. We can only presume that KMC engineers realized that the first-year crankpins did not offer enough bearing surface area for the torquey 350 engine, and so updated to a crankpin with a wider bearing surface area. To accommodate the updated wider crankpin, KMC engineers made the later crank flywheels 1mm narrower than the first-year cranks. For a very short amount of time KMC sold rod rebuild kits for the first-year cranks. However after 1972, when these first-year engines began to fail rods, Kaw shops were instructed to install the later crankshaft with the wider crankpin. The later cranks were cheap and plentiful, and often the crank upgrade was covered under warranty.
Fast forward to today, and (surprisingly) there are still many low miles first-year engines out there that still have the original first-year crank. Sadly, the few rod kits that were made to rebuild them are long gone, and there is no aftermarket option. The only option is to install a later style crank, or machine the first-year crank to accept the later crankpin. Klemm Vintage does this crank machining ($150) to allow use of the later pin.
|
|
 |
| The top shim rod spacers in place. This bearing has 30 high rpm hours on it. | The top shimmed rod with cut down thrust washers. |
About Gearbox Preparation - Many technicians feel very strongly about changing or modifying the shimming of the transmission gears in an effort to achieve good shifting. While we know how to do transmission shimming too, we have never found faulty shimming to be the cause of Bighorn gearbox problems. Instead, we focus on the fitment of the shafts, bearings, and shift drum in the cases, and the fitment of the shift shaft to shifting pivot .. these are the real roots of Bighorn shifting problems.
Countershaft Bearing - The biggest cause of gearbox shifting problems is the fit of the countershaft sprocket bearing in the crankcases. This bearing often becomes loose in the crankcase because of the loads of delivering power to the (often too tight) chain. Unlike the crankshaft bearings, the transmission bearings have no steel sleeve insert to rest in, so it is that much easier for those bearings to wear in the case. Sadly, the entire countershaft is supposed to be held in position by the press fit of the countershaft bearing in the case. If that fit becomes loose, the countershaft can easily move side-to-side (a few millimeters) resulting in missed shifts and jumping out of 4th gear. The fit between the loose cases and these bearings can easily be restored by re-sleeving the cases (for more info click here). We strongly recommend that any loose bearing fits in the cases be attended to by this resleeving process.
Clutch Bearing - The bearing mounted in the cases behind the clutch is intended to be a slip-in bearing, not a press-in bearing .which is fine. This bearing it supposed to be held tightly in place by a steel retainer plate that is behind the clutch. Unfortunately, over time, this retaining plate can experience wear that will allow the entire clutch shaft to move from side to side under load. The result of this side to side movement is occasional missed shifts as well as occasionally jumping out of 3rd gear. To fix this, the case must be machined to allow the retaining plate to firmly hold the bearing in place (this mod is part of our Blueprint Assembly).
Shift Drum - The Bighorn shift drum is located in the crankcase by a steel plate behind the clutch. On many Bighorns, the clearance between this shift drum locating plate and its groove in the shift drum is 1-2mm. While this doesnt sound like a lot of clearance movement, it can easily be enough to result in missed shifts or the transmission jumping out of gear under load (never a good thing). To resolve this, we modify the locating plate to have closer clearance in its groove on the shift drum.
Shift Shaft - The 350 Bighorn shift shaft often has two issues. One is excessive shift lever rotational play as a result of a poorly fitting spring spacer, and the other is non-centered adjustment of the pawls to the shift drum. The rotational play in the shaft can be resolved by fabricating a closer fitting spacer for the spring, and the centering adjustment can be resolved by fabricating an eccentric spring pivot bolt. Both of these problems are attended to in our Engine-Blueprinting.
Clutch - It bears noting that the Bighorn uses the same basic clutch basket as the H1 500 triple. Given that, there are plenty of new high quality clutch plates available for the Bighorn (we use Barnett plates) . But good clutch plates are not enough. The Elite and GP versions of the Bighorn easily have enough horsepower to cause clutch slippage under high loads even with new plates. The fix is to use H1 clutch springs or, better yet, heavy duty aftermarket H1 clutch springs. These heavier springs certainly make for a harder clutch lever pull . But they are what it takes to deliver the power of a 100+mph engine.
Transmission Oil - One would think that you could fill the transmission of a 2stroke to the proper level, and just forget about it for a while . Not so. A Bighorn that is run primarily at low rpms (as would be the case for commuting) will maintain a steady oil level for quite some time. However the story is different when you run the Bighorn at sustained high rpms (especially the sustained high rpms of road racing). Sustained high-rpm operation causes the transmission oil to be constantly strewn and sprayed around the transmission cavity with such force that a measurable amount of transmission oil is spewed out the oil vent hose at the back of the crankcases. Most racing bodies require that this transmission vent hose be routed into a catch bottle and with good reason. On our Bighorns, we fit a small plastic bottle into the old battery holder to act as the catch bottle. Routing the vent hose this high above the transmission helps to reduce the amount of oil that is spewed out but there is still measurable oil spewed out after every race. Given this, the transmission oil level should checked often during race days or high rpm outings.
The Rotary Valve Inlet System
Overview - The single biggest reason that the 350 Bighorn is a premier vintage racing platform is its rotary valve inlet. Rotary valve two strokes were the global high horsepower state of the art through the 1960s, 70s, 80s and 90s . Here is why.
Speaking from a strictly technical standpoint, every high-performance two stroke engine wants its inlet port to open at roughly 130 BTDC . And it also wants the inlet to close at roughly 70 ATDC. The only inlet mechanisms that can accomplish this asymmetrical inlet timing are rotary valves, and reed valves. In the 1970s, rotary valve technology was developed very close to its maximum, while (unfortunately) reed valve technology of the 1970s was in the Fred Flintstone Era . And the Jetsons Era of reed valves was a solid 20 years away. Given that, rotary valve 2stroke vintage platforms have a huge performance advantage over every other engine of the period. The 350 Bighorn was the largest displacement rotary valve single ever mass produced, and so it has a competitive advantage that few vintage lightweight/middleweight machines can match.
All this said, the rotary valve design is not without its small design problems. For the 350 Bighorn, all these problems are solvable . But must be recognized none the less. They are as follows.
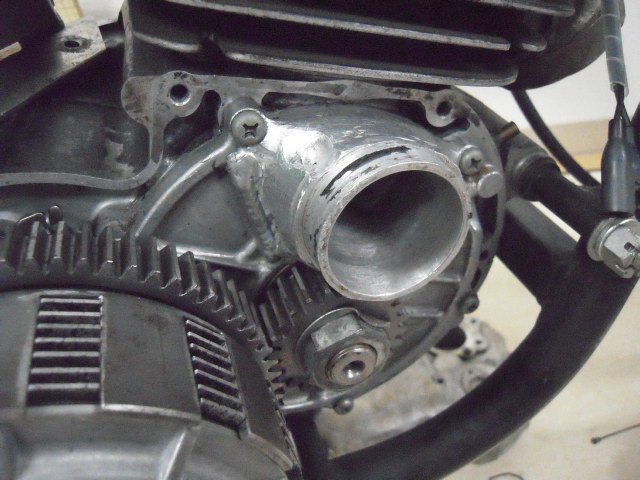
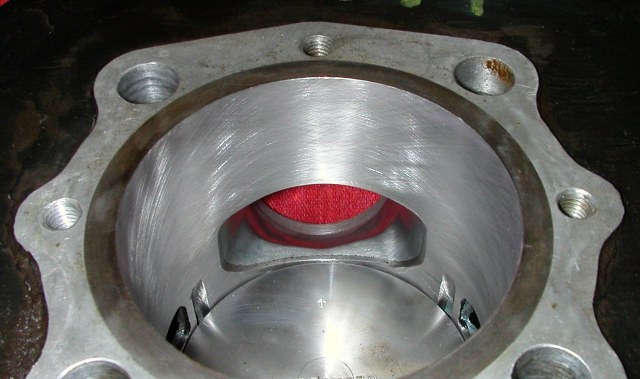
Rotary Valve Air Leaks Problems - The rotary valve cover is a relatively large, thin, cast part that seals to the crankcase with an O ring and a very narrow sealing surface. As long as the sealing surfaces of the crankcase and rotary-valve cover are very flat and true, there is no problem maintaining a reliable and lasting air-tight seal. However, on crankcases and rotary valve covers that are un-true or compromised troublesome air leaks can be a problem.
Beyond the issues of sealing the rotary valve cover to the case, is the more complicated sealing of the rubber carb manifold to the case. On stock 350 Bighorns, the stock rubber spigot manifold seals between the rotary valve cover spigot, and the outside clutch cover . With the help of lots of silicone sealer. This setup works okay if you have 24-hours to let the silicone kick. However if you are at the races needing to remove the clutch cover for any reason, that 24 hour kick-time is not an option. In addition, the stock Bighorn rubber manifold has no carb clamp (nor the space for one). Instead, the carb is held into the rubber inlet manifold by a metal stub on the carb cover and nothing else.
To collectively solve all these problems, we altered the rotary valve sealing surface arrangement by pressing a sleeve (with a wide sealing surface) onto the rotary valve cover. We then bored the opening in the clutch cover to allow the spigot of this wide surface sealing cover to match the sealing surface of the clutch cover. This modification creates a surface that will easily seal with a gasket and some fast drying sealer. In addition to this, we fit a slightly longer rubber inlet spigot manifold that can accommodate a clamp to firmly hold on the carb without any help needed from an outer cover. We used rubber manifolds that can hold the stock small-body 30mm carb or one that holds 34/38 carbs for the GP version.
 |
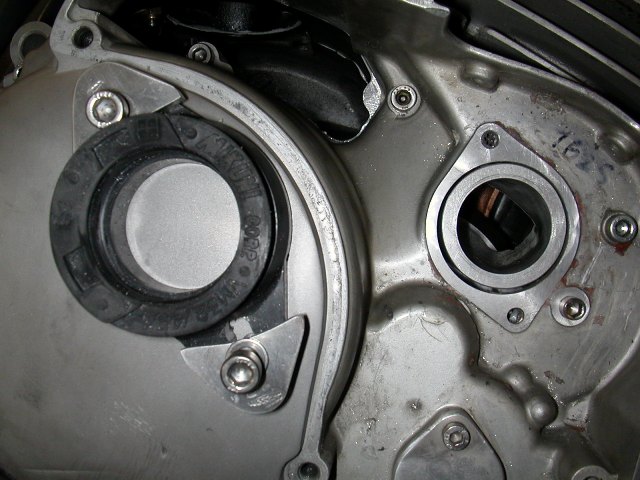 |
| On right is a stock rotary valve cover On Left is the Elite cover with pressed on sealing sleeve | The mounted Elite RV cover with bored clutch cover. Note 34/38 manifold with mount bolts and alloy holding spacers. |
Carburetors - Since the AHRMA production rules mandate the stock 30mm carb, we stuck with that for the majority of our stock-pipe development work. There is a perception among many that good 2-stroke jetting must be slightly over-rich to avoid piston scoring . And we could not disagree more. Managing engine temperatures is a function of rpms, cooling, compression, ignition timing, etc .jetting should never be set over-rich to protect a poorly laid out engine setup.
During our development work we spent lots of time getting the overall jetting to be as clean and seamless as possible. Our objective was to have jetting that offered easy starting, and strong acceleration, and be as free as possible of partial throttle over-rich conditions that would lead to loading-up in street riding scenarios . And we succeeded with that. Besides the carb calibration work, we also made some refinements to the carb that did not alter the 30mm throat size, but significantly improved overall carburetion. We offer full 30mm carb preparation that includes these refinements, as well as the jetting and top cap/jet holder drilling for the safety wiring required by racing tech inspectors.
Later on in our testing, we did try a 34mm carb, and we were surprised at how tiny the increase in acceleration and peak speed was . Why? For sure a 350 single can easily handle carbs larger than 30mm. However when the stock exhaust pipe is being used, those larger carbs will have a very small benefit. In short, the stock pipe Bighorn doesnt benefit much from carbs larger than 30mm.
The same cannot be said for the GP version that uses a racing oriented expansion chamber. The GP version requires at least a 34mm carb . We opted for a 38mm. We also sell fully pre-jetted and race-prepared 38mm carbs for the GP version Bighorn.
Rotary Valve Timing Modification - The stock 350 Bighorn rotary valve timing is extremely mild, to help generate the strong low end power the Bighorn was designed to make. For all of our Bighorn setups, the rotary valve timing is increased by cutting the steel rotary valve itself. Each level of engine modification has its own rotary valve timing specification. Klemm Vintage offers the precision cutting of the rotary valve for all the different engine levels (see price list below).
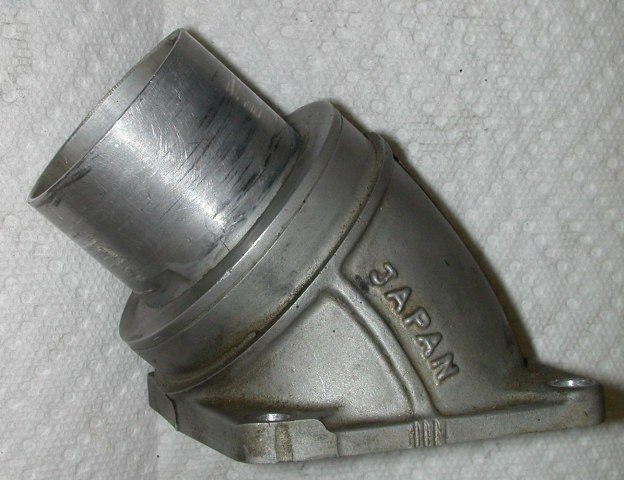
About Rotary Valve Cover Modification - While the stock Bighorn carb is 30mm, the inlet opening in the stock rotary valve cover and crankcase are the equivalent of a 34mm opening. This means that a 34mm carb could be installed with no case porting or rotary valve cover modifications at all. However to get the most performance out of the GP version, a larger (than 34mm) carb is needed. In the early 70s, top flight Bighorn GP bikes were fitted with 44mm round-slide Mikuni carbs. However a carb that large is not really needed to run competitive speeds in current day vintage race events. The 44mm rotary valve covers of the 1970s were custom fabbed with lots of weld and/or epoxy that made them high risk air-leak points. However fabbing a reliable rotary valve cover to accommodate a 38mm diameter is a much more doable mod that requires no welding at all. Klemm Vintage offers the 38mm rotary valve cover mod, as well as the case porting and matching to carry the 38mm opening all the way to and through the crankcase. (see price list below)
 |
 |
| On bottom is the stock rotary valve disk. On top is one of our custom cut rotary valves. | An example of a valve cover modified to 44mm. These covers were very hard to seal to the clutch cover, and air leaked often. |
About Air Cleaners - The stock 350 Bighorn has an air cleaner located under the seat that connects to a cavernous passageway in the crankcases leading to the carb. For good off-road air filtration, the stock air-cleaner joints, passageway, and carb cover must all be air-tight . Which is very difficult. The F81M racing version used a more spacious carb cover that had a built-in filter on the cover itself.
All that said, the serious flat-track racers of the day usually used some sort of filter that clamped on-to the carb. This worked fine for them because they were always making left turns only. The road racers of the day ran absolutely no filter at all and that was our approach for both the racing and street riding of our 21st century Bighorns. While we ran our Bighorns on the street and track with no air filters of any kind, we did make efforts to protect the carbs from detrimental air-flow, as well as bring them fresh-air that was relatively free from dirt/debris . Here is the back story.
Back in the day, there were numerous road racing platforms that had rotary valve engines with side mounted carbs. Tuners of these engines quickly learned that the worst possible thing you could do was run an open carb with no protection at all from the on-coming high-speed wind. If you failed to protect the carb mouth, the venturi effect of the high speed wind passing over the carb mouth would actually try to draw fuel backwards from the carb . fighting the engine for fuel from the carb. The solution was to shield the carb throat opening from the air-flow of the oncoming winds (The twin cylinder Kawasaki A1R and Bridgestone 175 factory machines had such covers). Failing to have these protective covers led to huge losses of high rpm performance.
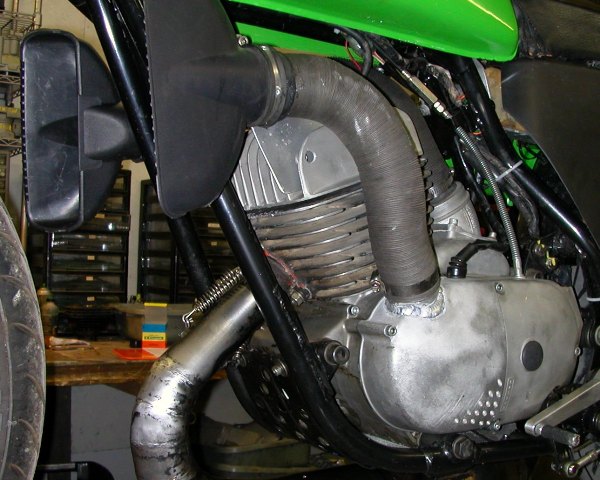
Our Bighorns offered a unique opportunity for dealing with this problem. We cut up a broken ignition cover and welded it over the top of a taller F8 carb cover. The result was a carb opening that was fully protected from the hurtful high speed on-coming air-flow, and also offered a large still-air volume to draw air from. At the same time, we turned the air inlet elbow on the top of the crankcase 180 so it faced forward instead of backwards, and then connected the elbow a very compact air-scoop (from a ShopVac) via a 2 automotive flex-hose. The end result was a compact, effective and affordable air-intake that brought a steady supply of non-turbulent air to the air inlet space. While there is no true filter in this system, the air being drawn in is relatively debris free, and the air-path through the crankcase makes it very difficult for large particles to make their way into the carb. All that said, if you often ride in an area with lots of fine dust in the air, you may need to consider some additional air filtering device.
In truth, we had no intention of fitting this air scoop for the purpose of feeding air to the carb. The original intention of this setup was to pass cool air over the hot crankcase surfaces in an effort to reduce net engine operating temperatures and reduce the engines detonation risks (for info on this see our Detonation Management document here). While it is more ideal to bring cool air to the carb than warmed air an abundant supply of non-turbulent air is always welcomed. In the end we felt we had solved two big issues with one very affordable solution. After our first undefeated AHRMA 2010 race season, AHRMA altered their rule book to disallow our scoop. Removing the scoop for 2011 made no noticeable change in carburetion, but we suspect it did slightly increase net engine operating temperatures. For the GP version that runs a 38mm carb, our extended carb cover was easily big enough to shield the 38mm carb, and the case inlet scoop is legal in all GP classes.
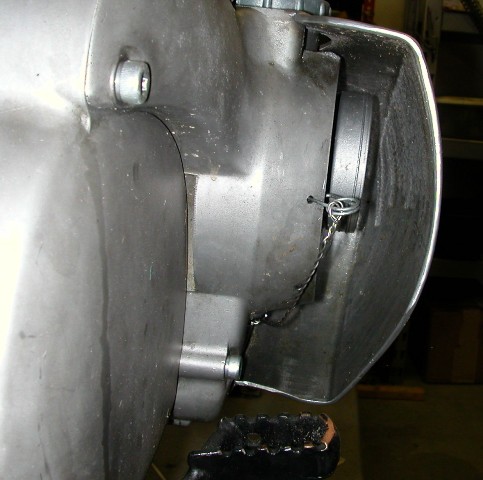 |
 |
 |
| The air deflector cover shown here over the 38mm carb | This shows the considerable surface area inside the large air inlet cavern. It's a great engine cooling opportunity | The modified air inlet spigot that allowed fitment of the 2" diameter flex hose. |
Top End Modification Our long experience building 2stroke racing engines has taught us that cylinders and heads need to be modified as matched pairs to net the best in performance results and reliability. To that end, we offer 4 different stages of porting and head modification sets that suit each of our setups: Recreational, Sport Café, Elite Production, and GP. While all four stages have excellent overall reliability, they do offer different peak rpms, and powerband widths. Sadly, there is no way to get the stump pulling low-end torque of a stock Bighorn along with the 100+mph speeds of the Elite and GP setups.
It bears noting that our Sport Café, Elite, and GP porting modifications use transfer ports that are fed through holes in the piston. For this reason, we also need the piston to do the porting on these versions.
 |
 |
| The cylinder, cylinder head, and piston component set that makes up the Sport, Elite and GP top end modification package. | An example of the added transfer ports of the Elite and GP cylinder porting modification set . |
Piston - As mentioned above, we use a an aftermarket forged piston that is designed for use in another two stroke model. This piston is stronger, lighter, and offers a more detonation resistant crown shape. Unfortunately, this piston requires some machining in order to fit in to the Bighorn motor. All the forged pistons we sell are already modified to install with no further mods. The stock Bighorn bore is 80.5mm (345.9cc). Our modified forged pistons are available in 81.0mm (350.2cc), 81.5mm (354.5cc), 82mm (359.9cc), and 83mm (367.7cc). AHRMA permits over-boring to 82.5mm, and the other associations whose limit is 360cc permit bore diameters up to 84.0mm. It bears noting that the stock Bighorn cast-in sleeve becomes dangerously thin in a few key areas if the cylinder is bored beyond 83.0mm, and so we do not carry larger diameters.
It also bears noting that this forged piston has a slightly shorter crown height than the stock piston, and all of our porting and head modification sets are designed to work with this new shorter crown height.
Exhaust Pipes - As mentioned above, we successfully road raced with the stock F9 exhaust pipe with excellent results. For sure, we are not under the illusion that the stock pipe is in any way ideal its not. However there are many other areas of the Bighorn engine that are creating a much bigger horsepower-bottleneck than this stock pipe. Our dyno testing confirmed that our Elite Production setup can make almost 40 rear wheel horsepower with the stock 30mm carb and the stock pipe . And thats great power for any vintage race machine. The GP machine makes close to 50hp, and has to spin a lot higher rpms to get it.
One back-handed advantage of the stock pipe is that it allows good power, but keeps the engine from making enough high-rpm power to break itself. The GP race pipe certainly makes a lot more overall power (and higher rpms), but the added loads of that power are much harder on the crankshaft, gearbox, and clutch, to say nothing of the added wear on the piston and bore. The last advantage of the stock pipe (worth mentioning) is that it draws a lot less attention from law enforcement while riding on the street . That is a very good thing.
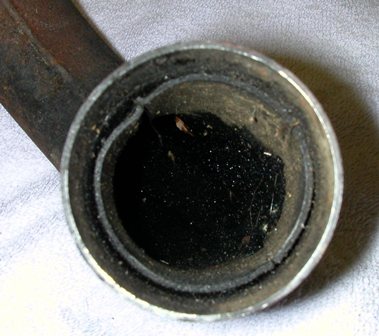
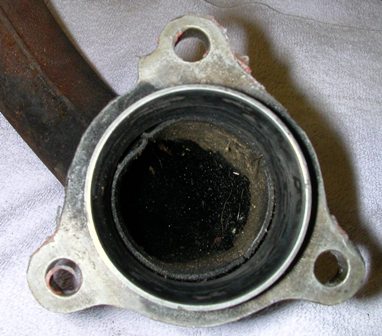
Exhaust Manifold Fitting - For those running the stock pipe, there is a detail modification you can do to help it work better. The exhaust flanges of the stock pipe were welded on in mass production mode with little attention paid to centering or alignment with the exhaust manifold. If you remove the exhaust manifold from the cylinder and slip it onto the head-pipe, you will immediately see the mis-match of the manifold to the head-pipe interior (they all mis-match differently). This area of a 2stroke pipe is one of the most harmful places to have an interior mis-match, and fixing that mis-match pays good dividends in overall performance.
 |
 |
|
The stock headpipe with non-centered inner sleeve |
The same pipe with the exhaust manifold inserted ... before matching. |
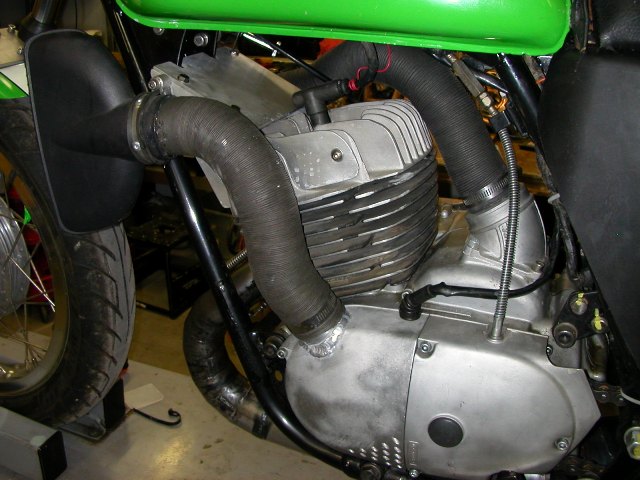
About Added Air Cooling - One of the biggest problems of a Bighorn engine is exchanging away heat during sustained high rpm use. We feel it is impossible to take too many measures to help deal with this problem. Our approach is : Since the bike & rider will be pushing a big chunk of air anyway, you may as well do your best to manage that air through parts of the motorcycle to improve cooling. This was our mindset when we fabricated the simple aluminum cylinder-head scoop fitted to our race bikes. Klemm Vintage will not attempt to sell these scoops because they can easily be made by any Jr.high school shop class student. The most important thought to keep in mind when making such a scoop is to direct as much air as possible toward the area of the head that is in front of the combustion chamber. The poorly conceived OEM head scoops of the RD400s and Suzuki 250-550 did not accomplish this important task, and so they had little effect on truly reducing detonation resistance.
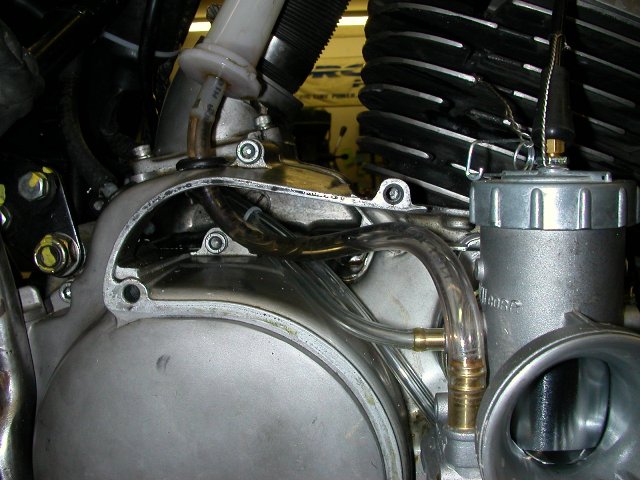
After directing air to the head and crankcase cavern, the next hotspot that deserves attention is the ignition. The ignition rotor and stator generate a terrific amount of heat that is absorbed by the crankcases. This added heat can measurably heat up the fuel charges entering the crankcase, and increase detonation risks. Old school racers would often just drill cooling holes in the front of their ignition covers to help cool the ignition. While this does help bring in some cooling air, the proximity to the ground also brings in lots of road flack, debris, etc. For our Bighorns we attached another scoop and hose to a 2 tube we welded to the top of our ignition cover. This scoop brought air in from much higher up off ground, and it gave us the luxury of drilling angles air exit holes 180 away, to net the best possible cooling effect from the air we were managing through the cover . Besides all that, it looks kinda cool too.
 |
 |
| This view shows the ignition cover input hose as well as the angled air-exit holes on the opposite site of the cover. Also visible is the head scoop, and case air inlet. | A forward view of the same machine. While some may joke of the appearance, this is the most compact and effective cooling package that can be applied to any vintage air-cooled engine. |
About Fuels and 2stroke Oils - Everyone has their own opinions of what the best 2cycle oil is us included. For our Bighorns we used only Maxima 927, which is a full castor bean based oil. 927 is much cleaner than the bean oils of yesteryear, and it still offers the same unmatched film strength that bean oil is known for. For racing, we ran a 20:1 premix with 110 octane race gas. For our street riding, we ran 40:1 premix with 91 octane pump gas. The rich 20:1 premix of oil for racing did cause a bit of loading up while running the bikes in pre-grid staging areas. But as soon at we entered the track, the bikes fully cleared out in the first few shifts, and carbureted flawlessly during every moment of every race with no visible smoke coming from the pipe while at speed.
When we converted to the 40:1 mix for street riding, we were surprised how smoke free the bikes ran, even after idling at long stop lights. We made no jetting changes to correct for the different ratios, and never experienced any loading up issues during street riding. Our street riding fuel range was nearly 100 miles, even with some segments of spirited riding in the mountain twisties. Whenever we took the Bighorns on a street outing that we knew would be high-paced, we ran the 91octane with a 50% mix of 100oct AV gas or a 25% mix of 110 race gas. The added octane was a safety margin to avert possible detonation, and it worked great.
 |
The piston on the left has 30 high rpm hours of testing and racing operation running on a 20:1 premix of Maxima 927 bean oil. This 82.0mm Wiseco piston was fit with a setup clearance of .003", and collapsed only .002" during it's service life. The rings were very free, and the skirt wear was minimal. This piston was re-installed (with a new wrist pin bearing) for a second season of racing. |
About Vibration - There is no getting around the fact that all singles vibrate to some extent. Unlike four cylinder engines, a single cannot be balanced to run smooth at all rpms. Instead, single cylinder crankshafts are built with a certain balance factor. In short, the balance factor assures that the engine will operate reasonably smooth in one rpm range, but vibrate noticeably more outside of that range the Bighorn is no exception. A Bighorn that spins 8000-9000 rpms has a very high-frequency vibration that can work bolts loose, and cause fractures in thin metal components (like fenders, small brackets, etc). This high frequency vibration is not much of a bother or discomfort during racing because the riders attentions are understandably elsewhere. However after every high rpm race outing, the machine does need to be looked over for loose bolts or newly fractured thin parts. We experienced very few of these kinds of issues because we using locking type nuts everywhere on the motorcycle that we could. In addition, we safety wired and cotter-pined all the items that AHRMA mandated and many that they didnt mandate.
For street riding, the average riding rpms are much lower than racing, and the vibration issues are much easier to live with. Like every single, the Bighorn has a sweet spot rpm range where it cruises smoothly and comfortably. During all of our road outings, the stiffness of the suspension was a much bigger comfort issue than the vibration.
About Vintage Chassis Rules
The AHRMA Production rules specify that the stock chassis, swing arm and forks must be used. The Vintage rules of other associations further permit gusseting, the installation of other period correct forks, brakes, etc from other period correct machines.
While some racers may feel compelled to install heavier forks, gusset the frames and swing-arms, as well as do other fabrication work to add stiffness, this is all very questionably worthwhile for the needs of a 110+mph Bighorn. We opted to do no frame additions at all. Instead, we focused on precise assembly and fitment to make the existing chassis as straight and stiff as possible . And that worked great.
Fork Legs - Its worth your while to start out with the best possible fork legs you can. Besides the legs being perfectly straight, the surfaces covered by the fork seals should be completely free of any rust or surface dents. No matter how straight your fork legs look, we consider it mandatory to inspect the straightness with an indicator and V blocks on a granite surface plate. Total run-out with the leg supported on each end should not exceed .005. If yours are worse than that, they should be straightened by someone with (a lot of) experience doing the job. This is a service that Klemm Vintage offers.
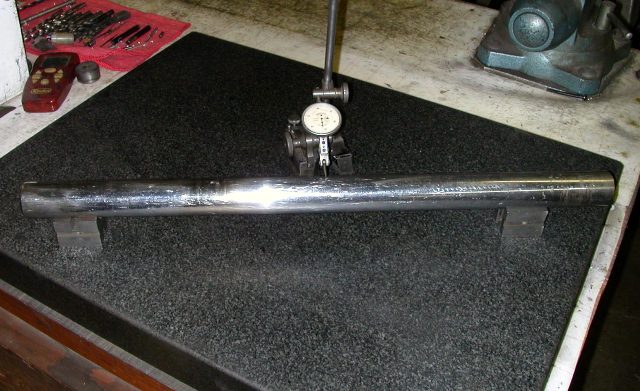 |
This is the basic setup to inspect the straightness of your Bighorn fork legs. If straightening is required, it should be done by someone that has the tooling and experience to do the straightening without leaving any "flat-spots on the leg faces. |
Lower Triple Clamp - The stock lower triple clamp is largely responsible for holding the forks rigid . And it does. However the lower clamp is made from relatively soft cast steel that can easily be bent in a moderate crash event. The good news is that a bent lower clamp can be straightened to racing quality.
The clamp can be checked for straightness by fitting the (perfectly straight) fork legs in each side, tightening the clamps on the legs, and then inspecting the perfect parallel-ness of the two legs on a granite surface plate. If the two legs are not perfectly parallel, the legs should be removed to physically bend the lower clamp until perfect parallel legs are achieved. This whole process sounds like a big pain in the butt to do . But it pays huge dividends in high speed handling stability. We consider this mandatory for Sport, Elite and GP builds. Klemm Vintage offers fork leg straightening, and lower clamp straightening services for owners who do not have the equipment.
Fork Sliders - Fork sliders should allow smooth full stroke movement of the fork leg. If a slider has a large dent in its body, that will cause a tight spot in fork movement. Sadly there is no precision means of fixing a slider with this kind of dent damage. Also inspect the brake anchor mount threads on the sliders to make sure you have a good quality threaded hole. Keep in mind that the fork sliders will be mounted to hold the axle in the rear-ward position. Repeated tests showed that this position offers the best high speed stability and handing for the Bighorn chassis.
Fork Hydraulics Kits - The stock Hatta forks are generally very soft and offer okay dampening. We installed the Race-Tech fork kit in one of our machines. This kit offered a stiffer ride, but much better overall fork action. We would strongly recommend this kit for an Elite or GP build.
Steering Head Bearings - Youll get a big improvement in front end rigidity by replacing the stock ball type steering head bearings with tapered roller bearing (aka Timken bearings). All Balls racing carries a tapered bearing set whose races press right into the stock frame. Sadly, that bearing set needs a sleeve made to fit the bearing to the steering stem, and the top adjuster nut and bearing shield modified to fit the top stem bearing. Klemm Vintage can machine your stem components to fit these bearings to your stem. We consider this upgrade to be mandatory for any machine that is expected to have good high speed stability.
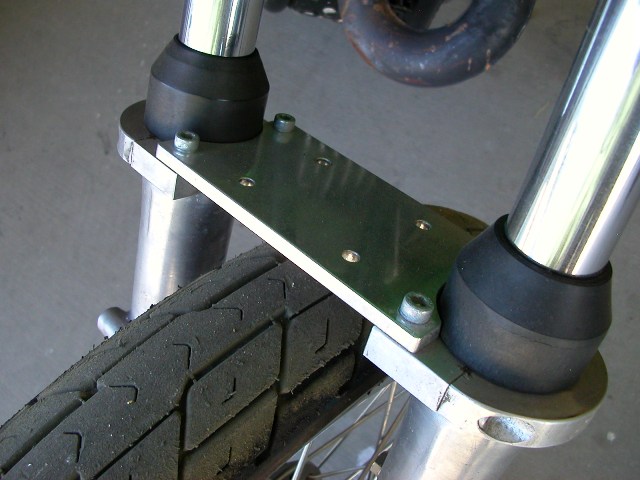
Fork Bracing - Fork bracing is strongly recommended for the Sport, Elite, and GP builds. The quick and easy way to do this is by finding a bolt on loop type brace that was traditionally use by dirt bike riders of the day. While the loop brace is very effective, many owners feel that it just plain looks ghastly on a pavement motorcycle (we sure did). We opted to fabricate a 3-piece fork brace that fit closely over the new 18 front rim we were running. To properly fit such a brace to the fork sliders, we had to turn a true diameter on to the not round sliders so that the slider clamps had a true diameter to hold on to. Klemm Vintage can custom fab this brace for you, however we will need your fork sliders to do it.
 |
 |
| Billet Fork brace showing clearance to 18" tire. | Billet fork brace with integral fender. |
Swing Arm Needle Bearings - We consider replacing the stock plastic swing arm bushings with needle bearings to be a mandatory upgrade for any Bighorn build. Commonly available 30mm needle bearings press easily into the swing arm, and work fine with the stock steel inner bushings. All Balls racing sells bearing sets that also include radial needle bearings that fit on both sides of the swing arm as well. Fitting these radial bearing kits does require some machining to the inner sleeves that come with the kit. For our Bighorns, we got good results with both setups.
 |
 |
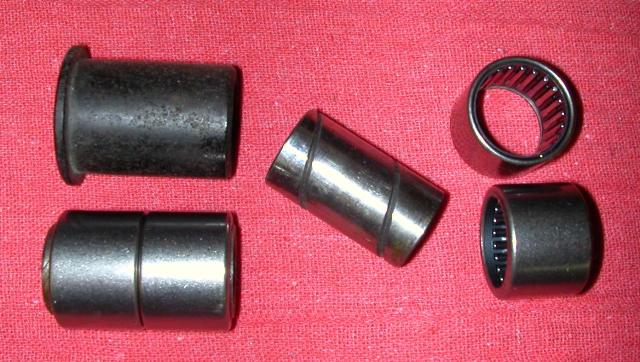
| Top left is the stock plastic swing-arm bushing, bottom left is two needle bearings on a stock inner bushing. Center is a stock inner bushing, and right are the individual needle bearings. | The Pivot Works kit has its own inner steel bushings, as well as radial needle bearings for the ends outer of the swing-arm. While this kit requires some custom fitting, it works great. |
Swing arm fitting - An important part of chassis rigidity is to minimize the amount of draw down tension being put on the frame by tightening the swing arm and motor mount bolts. We went to great lengths to shim the swing-arm into the relaxed chassis so that we put the very minimum of draw-down tension on the frame by tightening the swing arm bolt. Ideally, the shimming should also result in smooth swing-arm movement with absolutely no side play movement, when the swing arm pivot bolt is tightened to full torque. Its very important for high speed handling stability to perfect this fitment.
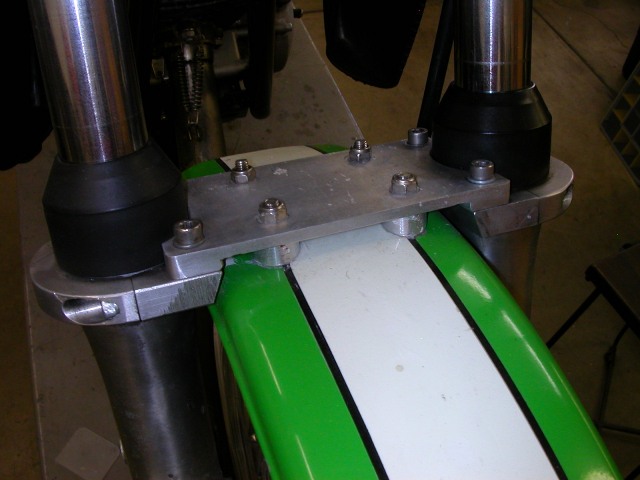
Engine Case to Chassis Fitment - If you fit the empty crankcases into the chassis with finger tightened motor-mount bolts, its clear that the engine has lots of room for movement, and requires lots of chassis drawdown as the motor mount bolts get tightened. To resolve this, we took a two part approach. Firstly, we replaced all the stock 12mm motor mount bolts with slightly larger grade-8 ½ American bolts. The holes in the frame will easily accommodate these larger bolts, however a very small amount of material has to be removed from the engine case holes (with a drill) to allow the ½ bolts to fit through. With the larger motor-mount bolts finger tightened in place, the motor fits a lot tighter in the chassis. However, it is also obvious that there are still big gaps between the cases and the relaxed chassis. All the gaps between the cases and chassis should be filled as best as possible with shim washers to minimize the amount of chassis drawdown when tightening the motor mount bolts. All this effort to perfectly shim the swing-arm and cases to the chassis will result in a much tighter and firmer high sped handling characteristic . Its well worth the time investment.
Shock Absorbers - There are many companies building very nice high-quality shocks for vintage bikes like the Bighorn. The sad truth is that we were not good enough riders to know that we might have needed top-drawer shocks. We replaced the stock Kawasaki shocks with 13.0 Progressive shocks, and we felt they were very adequate. Riders with better riding skills than us (which is just about everybody) may wish to choose Race Tech or Worx Performance shocks.
WHEELS
At bit of AHRMA Brake & Wheel History - Every vintage motorcycle rule set in North America (including AHRMA) permits upgrading machines to any period correct drum brake. The biggest period-correct production front brakes are the 200mm DLS (double leading shoe) units found on the Honda CB/CL 450 & CB77, early Kawasaki H1, and the 4LS 200mm brakes of the early Suzuki 750 and 550 2-stroke triples. Of all these 200mm brakes, the Honda brake offers the best mix of lightweight, great stopping power, and affordability. With that, we bought a couple of CL450 front hubs on Ebay, and replaced our stock 21 rim/150mm single leading shoe brake with an 18WM2 rim laced to our 200mm Honda DLS brake it worked great.
Then in winter 09 AHRMA changed the wording of their Production brake rule to say that Ltwt bikes could no longer upgrade brakes. (supposedly due to skirmishes between CB400 four and CB 350 racers) AHRMAs poor choice of wording in this rule resulted in our Bighorns having to go back to the stock 150mm single leading shoe front brake (while a 180mm DLS brake is found on virtually every other bike in the class). While we seriously questioned the wisdom (and safety aspects) of mandating worse brakes instead of equal brakes the rules are the rules, no matter how dumb they appear to be. With that we got to work refining our SLS 150mm brake (The details of or 150mm front brake improvement are below). In the end, our modified and upgraded 150mm SLS brake stopped almost as good as the stock CB450 brake. The truth is, all of our production road racing from72-75 was done with this same 150mm brake, and it was never a competitive problem then either.
In the winter of 2010, AHRMA once again altered the Production rules with wording that would require us to re-fit our old 21 front rim. Since we were the soundly crushing the competition in our class, it was hard to see how this rule had any other purpose other than to disadvantage the Bighorns. As of this writing, we have not yet decided whether to bother testing with a 21 front wheel.
 |
 |
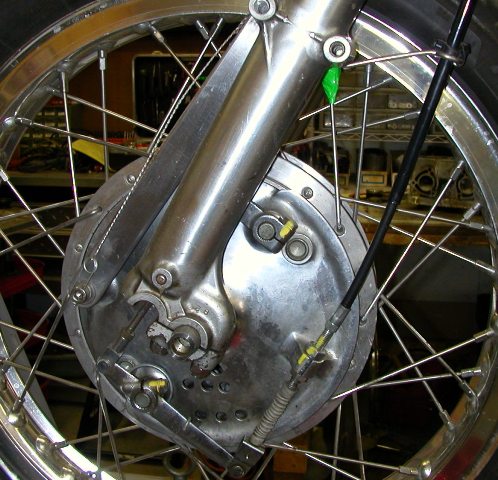
| The 200mm Honda CB/CL450 DLS brake with vent holes. | The fully modified 150mm SLS front brake with vent holes. Note brake anchor arms that hold the brake cable parallel to the fork leg. |
Wheel Teardown - Unless you have an absolutely mint rear hub, spokes, and rim, the rear wheel should be completely unlaced for preparation. If your stock WM3 steel rear rim is in good condition with no visible dents, it can easily be used for any level build.
Fitting wheel bearings - Installing new sealed wheel bearings is inexpensive and easy to do .we consider it mandatory. However the Elite & GP builds require some added attention to detail.
All Japanese wheels (of the period) have counter-bores in the hubs for the wheel bearing ODs to press up against, and an inner-hub steel-sleeve that spaces the two bearing IDs from one another. However on virtually all Japanese hubs (of that era) that center spacer-sleeve is about 2+mm longer that the counter-bores in the hub are wide. This means that at very high temperatures (and high turning loads) the hub can actually move slightly from left to right on the wheel bearing ODs. To be sure this movement is not a lot . But it only takes a small amount of wheel misalignment to induce high-speed wobbles and head shakes.
To resolve this problem, the center sleeve spacer must be machined to the exact same dimension as the distance between the hub bearing counter-bores. Klemm Vintage can do this modification for owners who dont have the measuring and machining equipment to do so.
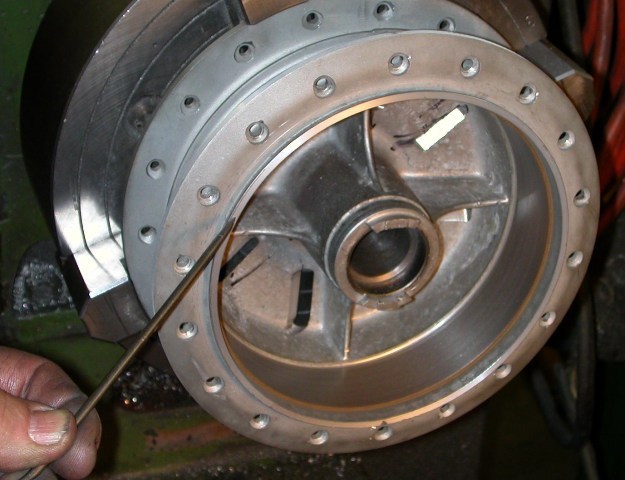
Vintage Brake Preparation - Turning the brake drums and arcing the brake shoes of a drum brake are common mods done by many folks . us included. However there is an added detail that no one talks about that makes a big difference in perfect brake performance.
First a bit of history, its important to remember that 1970s Japanese motorcycles were made in an era when computer controlled machining did not exist. On top of that, most Japanese motorcycles were mass produced to a meet price point, not a standard of mechanical excellence. Mechanical perfection of the brakes on 60mph recreational bikes was not a big deal. We learned these lessons while attempting to build our perfect stock 150mm front brake.
In an effort to cover every possible variable, we laced our hubs to fresh rims, and planned to turn the drums with the wheels laced and trued. We did this to cover the possibility that the spokes collective pressure may have the strength to slightly deflect the diameter of the brake drum. We took our perfectly trued front wheel off the truing stand (that holds the hub by the outer edges of the two wheel bearings) and mounted in our lathe via the axle between the two wheel bearings. Upon turning on the lathe, our perfectly trued rim now spun wildly out of round .. it made no sense. After taking considerable time for measurement and scrutinizing, we realized the problem was that the two wheel bearings in the hub were about .008 off center from each other in the hub itself. If we had any hopes of this brake working perfectly, this problem had to be fixed.
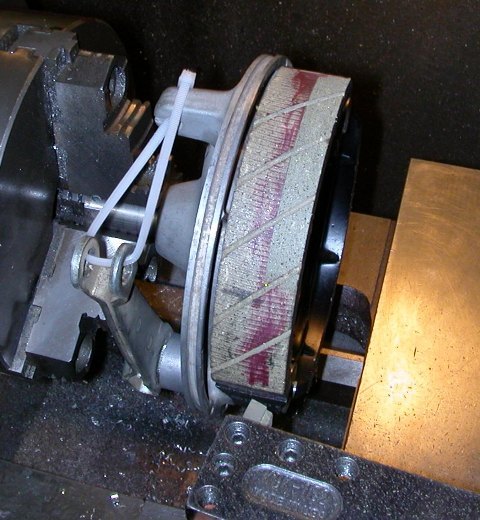
The short version of the fix is, we perfectly centered the (unlaced) hub in our lathe via the drum side wheel bearing and then cut the drum diameter, as well as two face and diameter locating surfaces. This allowed us to mount the hub on a mill table to perfectly center the hub to check the concentricity of the other wheel bearing hole. Doing this, we found both the front and rear hubs had the second bearing diameter .008- .010 off center from the drum side bearing. Instead of boring and resleeving the off center bearing hole to attain concentricity, we just bored the hub to fit a slightly larger double row bearing. After pressing in the new double row bearing, our wheel (and brake drum surface) spun perfectly true on both the truing stand, and the lathe. This hub was now perfectly true, and would offer full brake shoe contact with the brake lining.
In addition to all this hub preparation, we also fit the brake shoes. Fortunately, EBC still makes high-performance brake shoes for the stock 150mm brakes of the Bighorn. While these shoes are made of a very good braking material, they are far from being a "optimum" shape. With that, we mounted them on the backing plate a opened them to the hub diameter to give the the ideal "arc" contour for full contact with the liner diameter in the hub. We offer this service for owner who do not have the equipment.
 |
 |
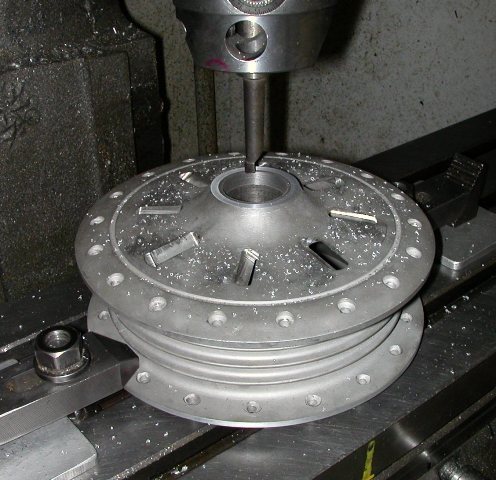 |
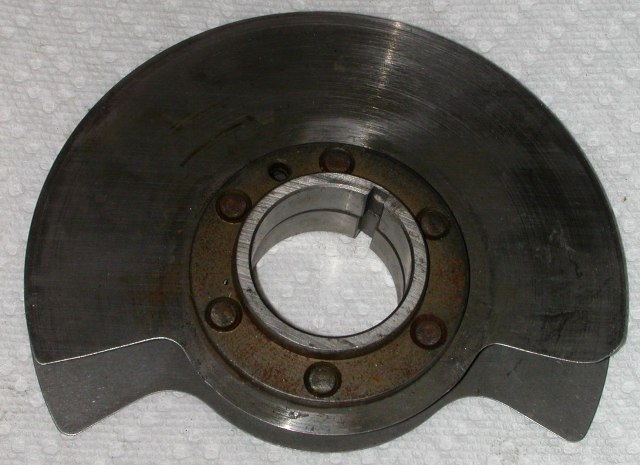
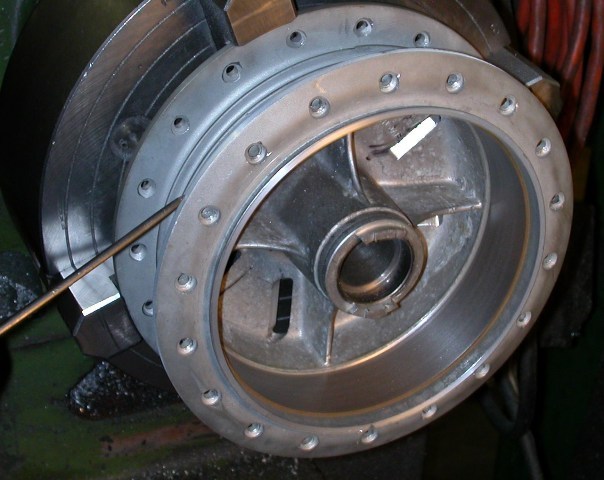
| The diameter cut concentric with the left bearing diameter. Note air vent louvers | The other surface cut square and concentric to the wheel bearing diameter. | The centered hub being bored with a perfectly centered wheel bearing hole. |
Brake Cooling - No matter what front brake you are running, fading from heat can become a problem. Many road racers fit a scoop of some kind on the backing plate to bring in cooling air, while others swiss-cheese the backing plate to get cooling air in. Since our Bighorns would also be used for street use, we wanted to offer good cooling for the brake while minimizing the opportunity for large debris to find its way into the brake. With that, we cut angled air inlet slots into the hub that would pull in air as the hub rotated. We then drilled some air exit holes in an area of the backing plate that would not comprise the rigidity of the cam and pivot points. After very little riding, there was a visible brake dust trail coming out of the air exit holes on the backing plate and we got the cooling results we were looking for.
 |
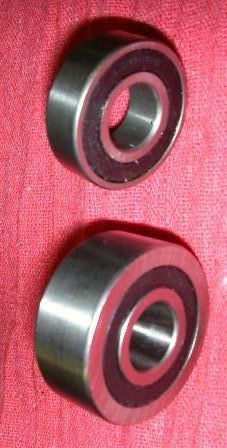 |
| The first skim cut of the painted brake shoes shows how "not flat" the new surfaces are. | The new double row right wheel bearing vs stock. |
About Brake Cable Routing - Multiple large radius bends in the front brake cable lead to a mushy feeling brake, and compromised brake effectiveness. To minimize the number of these bends in the front brake cable, the front brake anchor should be made to a length that sets the cable parallel to the fork leg. The cable can then be firmly secured to a cable holder at the top of the fork slider to further reduce cable movement. The end result is a front brake cable that has only one 90 radius as it mounts to the lever perch. This single 90 radius will net the least amount of cable movement, and significantly improve the positive feel of the front brake. (see photos above).
The Finished Race Prepped OEM Brake On the Road - Like any fresh brake, it requires some seating. Since our Bighorns were registered for street use, we took a an 80 mile road ride to help seat in the 150mm front brake of our bearing-aligned hub. After this seating, we found the perfectly trued 150mm SLS brake to be within a hairs-breath as good as our old CB450 DLS brake. The only downside was that it faded slightly if we did repeated high-speed to first-gear stops (that do not exist on any track). At the very tight and technical Miller Motorsports track, our 220lb rider never experienced the feeling of running out of brakes. The biggest difference was the increased use of the rear brake. With our big 200mm DLS Honda brake, we used the rear brake only for trail-braking purposes. With the upgraded stock SLS brake, the rear brake needed to be used as a true stopping force during high-speed to low-speed stops. One unexpected advantage of the SLS front brake was safer braking into turns. The old 200mm DLS brake was so touchy, that there was a risk of locking the front wheel if the brake was used heavily entering a high speed turn. The less violent grip of the SLS brake allowed for full grip front braking deep into the turns with a nearly non-existent risk of locking the front wheel. All in all, the AHRMA rule did not change the braking force of our Bighorn . It just made that braking force much more expensive (in shop time) to achieve. For those that do not have the equipment to do this front brake mod, Klemm Vintage offers this service.
DETAIL STUFF
Pegs and Controls Shift Linkage - Footpeg location is very much a rider preference issue, especially on a machine that is intended for street and track use. We set up one of our Bighorns with the stock peg location and it actually worked fine. On our second bike we hoped to move the pegs up and back slightly for a bit more ground clearance. Since the AHRMA production rules require using the stock foot peg mount point, we merely extended the peg holders mounted to those points. While the riding position was very comfy, our peg on the right significantly shortened the kick starter movement range, and the left peg put our shift lever in the perfectly wrong place. It wasnt a big problem to learn how to kick start the bike with the shorter movement, however the shifter was more complex.
One of the problems we also wanted to solve was that of seriously bending the shift shaft any time the bike falls on its left side. The stock shift shaft is very soft metal and bends easily .and it is a day-ender when it happens. In the end, we fabricated a lever linkage setup that pivoted the shift lever on a needle bearing at the peg shaft itself. We experimented with different length levers, and ended up with 5.5 center to center (which most stock bikes are). We also made the actual foot pawl of the lever a changeable ¼-20 stainless bolt. With this setup, a left side fall would break off the (easy to replace) bolt without harming the shift shaft or shift lever . And it worked great. On the practice day at AHRMA Miller Motorsports 2010, this bike lost rear traction exiting turn one, and the fall broke off the ¼ bolt as planned. In the pits, we easily installed a new ¼ pawl bolt, and found that no other parts of the linkage (or shift shaft) had sustained any damage at all more than could be said for the riders ego.
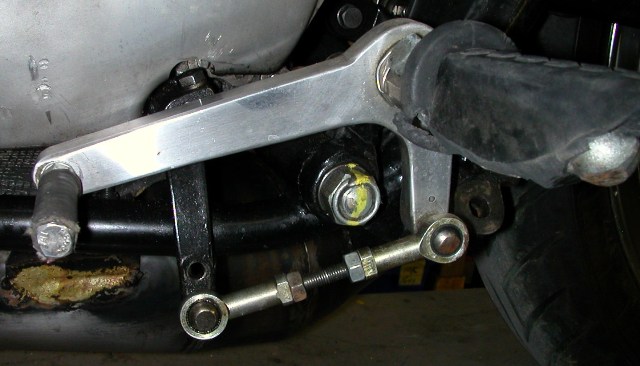 |
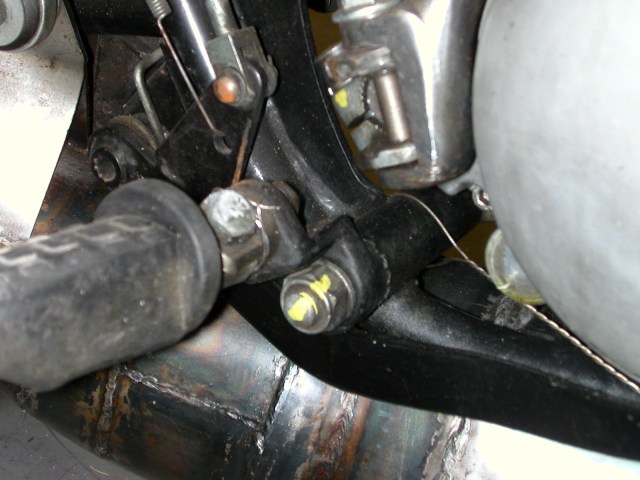 |
| The unrefined, but very functional, linkage of our raised peg setup. | The raised right footpeg. We fit Buell pegs on both sides. |
Handlebars - To say the very least, the stock Bighorn bars are not suitable for street sport riding, nor road racing. While clubman type bars were great for our record runs at Bonneville 2011, they offered a very uncomfortable position for road racing. After trying many different handlebars, we felt most comfortable on the street and track with Renthal #754 handlebars. These low rise bars offered excellent turning control at all speeds, and still allowed a semi-laid down riding position for the long straight-aways.
Chain and Sprockets - The stock Bighorn runs a 525 pitch chain that is very suitable for racing applications. We recommend to use a non-O-ring chain to avoid the power robbing resistance that they offer. In so far as sprockets, there are some important choices. We always selected gearing that allowed the use of a 15 or 16 tooth countershaft sprocket. Doing so helps to avoid using ridiculously, small rear sprockets. Our Elite Bighorns (with the close ratio F81m transmissions) ran 16/35 at fast tracks, and 15/36 at tighter tracks. Our GP Bighorn ran 16/28 to 16/30. It bears noting that the chain will make physical contact with the clutch rod when a 16 tooth countershaft sprocket is installed. To avoid this contact, we turned down a portion of the clutch rod to offer proper chain clearance. While the turned down rod may look a bit fragile, we never had any issues or failures related to them (even when running the heavy duty H1 clutch springs).
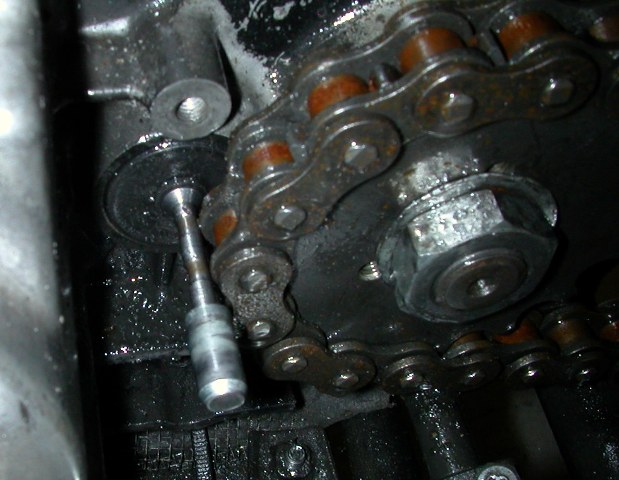 |
This photo shows the chain mounted on a
16 tooth countershaft sprocket that will make contact with the stock
diameter clutch rod.
This turned down rod allows ample clearance for the chain (The rusty chain rollers are a standard part of a week at Bonneville ... the salt gets into everything). |
Instrumentation - While the stock Bighorn instruments have a very classic vintage look, their gross inaccuracy makes them close to worthless as tools to help an owner do fine tuning of a high performance machine. For serious performance oriented owners, we recommend to remove the stock tach and speedo (along with all their heavy drive mechanism components), and replace them with lightweight modern instruments. We consider any non-digital tach to be not precise enough to help do any meaningful tuning. Our favorite choice for a digital tach is the TinyTach commercial model. Besides an excellent readout that updates ever ½ second, this very durable and affordable digital tach has a built in reset able hour meter, as well as a highest peak rpm indicator. While the readout numbers are not as large as we would like, this tach is still the best combination of affordability, durability, and visible readout.
Speedometer - For owners that feel a strong need to have a speedometer, we recommend a non-wireless bicycle digital speedometer. Non-wireless is important because some cdi ignitions will talk to a wireless unit. The non-wireless models (without cadence and heart-rate) are very durable and effective, and can be found with large digital displays.
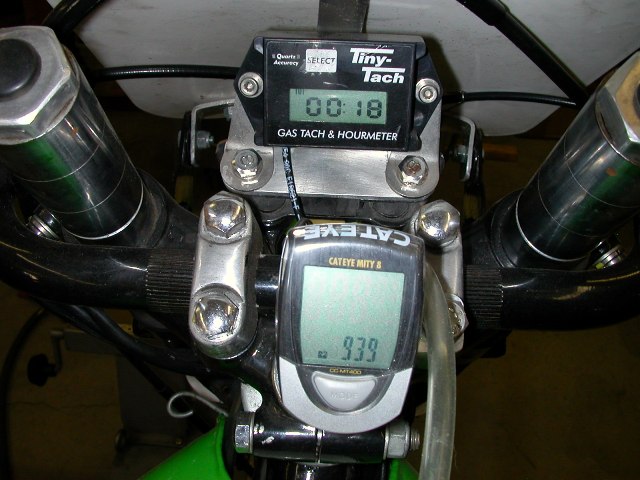 |
The center mounted Tiny Tach digital
tach has it's own power source, and pulls signal data from a wire
wrapped around the spark plug wire. The "non-wireless bicycle speedo is functional and visible. |
Petcock - Most F5/F9 models were built with a vacuum actuated gas-tank petcock. The original intent of these over-engineered petcocks was to help avert the crankcase being flooded with fuel by a poor sealing carburetor needle and seat. Unfortunately, the petcocks often malfunctioned, and caused a litany of other fuel system problems.
We recommend to replace the petcock with a non-vacuum aftermarket model from Reproduction Decals in Canada. Their replacement petcocks are affordable and very functional.
Number Plates - AHRMA (and many other organizations) require that three 8x10 number plates be mounted on production style machines. It was our intention to be able to quickly convert out Bighorns from race use to street use, and vise versa. Given this, we configured our number plate mounting to be very quick to change. At the rear, we mounted the number plated to the stock blinker light mounts via a single 8mm bolt. To keep the rear plates from flapping about or cracking, we attached them via an L shaped aluminum mount plate they worked great. We decided to mount our front plate in the upright position in an effort to help give the rider a bit of aerodynamic cover. We fabricated a lower mount that attached to our headlight ears, and made a single center mount for the top that held the plate at a nicely slanted angle. The front plate was both easy for scorers to see, and at the same time it was casually aerodynamic.
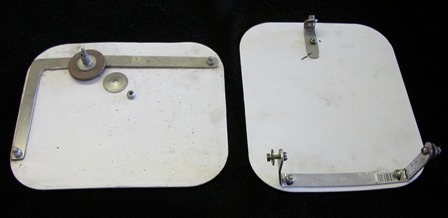 |
On the left is the rear number plate(s)
with a spacer to fit closely in the blinker hole on each side of the
frame. The front plate mounts quickly on the headlight ears and instrument bracket. |
Fenders - Normally, fenders dont merit mentioning unless you race AHRMA Production class. The AHRMA Production rules specify that fenders must be untrimmed. At Miller Motorsports 2011, our 60 year old, 220lb (dressed) machinist raced our Bighorn and was 5+seconds a lap faster than anyone else in the class. After the race was over, we learned that AHRMA road race referee Will Harding found the material trimmed from our front fender to be such an egregious violation of AHRMA rules that it merited immediate disqualification and loss of points. If fender trimming made for a significant rider safety risk (or competitive advantage), this would be a good rule . But every thinking person on earth knows that is not the case. Despite this being the stupidest reason in the world to disqualify an enthusiastic racing member know that AHRMA road race referee Will Hardin will do it.
Seat - The stock Bighorn seat has the thick foam padding that is standard for any dirt bike of the period. This thick foam significantly raises the riders center of gravity, as well as raising him into the air-stream of wind resistance. On our Bighorns, we completely removed the stock padding, and replaced it with a 1 thick dense foam pad. The stock seat cover can easily be re-fit over this thinner pad to give a semi-stock appearance. While this new seat is certainly firm, we have done numerous long road rides with them with no great discomforts. From a racing standpoint, the lower seating position helps to get the riders shoulders more behind the handlebars, and that makes for much better steering control.
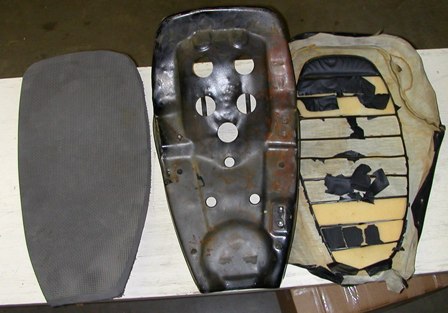 |
The raw metal seat base shown with the
1" thick dense foam pad to the left. The stock seat cover
(right) fits nicely over the thinner pad. It's a very "Spartan" setup that is focused on speed and handling ... we ride our other motorcycles when we seek opulent comfort. |
Tires - In our 2010 season, we raced with Avon Road Runner tires (100/90 front , 110/90 rear). These tires worked great for street riding, and surprisingly well for road racing. The following year, we fitted Avon AM series road race compound tires (90/90 front 110/80 rear). The road racing tires made a huge difference in grip and confidence in high speed turns. While the AM tires are a bit expensive, they are certainly worth every cent of the money.
Street Lighting - The ignitions we chose for our Bighorns had no charging system. Given that, we installed a battery with our street lights that operated the stop light and nothing else. While that is a bit cowboy, it make for good basic safety . As long as you always get home well before dark we do.
|
|
|
|
Blue Print engine Assembly and Pressure test |
575.00 |
|
Tiny Tach Commercial |
79.00 |
|
LOWER END MODIFICATIONS |
|
|
|
60.00 |
|
Crankcase Bearing Re-Sleeve |
|
|
"First-Year Crankshaft Machining (to accept late model crankpin) |
150.00 |
|
OEM Yamaha Rod Kit |
145.00 |
|
Hot-Rods Yamaha Rod Kit |
110.00 |
|
Stainless Steel Top Rod Spacers (for Elite Crankshaft) |
90.00 |
|
Allen Bolt Kit |
45.00 |
|
Basic Crankshaft Rebuild (Labor) |
60.00 |
|
Elite Crankshaft Modification and Rebuild (Labor) |
160.00 |
|
Clutch Shaft Mod for 16 tooth C/S Sprocket |
20.00 |
|
|
|
|
Crank Machining and Adaptor Plate for 2000+ KX250 Ignition |
300.00 |
|
Air Cooled Ignition Cover Modification |
90.00 |
|
Air Cooled case adaptor |
60.00 |
|
Air Scoop with Clamp, Spacer, & Flex Hose |
49.00 |
|
|
|
|
30-34mm Rotary Valve Cover Modification |
115. |
|
38mm Rotary Valve Cover Modification |
165. |
|
Rubber Manifold Clips |
30.00 |
|
Small Body 30mm Rubber Manifold and Gasket |
18.00 |
|
34/38mm Rubber Manifold and Gasket |
25.00 |
|
OEM 30mm Carb Rebuild, Jetting, Blueprint and Safety Wire Drilling |
180.00 |
|
Prejetted 34mm Carb with Blueprinting and Safety Wire Drilling |
135.00 |
|
Prejetted 38mm Carb with Blueprinting and Safety Wire Drilling |
149.00 |
|
In-Line High Volume Fuel Filter |
9.00 |
|
Crank-Case and Rotary Valve Porting for 38mm Carb |
120.00 |
|
Cylinder to Case Transfer Port Matching |
130.00 |
|
|
|
|
Rotary Valve Cut for stock port cases (specify recreational, sport-café, or Elite) |
45.00 |
|
Rotary Valve Cut for 38mm ported Cases (Elite and GP) |
45.00 |
|
|
|
|
TOP END MODIFICATIONS |
|
|
|
|
|
Cylinder Boring , sizing & Chamfering |
75.00 |
|
Cylinder Boring with Top and Bottom Gasket Surface truing |
135.00 |
|
|
|
|
Recreation Modified Forged Piston with rings, wrist pin, & circlips (81.0 ,81.5 82.0 , 83.0) |
170.00 |
|
Sport Café, Elite/GP Modified Forged Piston with rings, wrist pin, & circlips (81.0 ,81.5 82.0 , 83.0) |
198.00 |
|
High RPM Wrist Pin Bearing |
38.00 |
|
|
|
|
Cylinder Porting - Recreational |
250.00 |
|
Cylinder Porting and Piston Modification Sport Cafe |
280.00 |
|
Cylinder Porting and Piston Modification Elite (Stock Pipe) |
300.00 |
|
Cylinder Porting and Piston Modification GP (Race Pipe) |
300.00 |
|
|
|
|
Cylinder Head "Recreational" Mill and Squish cut |
150.00 |
|
Elite / GP Head Mod (welded dome, center long reach plug hole |
250.00 |
|
One Piece GP Exhaust Manifold |
120.00 |
|
Two Piece GP Exhaust Manifold |
170.00 |
|
|
|
CHASSIS PRICE LIST
|
|
60.00 |
|
|
|
|
Fork Leg Inspection & Truing (2 legs) |
60.00 |
|
Complete Fork Leg Disassembly and Re-Assembly (pair) |
60.00 |
|
Lower Triple Clamp Inspection & Truing |
70.00 |
|
Tapered Roller Steering Head Bearings |
49.00 |
|
Machine Fit Tapered Bearings to Steering Stem |
80.00 |
|
|
|
|
Needle Bearings Set for Swing Arm |
75.00 |
|
Install Needle Bearings in Swing Arm |
40.00 |
|
|
|
|
Grade 8 ½ Motor Mount Bolt Kit |
39.00 |
|
|
|
|
Fit Wheel Bearing Spacer & install Sealed Wheel Bearings (labor only) |
40.00 |
|
Brake Shoe Arcing and Dust Cut |
85.00 |
|
Wheel Bearing Alignment Machining |
120.00 |
|
Brake Drum Turning |
50.00 |
|
DLS Axle Modification (to fit Hatta Forks) |
130.00 |
|
Wheel Lacing & Truing (Labor only) |
95.00 |
|
|
|