CZ Technical Overview by Harry Klemm www.klemmvintage.com
Preface - Vintage Motocross racing has seen an increase in popularity that no one could have foreseen nor predicted. While CZ MX racing bikes were not the most popular brand during the 70's heyday of USA motocross, they were certainly a prominent make in the years just before the mid-70's explosion of MX popularity. In today's vintage MX world, , CZ race bikes now seem to be experiencing a bigger percentile of popularity than they enjoyed "back in the day". That popularity is not just based on nostalgia, it's based on manufacturing and design that has stood the test of time. Unlike the lightweight and "very perishable" Japanese racers of the day, production CZs were built to be durable first ... and everything else afterwards. It could be easily argued that the 1970's CZs were such durable bikes because they were generally not very fast. But the truth is that CZ engines could easily be made to run plenty fast, and still be reliable .... but accessing that power does require some attention to detail.
This page is not intended to be the last word on tuning or building the popular CZ vintage motors, but rather a hindsight technical view on how to attend to CZ mechanical problem areas and mechanical details. A current day vintage CZ MX racer can easily be built to be easy starting, fast and reliable. For sure, handling and chassis setup are also a huge part of building a fast MX racer .... But this author is not qualified to address all those chassis issues. I'll be happy to let someone else write "that" page.
Old World Tuning vs. New World Tuning - When I first starting tinkering with 2 strokes in 1970, there were two very different sets of tuning wisdom. The European approach, and the Japanese approach. At that time, the European traditionalists insisted that the design and tuning-style used on Japanese 2strokes would not work on any European built engines. Even as a teenager, I refused to believe that concept. I knew that all engines were made of metal parts, and every one of those metal parts was subject to the laws of physics. I knew there was no European and Japanese physics. During that same time, Cycle magazine tech editor, Gordon Jennings, released an industry changing book called the 2stroke Tuners Handbook. Gordon's book laid out the "physics" of how racing 2strokes worked ... and with his book, he forever debunked the concept of European and Japanese tuning.
Despite the Jennings book, many tuners of European race machinery still clung to many of their ill conceived "beliefs", and baseless tuning traditions. Time has proven that they were wrong then .... and they are still wrong now. I still contend today that the power of Rex Staten's 1975 USGP CZ400 racer was not a function of tuning that made the engine a short fused time bomb. It was merely the first example of a CZ400 that was built entirely based on proper physics....not old world traditions. The text below carries this same mindset.
Understanding the Goals - Every successful race bike is built to meet the exact set of needs for the competition it will be pressed into. It is safe to say that today's vintage MX races have a completely different set on goals from race bikes built for pro level racing in the early 70's ... and those different needs make for many different tuning choices. In 1975, pro level MX racing was two 45 minute motos ridden by fit and somewhat ruthless athletes, on motorcycles with unlimited suspension travel. Today's vintage MX racing is two 15-30 minute motos, ridden by 40+ enthusiasts, on "suspension limited" motorcycles ..... These are two completely different sports that have very different goals.
For lack of a better title, we refer to vintage MX as "suspension limited sprint racing". The tracks for this racing have fewer high speed sections and fewer "obstacle sections" than current day MX tracks. This form of racing calls for a machine with a very broad powerband, linear power delivery, easy starting and .... easy starting. None of these qualities were on the list of goals for 1975 pro level MX machine. With the relaxed set of performance needs for vintage racing, it's very easy to create a platform that also has excellent long term reliability.
Facing the Biggest Technical Problems - As someone who has done R&D on high-performance 2strokes for 40+ years, the first order of business in racing development is to gather all the specs and performance data from the stock engine platform. Sadly, there are virtually no "bone stock" CZ 250/360/400s in America available to spec and evaluate. Given that, the best that can be done is to spec and evaluate running examples that have been modified with the "prevailing wisdom" of the industry over the years..... and that has been our 21st century starting point.
In short, all the CZ running examples we have worked with in the last 3+ years seem to have the same set of problems. Here is the list :
|
||||||||||||||||||
| Significant leaks at transmission top plate |
SOLUTIONS FOR THE PROBLEMS
AIRLEAKS - During my days of building Kawasaki 350 Bighorn road racing engines, job #1 was to assure that each engine was 100% free of airleaks (for more detailed info on airleak testing, CLICK HERE). We learned that any air leak at all would deliver a seized piston the first time the engine was run at peak rpm in the taller gears. Besides that issue, the airleaks constantly caused inconsistent carburetion, and difficult starting. In 1974 when I started with Rex and his 250/400 CZs, the very first order of business was to check the race bikes for air-leaks .... and there were plenty. Being a naive 19 year-old, I decided to visit the head CZ mechanic at the Pomona dealer we were sponsored by. This mechanic was a "very" old world Czechoslovakian that had "worked at the factory". I explained to him the numerous air leaks in the bikes Rex had been given, and my previous (bad) experiences with air leaks. After a short and abrasive conversation, I realized that he had never heard of air-leak testing, and he had never air-leak tested any engine he had built. Within minutes, I was invited to leave his shop, and never come back. I don't think he was a bad guy nor a bad mechanic, but he was a product of the European mindset of the day ... and being open minded was not a part of that mindset. All that said, it is impossible to overstate the importance off eliminating every airleak.... no matter how small it may be. Air leaks never heal .... they only get bigger.
Anytime we suggest to a current-day client that their issues may be caused by an air-leak, the standard response is "there can't be an airleak, because I just had the engine rebuilt with new seals". It's worth noting that every CZ we have rebuilt in the 70's (and recently) has had numerous airleaks in unexpected locations. The rebuilding process is not an assurance of no airleaks .... It's just a formality we go through so that we can begin finding and sealing all the air-leaks yet to be found.
It's important to understand, about 90% of the CZs at a track on any given race day have numerous airleaks .... and don't seize a piston ....why?? An air-leak will only deliver a scored piston if the engine is held at high-rpm/full-load for 20-30 operating seconds. In "suspension-limited" vintage MX racing, very few 250/open class CZs get run at high-rpm in the taller gears, and so they never seize .... they just run crappy and start hard.
One of our recent CZ400 clients, brought us an engine that he had rebuilt two seasons earlier. He said the engine had worked fine for those two seasons, until he let a young pro-racer take it out for a few laps. This young pro took a couple of laps to get used to the bike, then opened it up to see what the max ability of the bike was.... Within two laps, it seized a piston. Our first instinct was not the see the scored piston, but rather to pressure test the engine. We quickly saw that there were several external air-leaks ..... and the nearby wet-dust trails told us that these leaks had been leaking for a long time. The hard truth was that this engine was likely air-leaking from the day it was rebuilt, but in never seized a piston because it never got run hard enough to do so. The piston seizure took place because the young pro rider easily had the skills to run the engine at a high-rpm` pace that this engine had never seen before.
.jpg) |
 |
.jpg) |
| ABOVE -
Every CZ we pressure tested air-leaked at the stock 2-piece
spacer/washer in the left crank seal, and most air-leaked between the
case and the alloy seal holder (the leak is visible at 12 o'clock). BELOW - We fabricated a 1-piece version of the two parts, and added an "O" ring to perfectly seal off the air leak. It is a close tolerance part ... but it was the only way to consistently seal the leak. |
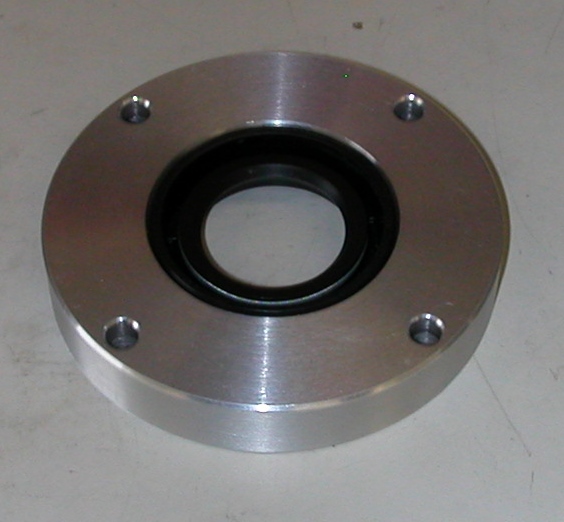
ABOVE - After years of
use, the stock "tin" right crank bearing retainer plate was bent .015"
from the ID to the OD. The bending of this plate caused a major air
leak, and allowed .015" of additional crankshaft side play. BELOW - We fabricated a billet alloy crank seal holder to replace the stock two-piece tin holder. |
ABOVE - The bearing side
of our billet right crank seal holder was perfectly flat and sealed off
the airleak without the need for the stock gasket. The alloy holder
will never bend as the tin plate did. BELOW - The new billet seal holder was made to capture the crank seal. |
.jpg) |
.jpg) |
 |
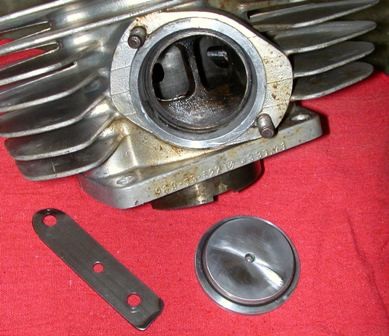
Airleak Apparatus - Likely one of the reasons that few CZ engines get pressure tested is because the tooling to properly seal off the exhaust port is not simple. We made a couple of versions before finding the setup that sealed consistently. The final version was an aluminum puck whose diameter fit very closely into the machined diameter on the cylinder. Even with the close fit, the plug was not airtight, so we fitted an "O" ring that finally made for a perfect seal. The plug was held in place by a simple steel strap. While the fabrication of the plug was a bit close tolerance, the compact design of the block-off allowed for easy sealing of the exhaust port with the engine still in the chassis.
 |
.jpg) |
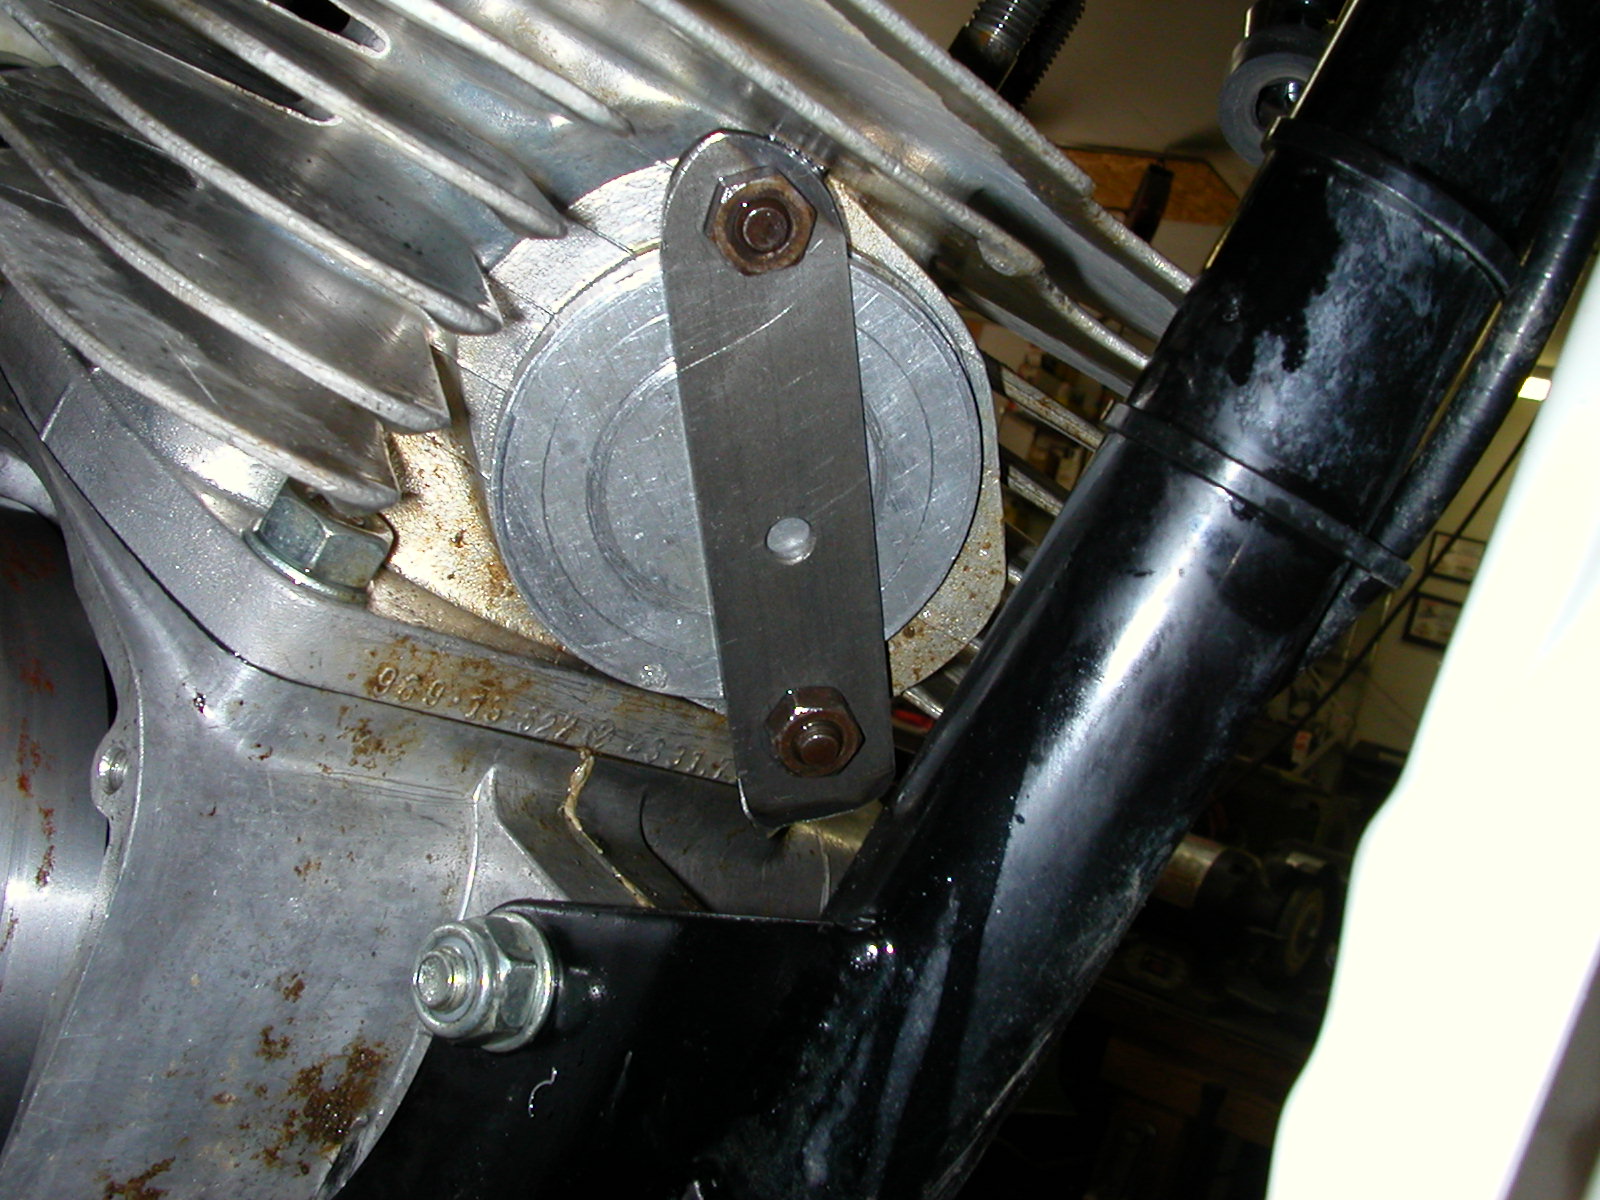 |
| The step on the alloy plug is shallow, so the "O" ring was mandatory to get a proper seal. | Even with the "O" ring, the diameter in the cylinder needed to be thoroughly cleaned of carbon and oil. | The two piece block-off easily clears the chassis for "in frame" pressure testing. |
Some versions of the CZs employ a steel sleeve for the exhaust pipe to slip over. Sadly, these stock sleeves are thin-walled, and not made of very good material. Given that, the stock sleeve is nowhere near airtight enough for pressure testing. With that, we opted to remove the battered stock sleeve and replace it with thicker chromoly sleeve. Fortunately there was enough material in the cylinder casting for us to bore to a slightly larger diameter. This increased the wall thickness of the part of the sleeve that pressed into the cylinder, The sleeve was easily port matched to the existing exhaust port. Most importantly, the new sleeve made for a 100% airtight fit to the cylinder that allowed for prefect pressure testing. We simply blocked off our new sleeve by fitting a common automotive expanding rubber freeze plug inside it.
.jpg) |
.jpg) |
.jpg) |
| The stock exhaust sleeve on left was far from an airtight fit. | The new bored diameter of the cylinder ready to accept the pressed in sleeve. | The chromoly sleeve in place. |
Excessive Compression- The most surprising thing we have learned about current day CZs is the abundance of machines that are setup with compression ratios that are ridiculously high. To be sure there is a technical means of calculating the mechanical compression ratio, but more commonly a compression gauge reading is used to choose a safe ratio. We are not big fans of compression gauges (because of the variation in gauge readings). However a properly done compression test can be very helpful data in the diagnosis of an engine setup .... The key phrase is "properly done" (for detailed info on properly done compression reading CLICK HERE)..
Again reaching back to our 350 Bighorn roadracer days, we learned that the only valid compression test of a 250/open class 2stroke engine, is a "2 man push test" using a high quality "screw-in" type gauge ..... here is why. The kick starter on all 250/open bikes have varying ratios that allow for acceptable start up speeds ... but far from acceptable speeds for consistent and repeatable compression measurement readings. The 2 man push test yields 100% accurate and consistently repeatable results. Depending on gearing, the bike is pushed by two healthy boys for 30-50 feet in 1st/2nd gear at jogging speeds with the throttle being held wide open. This is the only method that results in accurate and repeatable data. The likelihood of getting an accurate and repeatable compression reading while "kicking" any CZ motorcycle is absolutely zero.
Every running CZ 400 we have recently push-tested had 220-240 psi of compression.... needless to say, that is ridiculously high. No open class 2stroke on earth needs more that 180psi (2man push test) to make optimum horsepower. Running higher ratios results in reduced high rpm performance, increased detonation risk, and near impossible starting. The only way to kickstart an open class 2stroke that has 220+psi compression would be by installing a 4+ pound flywheel that offers the rotating inertia needed to get through a 220+psi compression stroke. The 400s we recently tested were, in fact, equipped with these ridiculously heavy 4+ pound ignition flywheels. Here again, no open class MX race engine on earth "needs" a 4 pound flywheel to deliver any version of torque or linear power. It bears noting that we also push tested a CZ125 that came to us with 260psi compression ... needless to say, much too high for any 125 racing application.
The best that we can imagine is that someone (who knew nothing about 2man push tests) set the compression on these 400s via a kick-start compression test. After unwittingly setting up the machine via a kicking compression test, the resulting compression ratio made kick starting near impossible. Given that, they fitted a 4pound ignition rotor so that kickstarting was possible. This is a classic case of doing two large technical wrongs, hoping to make a right. It is important to know that powerband width and power delivery of any 2stroke is a function of port timing choice and expansion chamber design. The rotating mass of the ignition flywheel is in no way connected. After analyzing these recent over-compressioned CZ400s, we reconfigured the port layout for a broad powerband, reduced the compression to 180psi, and cut the ignition rotor to 3 pounds. We would have taken more weight from the flywheels, but the flywheel construction was not known. Either way, the end result was an engine setup that was cooler running and higher revving (because of the reduced compression), and accelerated much stronger (because of the lighter flywheel) This new "lower compression" setup had great power delivery (because of the changed port timing/area layout), and very strong acceleration (because of the lighter flywheel). It was a win-win on every level. It bears noting that in 1975, we used a Snap-On gauge and a 2man push test to set Rex Staten's USGP CZ400 at 180psi ..... it was fast enough to out run Roger D.
Cylinderhead Dome Design - Many European MX engines of the 60s/70s used cylinderhead domes with a "trench" type head dome, or an off-set hemi dome. As time and technology played out, both designs turned out to have no measurable performance merits, and very high detonation risks. The popular means of dealing with this design problem was to fill the head dome in with weld, and then cut in a well proven concentric "hemi" dome, with a close clearance squish band. This mod is neither new nor revolutionary, but is very functional. The result of doing this modification on a CZ is a dramatic reduction in detonation risk that often offers the luxury of slightly advancing the ignition timing (to get a broader powerband). If your CZ does not have this updated head dome, it needs one.
.jpg) |
.jpg) |
.jpg) |
| The stock CZ400 head offset dome | The welded and recut "centralized" hemi dome. | A view of the head from the outside shows the new centralized spark plug location. The old plug holes were welded up. |
Inlet Issues - All CZs of the 60s/70s came stock with a "piston-port" type inlet. In a piston-port inlet, the inlet port timing is controlled by the rear piston skirt exposing and blocking off the inlet port. Piston ports are the ultimate in simplicity, and a well configured piston port can be made to produce very respectable peak power, along with a wide powerband. It bears noting that production Honda CR250's were not fitted with reed valves until 1978, and Suzuki RM250s were not fitted with reed only inlets until 1981.
Since the 70's there have been many aftermarket offerings that converted a CZ to a reed-valve type inlet (as was used on Yamahas of the day). The premise is that a reed valve offers more overall power, and a wider powerband than a piston-port .... and we take exception to that. The truth is that a cylinder with a "well designed reed inlet" CAN offer slightly better overall power than a "well configured" piston port inlet. That said, many of the aftermarket reed kits offered are not a re-designed cylinder, but rather a stock piston-port cylinder with a reed assembly fitted to it. This kind of fitment can certainly work well, but it is far from an ideally designed reed valve cylinder. It is our opinion, and our experience, that a well configured (CZ) piston-port cylinder can easily match or exceed the power output offered by a "technically less than ideal" reed valve cylinder. In addition, the piston port arrangement offers easier maintenance and fewer opportunities for break-downs .... here is why.
Inlet "Signal" - Every 2stroke, regardless of inlet design, shares a few basic inlet functions and needs. As the piston travels upward from bottom dead center, it creates a "negative pressure" in the lower end (engineers hate when you call it a vacuum ... but it kinda is). At the moment that the inlet port opens, a negative pressure wave travels up the inlet port to actually draw fuel though the jet circuits of the carb, as well as air in from the airbox. The lower end of each 2stroke can only create a certain amount of negative pressure, so it's important to avoid weakening that negative pressure wave. One of the worst enemies of this precious negative pressure wave is excessive inlet port volume. In a well designed reed cylinder, the engineers go to every length to reduce the inlet port volume. They move the reed cage as close to the piston as possible, and they minimize clearances between the cylinder casting and the reed cage. On top of that, there is much attention given to making the carb holder as low volume as possible, and air-guides (reed stuffers) are fitted into the reed cage itself to help preserve inlet signal.
In a "bolt-on" type reed application, it is often difficult to get the reed cage close enough to the crankcase (especially on a CZ cylinder), and the increased inlet port volume not only harms inlet signal, but it also delays reed petal response times. On the carb side of the reed cage, many aftermarket manifolds unnecessarily add considerable volume to the inlet passageway. All these increases in inlet tract volume do not make the bolt-on reed valve worthless, but they certainly do sap away much of the available benefits that would come with a properly designed reed cylinder/inlet.
Stock CZ inlet manifolds are far from optimum, but they have "reasonable" inlet tract volumes. Sadly, the most common modification made to most CZs has been the installation of an aftermarket inlet manifold that allows the easy fitment of a Mikuni carburetor. In the 70's, very few aftermarket folks understood inlet signal, and how easily signal can be harmed. The well meaning designers of these aftermarket Mikuni inlet manifolds, increased the inlet length to allow the Mikuni carbs to more easily reach the airbox, and they also increased the internal passageway to accommodate the bigger carb throat sizes. The result was an inlet manifold with over double the internal volume of a stocker. This huge increase of inlet port volume greatly weakens the inlet signal. This weakened signal makes for diminished throttle response, more temperamental jetting, and harder starting. Sadly, virtually every piston-port CZ has been fitted with one of these performance killing aftermarket inlet manifolds..... who knew.
For our CZ400 package, we fabricated a short billet inlet manifold in an effort to get inlet passage volume to an absolute minimum. We fitted our billet manifold with a snow-mobile grade Mikuni rubber carb mount to avoid the rubber tearing failures so common to the less durable motorcycle versions. The end result was reducing total inlet manifold volume to 33cc from 86cc. The changed carb position did require a longer tube between the carb and airbox, but added length in that area has zero impact on inlet signal or performance. The end result of the modification was much easier starting, better low speed carburetion, and noticeably quicker throttle response. It bears noting that we also made a similar inlet manifold for the 1975 Rex Staten USGP bike, but Rex's dad wouldn't let us try it because the jetted bike was already faster than any open bike around .... I was only 20 years old, and Rex's dad was boss.
.jpg) |
.jpg) |
.jpg) |
.jpg) |
| The carburetor side of the two inlet manifolds | The cylinder side of the two manifolds shows the obvious difference in length. | While the snowmobile grade rubber inlet does add a bit of inlet volume, the reliability it offers makes that an easy trade-off. | The carb mounted on the new manifold does carry a slight angle, but that angle is no consequence to performance or carburetion. The longer airbox hose is visible. |
Inlet Signal 2.0 - Every CZ400 we have seen in recent years has a major inlet "mistake" that also hurts inlet signal and overall performance. The well meaning folks that did the cylinder porting got careless and cut an inlet port shape that did not match the piston skirt profile (see photos). On a well configured piston-port inlet, it is very important for the full width of the inlet port to be exposed as suddenly as possible. This allows the inlet signal to move towards the carb at maximum strength. The strength of the inlet signal is greatly weakened by a "partial opening" of the inlet port (as was the case here). This partial opening (and closing) accounted for about 20' of crank rotation .... that is a very long loss of inlet signal. As it turned out, we were able to cut the piston skirt to match the profile of the inlet port shape, and still fall within the port timing range that was needed to offer a wide powerband .... it was a lucky break.
.jpg) |
The photo to left clearly shows the partial opening of the inlet port at the bottom outside corners. This slow and gradual opening of the inlet saps away very valuable inlet signal. Conversely, on the port closing side of the cycle, the gradual port closing serves to reduce the crankcase compression that drives fuel/air mixture into the combustion chamber. |
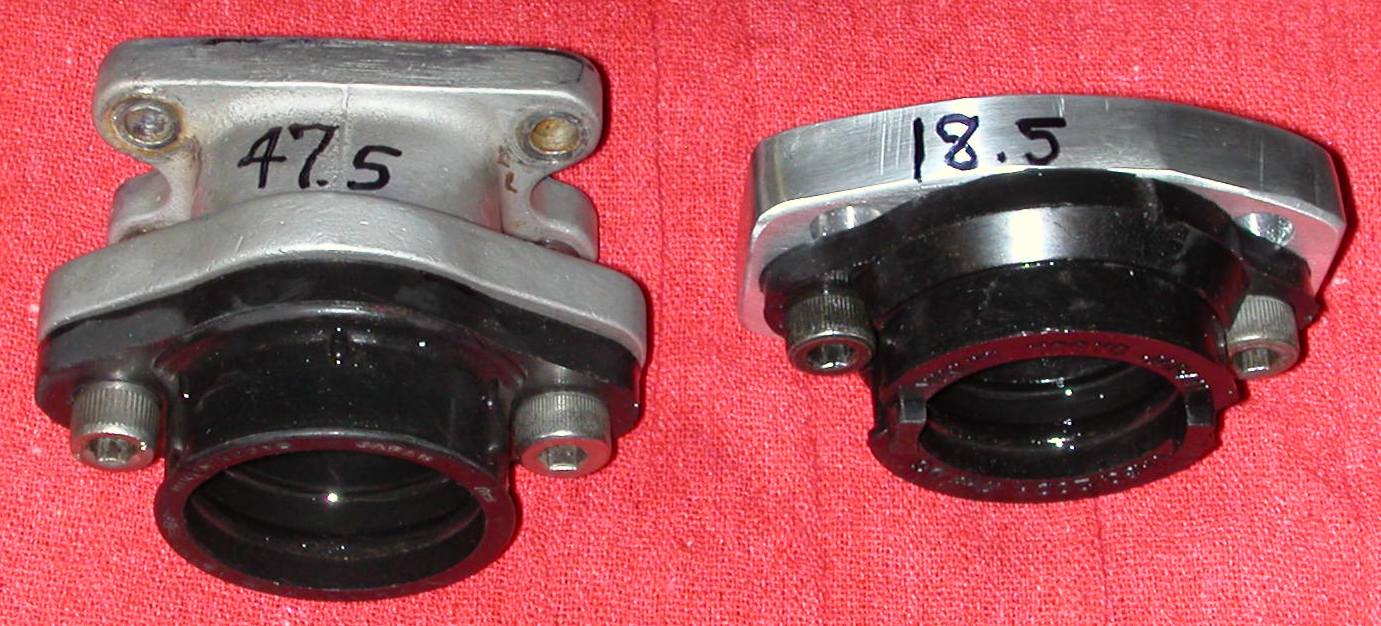
Eliminating all the aftermarket inlet problems in the "common" CZ piston port inlet system made for a huge improvement in throttle response as well as a noticeable increase in overall power (to say nothing about the much easier starting). We would respectfully submit that our "improved" piston port inlet would be an easy performance match for any of the aftermarket reed valve conversions we have seen ..... and a fraction of the price to boot. We did a similar manifold/inlet modification on a CZ125, and got similarly great results.
 |
 |
 |
| The pic above shows the CZ125 stock inlet manifold on left, and the low volume billet replacement on right. 47.5cc vs. 18.5cc internal volume is allot on a 125. | Carb view of the billet 125 manifold shows a clean transition to the square port shape. | The 34mm Mikuni carb fits somewhat close to the 125 cylinder, but still clears everything nicely. |
Cylinder Porting - With all the inlet "issues" attended to, The actual cylinder porting layout had several important problems that needed addressing. As mentioned above, powerband width and power delivery are a function of port timing/area choices and expansion chamber design. Thankfully, most of the expansion chambers available for current day CZs are capable of delivering a broad and linear powerband .... they just need a cylinder porting layout that shares the same goals.
Selecting good exhaust and inlet port timings and widths for a CZ cylinder is not difficult at all. However the area where CZs fall short (compared to better designed Asian machines) is transfer port area. One of the big advantages of the reed valve conversions is the ability to significantly increase this much needed transfer port area. Unfortunately, with the installation of most reed valve setups, the added transfer port area comes along with significant increases in total crankcase volume and/or big increases in inlet tract volume. Increases in crankcase volume reduce crankcase compression ratios, which reduces the pressures available to push fuel/air mixtures up the transfer port passages. Increases in inlet tract volume reduces the strength of the important inlet signal as mentioned above .... so what is the solution?
For our piston-port setup, the best way to increase the much need transfer port area would be the use of "boost ports" fed by holes milled into the piston. Piston fed boost ports are a bit more tedious to install, but they have numerous technical advantages over "reed valve added" boost ports. Piston fed boost ports are little more than shallow trenches strategically placed in the rear wall of the cylinder. These small trench ports are fed transfer mixture through milled slots near the crown of the piston. While these boost ports do not move huge volumes of fuel/air mixture, they still have many merits. First and foremost is that piston fed boost ports make a very nominal increase in crankcase volume and no increase in inlet tract volume. In addition to that, these boost ports get their fuel air mixture from holes milled into the piston. Because this mixture passes across the underneath of the crown of the piston, these ports actually help to reduce piston crown temperatures ... and with that reduced detonation risks.
One big problem with a piston fed boost port layout is placement of the holes in the piston. These holes cannot be exposed to the inlet port (at BDC), but they still need to have the volume ability to properly feed the boost port. In the case of the CZ 400, this set of problems is solved by fitting a single ring piston rather than the stock type two-ring piston. Fortunately, quality single ring pistons are readily available from CR Performance. These forged pistons, manufactured for CR by Wiseco, are available in a broad range of sizes. During the 70's, Wiseco pistons were often problematic (for a long list of reasons). However during the 1990s, Wiseco made numerous design and materials changes that have made them a top notch choice that has no compromises at all. The single ring CR pistons worked perfectly for our boost port application, and we strongly recommend them.
.jpg) |
.jpg) |
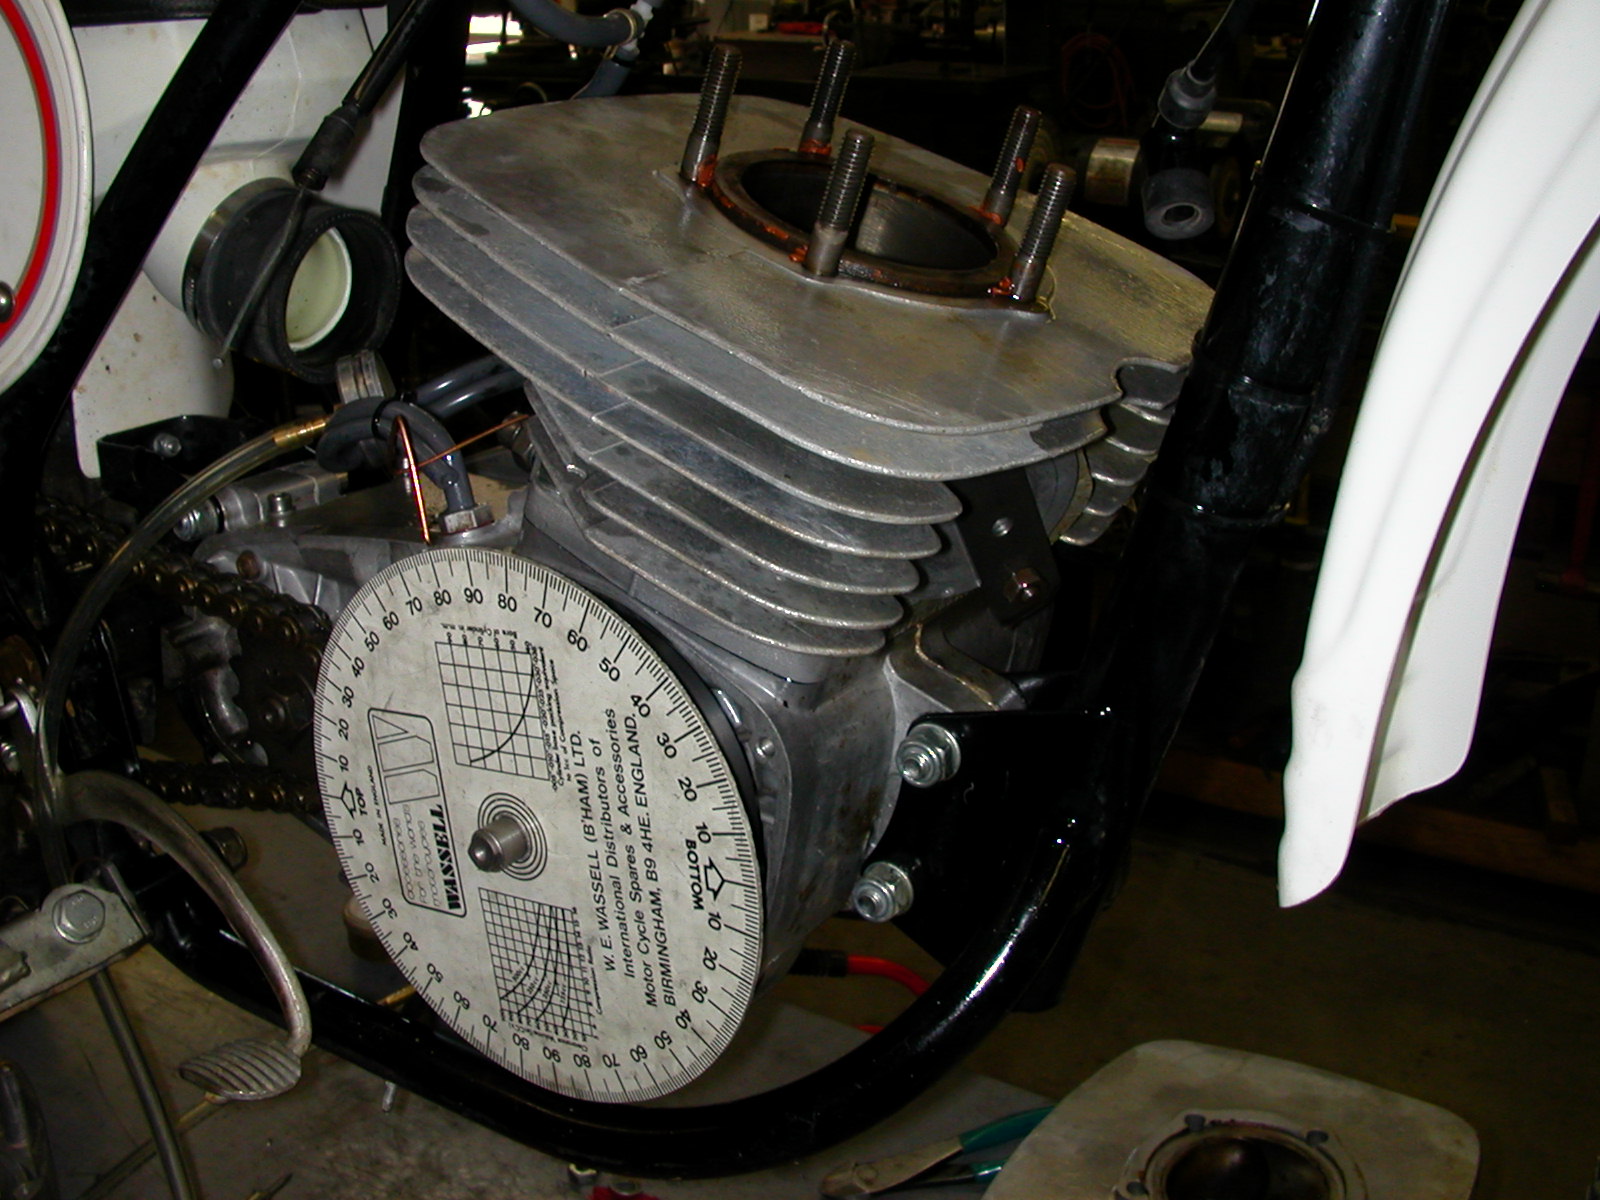 |
| This view down the cylinder shows the added boost ports. A wide port was added to the right, but two smaller ones were placed on the other side to offer an uninterrupted path. for the ring ends | This view shows the boost port feed holes milled into the single ring piston. The scribed lines on the piston show the boundary of the inlet ports at bottom dead center. | A degree wheel is used to plot out the port timings for our project. Behind the cylinder, the pressure testing block-off for the rubber inlet spigot can be seen. Like all our projects, pressure testing is the very first thing we do. |
Excessive Piston to Cylinder wall Clearance - For all the many reasons listed above, CZ motocrossers sadly gained a reputation as machines that often seized pistons for no apparent reason. In many such cases, the well meaning mechanics believed the best way to attend to that problem was the increase the piston to cylinder wall clearances..... and increased clearances is the worst possible attempted solution for the piston seizure problem .... here is why.
The number one cause of most CZ piston seizures is excessive piston crown temperatures from varying levels of detonation. Only catastrophic levels of detonation results in a holed piston, however "limited percentile" detonation merely increases piston temperatures until a seizure takes place. Excessive air leaks do create random lean conditions that can further contribute to the increased detonation rates, but the air leaks do not technically create the seizure .... the temperatures of the increased detonation rate causes the seizure.
A close piston clearance is important because the piston literally dissipates much of it's heat away by shedding it off to the cylinder. The oil film of the premix oil acts as a barrier of sorts that assures that the piston face and cylinder bore never actually touch .... this is why oil film strength is so important. There is no oil that has a stronger film strength than castor based bean oils. Of these, the most modern is Maxima 927. The film strength of 927 is perfectly suited for the high temperatures of an air cooled engine, and it also is a good conductor the heat that the piston sheds to the cylinder.
The normal piston set-up clearance for a forged piston in a CZ400 is .0035"-.004" (a 125 would be about .0025" ). Attempting to run greater clearances makes it more difficult for the piston to shed off it's heat. At the same time, the excessive clearance also results in piston rocking that will quickly collapse the piston skirts ... resulting in even greater clearances and even less heat shedding. Using excessive piston clearanceing to avoid seizure is yet another "doing 2 wrongs to make a right" scenario... don't do it. The proper way to avert piston seizures is by taking every measure to reduce detonation risks.
There is another often over looked issue related to piston/cylinder clearances ... and it speaks to the differences between "mechanical" compression ratios, and "gauge indicated" compression ratios. In an ideal setup on a 400, the piston clearance would be setup properly close (.0035"-.004"). After a gentle break-in, the compression can be tested via a 2-man push test. However if that same engine is set up with excessive piston clearance (.006"-.008"), the indicated compression gauge numbers will be considerably lower. It sometimes happens that a well-meaning technician will set up a cylinder with excessive clearance, and then attempt to get an indicated compression reading. With the loose bore clearance, and large ring endgap, the gauge reading will be much less than normal .... and fool the tech into believing that the "mechanical" compression ratio needs to be increased...... but not so. The correct approach is always to go with the closesest allowable piston clearances, and setup compression with those gauge readings. Taking compression gauge readings from an engine that has excessive piston/cylinder clearances is guaranteed to give inaccurate and worthless compression data.
Transmission pressure Testing - Pressure testing the transmission is not a common procedure on 2-stroke engines .... but it should be. Standard engine pressure testing is done at pressures between 6-9 psi. Transmission pressure testing is done with only 2-3 psi. The purpose of pressure testing the transmission is to locate all the trans oil leak points .... and there are usually plenty of leak points. In the case of CZs, the most common leak points are at the transmission cover plate behind the cylinder. A leak in this area is particularly dangerous because it allows significant amounts of dirt and pressure-wash water into the transmission. Sadly, most plate leaks are a result of a mismatch of the two crankcase sealing machined surfaces.
.jpg) |
TOP LEFT -
We used a dial indicator to show the mismatch of the two crankcase
sealing surfaces. This photo shows the indicator at zero on the right
case. BOTTOM LEFT - This photo of the same indicator sweep shows the left case surface to be .007" lower. The is no way for gasket sealer to fill this gap and seal out dirt/water. The only option is to mount the two cases in a mill and match the surfaces BELOW - Lapping the center case sealing surfaces clearly showed a significant low spot on the case surface that will forever leak trans oil, and leak air during a transmission pressure test. This low spot was filled with industrial epoxy to restore a surface that would maintain a lasting seal, and pass a pressure test. RIGHT - We pressurized the transmission through the conveniently located transmission vent. BOTTOM RIGHT - Even with ample sealer, the mismatched cases leaked heavily during a common transmission pressure test. The cases had to be machined to seal the leak. |
|
.jpg) |
|
|
.jpg)