Kawasaki
Bighorn 350 & Bison 250
Recreational
Preparation
& Modification
Overview The Kawasaki F5 / F9 Bighorn 350 and F8 Bison 250 are rotary-valve 2-stroke single Enduro (aka dual purpose) bikes built from 1970 to 1975. The Bighorn and Bison are basically the exact same motorcycle, expect the Bison came with a 250cc top-end, 19 front wheel, and points ignition . while Bighorns had the 350cc top end, 21 front wheel, and CDI ignition. While the chassiss on these bikes were not up to par with motocross racers of the era, the wide powerbands and reasonable suspension made them fantastic dual purpose and flat-track racing machines. Of all the vintage enduros of the day, the Bighorn 350 and Bison 250, had by far the best overall power output .. along with reliability that easily matched all the rest.
From the riders standpoint the Bighorn & Bison are unique vintage candidates because they offer a very comfortable riding position, especially for taller and heavier riders. The chassis can offer excellent high speed (pavement) handling characteristics, and the motor has the power to satisfy any vintage sport riders needs. While the bikes did come with passenger foot-pegs, they were not very comfy for long distance two-up riding.
The large production run of the Bighorns from 1970-1975, and Bisons from 71-72, has resulted in a plentiful supply of affordable restoration candidate machines. In addition, there is an abundance of affordable spare parts available on Ebay and other sites. The Bighorn & Bison easily offers more high-performance bang for the buck than any other lightweight vintage two-stroke platform.
Our Goals - The goals of this document are to offer current technical info to the owners, builders & riders of these vintage enduros to help them build a reliable recreational machine that suits their particular riding needs. This info is geared towards those that ride occasionally or often, and those that tour slowly as well as those that enjoy more aggressive recreational riding.
About Reliability - Many old-school dirt bike riders of the day wrongly gave the Bighorn & Bison a reputation as bikes that seized pistons constantly, and were not reliable . And we could not disagree with them more. It is true that if a Bighorn/Bison engine was assembled by a casual mechanic with no interest in covering details . These bikes (and any other for that matter) would repeatedly have problems. However if a mechanic takes a little extra time to attend to a short list assembly details, these engines can deliver great reliability for many seasons of hard riding.
Air Leaks - By far the number one problem area of the Bighorn/Bison motors is air-leaks caused by careless and casual assembly habits. The tolerance for air-leaks is zero .. there is no such thing as an acceptable air-leak. There is absolutely no way to compensate for an air leak with larger jetting or more oil. Back in the day, it often happened that casual mechanics would try to simply install bigger carb jets after repairing a seized piston. Invariably, the piston would seize again from the air-leak, and the casual mechanic would then install a lager yet main jet. This resulted in a bike that was rich enough to foul plugs frequently . Yet still seize a piston the first time it got run at full throttle.
The correct solution would have been to eliminate all air leaks, as this would allow the use of clean running jetting along with excellent reliability. Since casual mechanics of the day never pressure tested their engines, this scenario played out countless times for countless owners.
The only way to be sure your engine has no air-leaks at all is to pressure test it (click here to read our Air Leaks document). We offer the gauge head assemblies needed to pressure test your engine. For owners that would rather have this taken care of by a professional, we offer Blueprint Engine Rebuilding that attends to all the regular air-leak risk areas, and included confirmation that your engine has no air leaks at all. For more info on Air Leak Testing, CLICK HERE.
Detonation - The Bighorn & Bison were designed to run on regular pump gasoline in 1970. However its important to remember that in 1970, regular fuel was 95-octane, and premium was 101-octane. To achieve 95-octane today would require a percentile mix of Av gas or race gas, which is not convenient for most folks. For those wishing to get this actual octane, here are some mix options.
95 Octane Mixes in 5 Gallon batches
91-oct 2.5 gall / 100-oct (Av gas) 2.5 Gall
91-oct 1.5 gall / 110-oct (race gas) 3.5 Gall
91-oct 4.0 gall / 120+oct (race gas) 1.0Gall
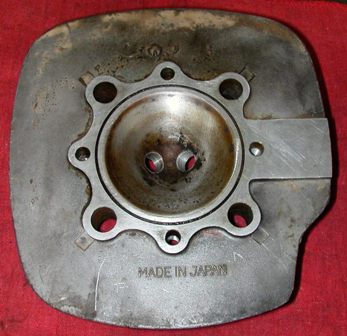
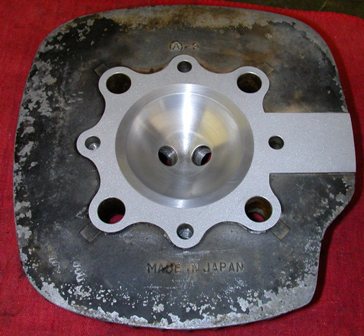
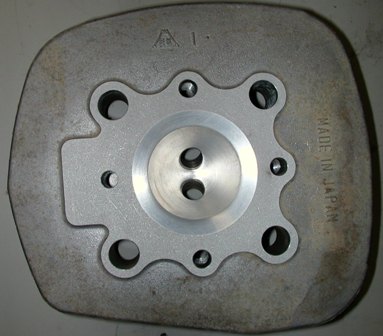
The Other Option - In truth, the big detonation risk of the Bighorn/Bison engines is mostly a function of the cylinder head dome design . And those dome designs can be re-machined and altered to allow safe recreational use of todays 91-octane fuels. This 91-Octane Head Modification does not change the external appearance of the head in any way, and there is no performance loss of any kind. As an added benefit of this head mod, the engine runs considerable cooler at all rpms, which allows the use of a slightly warmer heat range spark plug to help reduce spark plug fouling. If you do no other modification on your 350/250 stock bike....this is the one mod to do.
For the 350 Bighorn, we also offer our Sport head mod that involves welding up the entire head-dome and both spark plug holes. We then machine the head to accept a centered long-reach (3/4) spark plug along with a dome that runs even cooler than the standard 91-Octane mod. The ¾ reach spark plug runs considerably cooler than the stock ½ reach plugs because it has more thread contact surface area to give its heat off to the head. Here again, this allows the use of an even warmer heat range spark plug. We recommend the Sport Head Mod to riders that will be doing more aggressive riding that entails more time in the upper rpm ranges.
 |
 |
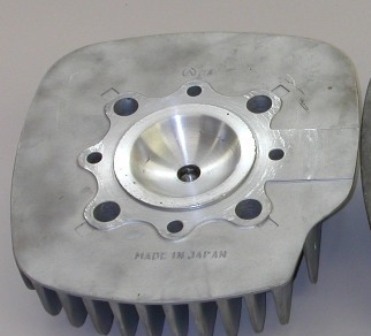 |
| This is the stock F5/F9 Bighorn head dome. It's conical shape and absence of a squish band made it very easily prone to detonation even on the 98 octane premium fuel of the day .... and worse yet on today's 91-octane premium fuel. | This is our "91-Octane" Head modification that offers a reshaped dome with a squish band. Even though the squish band is narrow, it helps greatly in reducing detonation. This head mod also includes a very slight increase in compression ratio over the stock head. | This is the "Sport" head mod that features a center mounted 3/4" long reach spark plug, and a wider squish band. This design offers the excellent detonation resistance and improved spark plug cooling that is needed for more aggressive riding applications |
 |
 |
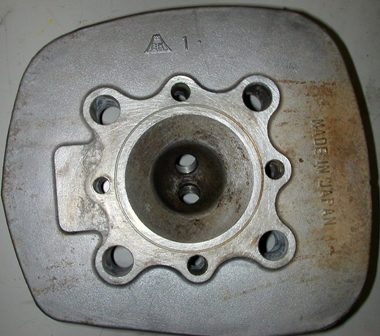
| This shows the stock F8 250 Bison head dome. The steep angle of the squish band is very detonation prone on today's 91-octane gas. | The "91-Octane" dome modification has a much closer fitting squish band, and a slightly enlarged combustion chamber dome. |
About Compression Releases - In the 60's and 70's era. it was very popular to install a "compression-release" in the spare spark plug hole that existed in so many models of bike. These compression releases were used to help ease the starting of higher compression open class singles, as well as acting as an alternative "braking" device for flat-track race bikes that were not permitted front brakes (and had horrible rear brakes). While these compression releases were very effective, engine builders of the day quickly realized that they did much more harm than good. Besides the high risk of the compression release valve breaking off into the motor, most engine builders quickly learned that these valves also drew large amounts of dirt, dust, and debris into the interior of the engine. In short, if your bike has a compression release... remove it.
About Spark Plugs - The most popular and reliable spark plugs we have worked with are the NGK brand, and all our references here with be with NGK related code numbers. The stock recommended spark plugs are the B8HS for the points ignition 250, and B10H-15 for the CDI ignition 350. The 250 recommendation is very normal and functional. However the 350 recommendation has problems. The "10" heat range plug is an extremely cold heat range, and prone to fouling. In addition, the "-15" designation is a plug that is designed for a .060" (1.5mm) gap, however all the data we have seen for the 350 recommends a .024" gap. It may have been that KMC engineers recommended this cold plug in an effort to reduce combustion chamber temperatures .... which exactly the wrong way to achieve this. The correct way to reduce the temperatures would be to all-together change the design of the head dome. By doing so, combustion chamber temps are reduced by such a big margin that hotter (more foul resistant) heat ranges can be used. In our 8000+ rpm production road racing 350s, we ran a 9 heat range spark plug, and never had any overheating or fouling issues. When we operated the same machines on the street, we ran 7 heat range plugs for low speed commuting, and 8 heat range plugs for recreational cruising. 350s with our 91-octane head mod can follow these same recommendations.
About Spark Plug Thread Repair - It often happened that one (or both) of the threaded holes in in these 350/250 heads was stripped or seriously compromised in some way. For decades, the standard fix was to install a "Heli-Coil" that cleared out the damaged threads and left behind a nicely threaded hole. This Heli-Coil is very literally a coil of metal that is wound into a pre-threaded hole to leave behind a perfectly fresh and functional threaded spark-plug hole. While heli-coils worked well for most applications, heads that were more seriously damaged needed the installation of a "Time-Sert". A Time-Sert is a solid insert sleeve with mounting threads on the outside, and fully sealed spark-plug threads on the inside. The Time-Sert is a better fix, but it is more time consuming....and a bit more expensive. At Klemm Vintage, we offer both Heli-Coil, and Time-Sert thread repair (see price list below).
About Pistons
350 Bighorn - The stock 350 Bighorn pistons were a very heavy three ring cast piston ( with an oil ring behind the two lower rings). This cast piston was prohibitively heavy, and the rings offered excessive surface drag on the bore diameter . It was a technically very bad part. In the early 70s, Kawasaki offered a beautifully made lighter-weight, forged, speed kit piston that had two rings. This very desirable piston was made in .5mm (.020), and 1.0mm (.040) sizes. Both size pistons (and rings) are very rare to find nowadays . But if you can find them, they are the best option for overboring.
The next best option is a very high quality Wiseco (single ring) forged piston that is currently being made for the vintage CZ400 motocrosser. These CZ pistons are very lightweight, and the single ring is made of a very high quality alloy that makes it an excellent choice for any 350 Bighorn. These pistons are available in .010 increment sizes from 82.0mm to 84.0mm, that can bring back into service even the most heavily worn Bighorn cylinder. The only unique spec on this piston is the crown angle that is different from the standard Bighorn. Given this, any Bighorn fitted with the CZ piston, must have the squish band on the cylinder-head properly cut to match it. We strongly endorse the use of these forged single-ring CZ pistons for 350 Bighorn cylinders bored beyond 81.0mm.
250 Bison - The Bison comes with a cast, dual ring, 68mm stock piston. While some oversize oem pistons and rings are still available on Ebay and elsewhere . They can be a tough find. The more practical replacement is a modern design Suzuki TS250 (two ring) piston offered by Wiseco in diameters from 70mm-72.0mm in .5mm increments. These very high quality pistons are a perfect fit to the F8 cylinder, and offer the very best in modern piston and piston ring materials technology .we strongly recommend them.
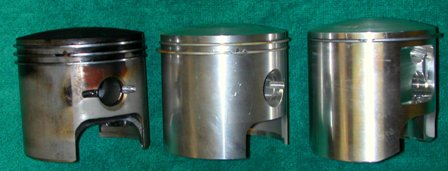 |
To the left is the stock 80.5mm
three ring cast piston used in all stock F5 and F9 models.
In the center is the much more desirable 81.0mm forged Kawasaki "Speed Kit" two-ring pistons. To the right is the 82.0mm single-ring forged Wiseco Piston, originally made to fit the CZ 400 motocrosser. |
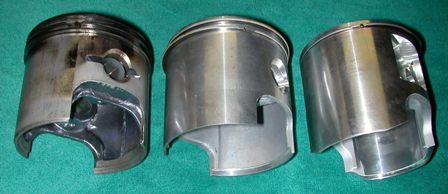 |
This underneath view shows the
thinner skirt walls of the two forged pistons. The weights
are:
3-ring OEM Piston 13.9 oz 2-ring Speed Kit Piston 13.1oz Single-ring Wiseco Piston 12.9oz |
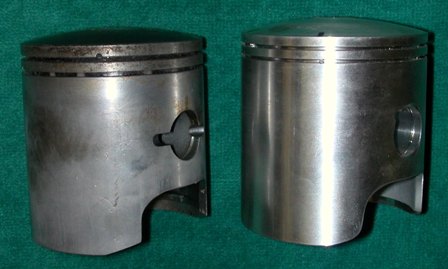 |
To the left is the stock 68mm
oem F8 250 "Cast" aluminum Piston.
To the right is the 70mm Forged Wiseco piston (originally made for the Suzuki TS 250). Despite being 2mm larger than the stock Kawasaki piston, the Wiseco is still slightly lighter, and has rings that are made of much better quality material. |
About Cylinders and Porting - Many recreational owners are understandably wanting to stay with the stock cylinder porting configuration. To that end, we offer two different options. Our port match option is a very inexpensive mod that removes the large casting imperfections and mis-matches that are so often a product of mass produced cylinders.
Our Blueprint Cylinder Porting is a much more detailed modification that attends to all the cylinder ports and passages, intended to give the stock ported cylinder every advantage it can possibly have. This Blueprint porting includes smoothing of the exhaust port to help reduce carbon buildup, as well as transfer port rough-finishing that helps with fuel atomization. This Blueprint Porting is an all-gain, no-lose mod that retains the strong low-end power and reliability that comes with stock cylinder port timings.
For more aggressive 91-octane riders, we also offer Sport cylinder porting that offers a stronger overall power delivery, and much better high range drive for those aggressive gear-to-gear acceleration runs. We strongly recommend the Sport cylinder-head modification along with this cylinder porting.
 |
 |
 |
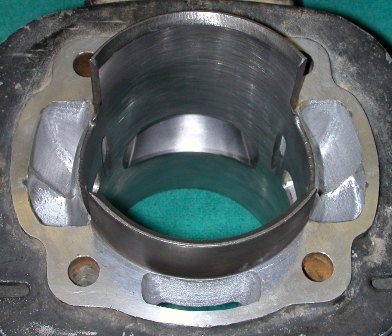 |
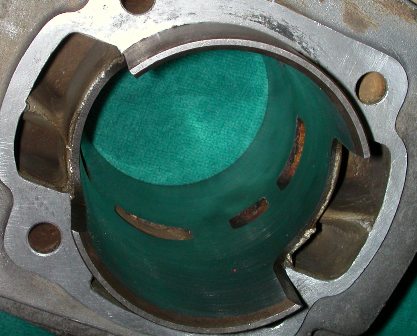
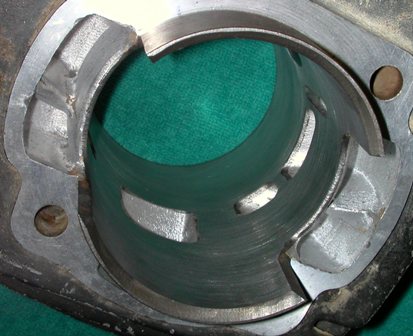
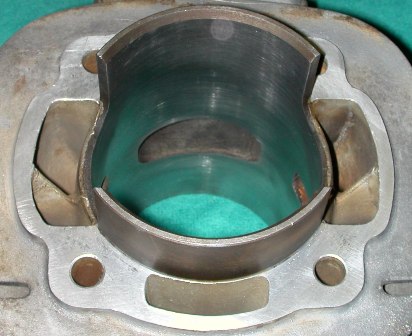
| Two views of the stock F9 350 Cylinder Porting. It bears noting that all stock F5 and F9 cylinder porting specifications are the same. |
Our "Blueprint" and "Sport" cylinder porting are both finished in this way, but the Sport Spec has slightly greater port timings and widths. The "rough finished" transfer passages offer much better fuel atomization, while the smoothed exhaust port helps to educe carbon deposit build-ups. |
About Vibration - Its important to know that no 2-stroke single cylinder (nor twin or triple) engine can be truly balanced to run smooth at all rpms. The best that can be done is to calculate a balance factor, for the crankshaft flywheels, that allows the engine to run smoothly in one rpm range .while running less than smoothly in rpm ranges higher and lower.
Both the 350Bighorn and 250Bison crankshafts have balance factors that allow them to run pretty darn smooth between 2500 and 5500 rpm. However above and below that rpm window, these engines will vibrate a bit . And there is no way around that.
To be sure, the weight of the piston assembly is part of the crankshaft balancing factor, and it bears noting that all F5/F9 350s and F8 250s use the same crankshaft flywheels that have the same heavy-metal counterbalancing weights. At the same time, the weights of the 350 and 250 pistons are quite different (13.9oz vs. 8.2oz). One would think this big weight difference of the piston would cause a big difference in the vibration characteristics of a 350 vs a 250 . But in all our testing, we never really observed that. Add to this, we ran 350 pistons weighing as little as 12.8oz, and again could not tell any appreciable change in vibration characteristics (even on our 8500rpm race engines). The take away from all this is that lighter pistons can certainly result in quicker acceleration . But they seem to make little change in the actual vibration that the rider would experience.
About Crankshafts and Bearings The stock 350/250 crankshafts all use the same rods and bearings. The stepped crankpin used on these cranks allows for a very large big-end rod bearing to contend with the torque loads of the 350/250 motors but it is a heavy setup. There is no lighter weight modern replacement rod (from another machine) that fits into these motors, so the stock rod and bearing is the best setup to use on recreational 350/250 motors.
There is an oil catcher plate attached to one side on the crank that supposedly helps to feed oil to the oil passage in the crankpin leading to the big end rod bearing. Every engine we have prepared for racing was converted to premix, and this plate was removed. Of all the mechanical issues we have seen on the 350/250 engines, big-end rod bearing failure has been waay down the list as a problem. Given this, we strongly question the value of this plates function, and generally we recommend its removal from the crank.
The ignition side crank bearing is a regular 6305 ball bearing, but the drive side bearing has a special relief cut in to accommodate the bearing holder plate. This holder plate keeps the crankshaft (and right bearing) from moving side to side in the crankcase. This special stock bearing is both expensive and hard to find. On all the engines we build, we opt to use a much more common 6306 bearing (without the relief step) and we bore the retainer plate to accommodate this bearing. We then set the overall crankshaft width at the exact width of the two bearings fitted in the crankcases. In this way, all side-play of the crank is eliminated, and the big end of the rod gains additional clearance that allows more oil into the lower rod bearing. This approach is a long-term win/win from every angle.
About the First-Year F5 and F8 Cranks - There are some minor differences in the engines of the first-year 1970 f5 / 1971 F8, and all the other later models of the 250 and 350. By far the most meaningful difference is in the crankpin and crankshaft flywheels. All F5/F8/F9 engines use a stepped crankpin whose diameter is larger in the center where the big end rod bearing rides. However the first-year cranks used a crankpin that had a center bearing surface that is 2mm narrower than all the later cranks. We can only presume that KMC engineers realized that the first-year crankpins did not offer enough bearing surface area for the torquey 350 engine, and so updated to a crankpin with a wider bearing surface area. To accommodate the updated wider crankpin, KMC engineers made the later crank flywheels 1mm narrower than the first-year cranks. For a very short amount of time KMC sold rod rebuild kits for the first-year cranks. However after 1972, when these first-year engines began to fail rods, Kaw shops were instructed to install the later crankshaft with the wider crankpin. The later cranks were cheap and plentiful, and often the crank upgrade was covered under warranty.
Fast forward to today, and (surprisingly) there are still many low miles first-year engines out there that still have the original first-year crank. Sadly, the few rod kits that were made to rebuild them are long gone, and there is no aftermarket option. The only option is to install a later style crank, or machine the first-year crank to accept the later crankpin. Klemm Vintage does this crank machining ($150) to allow use of the later pin.
About Crankcases - The crankcases of the 350 Bighorn engine have a few areas that need to be scrutinized and attended to. Most important of these, is the press fit of the crankshaft bearings into the cases, and the flatness of the base gasket surfaces.
Crank Bearing Fit Both of the crank bearings of the Bighorn should be a gentle press fit into the crank cases. Unfortunately, over long term abusive operation, the ignition side bearing can become loose in the case as a result of loads from the excessively heavy ignition flywheel. At the same time, the drive side bearing sometimes becomes loose from the sheer loads of delivering power to the primary gears. This bearing fit problem is compounded by the somewhat soft steel bearing holders that are cast into the crankcases. If these loose fit bearings are not tightened, the result will be very significant engine vibration at higher rpms.
The fit between the loose cases and these bearings can easily be restored by re-sleeving the cases (for more info CLICK HERE). We strongly recommend that any loose crank bearings in the cases be attended to by this resleeving process.
Base Gasket Surface - In the 1970s, it was very common for manufactures to make crankcase halves as individual parts, not as matched pairs. It was also very common for mechanics in the 70s to replace a left side crankcase (after a broken-chain event) . And never think to match the heights of the left and right base gasket surfaces. Given this, there were often significant variations in base gasket surface height between the left and right case halves. This difference in heights results in the cylinder not sitting square on the cases, not to mention significant airleak risks at the case center joint. To resolve these problems, we assemble the two empty case halves together, and mount them in a mill to cut the base gasket surface perfectly flat (and square to the crankshaft). This service is included as part of our Engine Blueprint Assembly, or can be done as a separate machining operation. Of all the 350/250 motors we have built, fewer than 20% came stock with matching base gasket surface cases.
About Ignitions - All F5 &F9 350s use the same non-points CDI ignition (this exact same ignition is used on all F7 175s). While these CDI ignitions generally are pretty reliable, brain box and stator coil failures do occur. Since all available spare ignition parts are arguably 35+ years old, its worth asking whether its worth keeping the entire ignition. There are no easy answers here. The only options are to take a chance that a used replacement part will get you going, or to fit a modern CDI ignition from Penton ( http://www.pentonracingproducts.com/ ).
For owners with stock ignitions that are working fine, there is an available upgrade. The stock 350 ignition flywheels weight just a bit over 4lb (which is exceptionally heavy). Klemm Vintage offers a lightening modification that reduces the weight by .5 pounds. While .5 lb is not a lot of weight, this mod makes a very noticeable difference in the quickness of acceleration because we remove the majority of the weight from the outer parameter of the flywheel where it hurts inertia the most. While allowing noticeably quicker acceleration, this modified flywheel still retains all the positive effects of a big flywheel. It addition, this mod reduces the loads on the much over-worked ignition side crank bearing.
About Rotary Valves - All 350/250 engines use the same rotary valve cover and steel rotary valve disk. This steel rotary disk controls the inlet port timing. Racing versions of these engines use steel disks that offer much longer inlet port timings that suit the needs of a high rpm engine. However for recreational machines, a very minor increase in inlet timing (by cutting the valve) can allow for a nice improvement in overall performance without harming low end power in any way. We offer Inlet Upgrade modifications that include two different levels of this rotary valve modification to suit both the Blueprint Recreational engine setup, and our Sport engine setup. There is no loss of low end power with either mod.
In addition to the rotary valve mod, Our Inlet Upgrade Mods also includes blueprinting the rotary-valve cover inlet port itself. This mod improves flow through the cover, and nets a slight performance increase at all rpms.
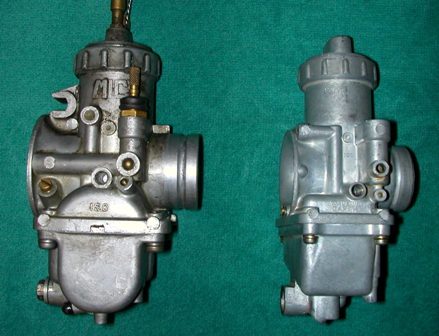
About Carbs - All 350/250 engines come stock with a 30mm Mikuni carb but these 30mm carbs are not all the same. All 350s have a small-body 30mm carb that is cast from a relatively heavy pewter material. The F5 350 had a brass dual-float-valve while the later F9s had a single composite float valve. Both floats worked well, but the composite single floats have done a better job of lasting over time.
Back in the day, Kawasaki offered a 32mm speed kit carb that worked very well and improved overall power, but those carbs are all long gone (and mostly lost) now. That said, the stock 30mm carb can be made to flow significantly better while retaining its stock 30mm diameter. Our Inlet Upgrade package also includes this subtle carb throat modification that nets a slight improvement at all rpms. While a 30mm carb seems a bit small for a 350cc single, it bears noting that our AHRMA production class road-racers (equipped with the stock 30mm carb) out accelerated everything in our class and ran 105mph (with our Inlet Upgrade Modification). We tested with carbs up to 34mm on our AHRMA production racers, and quite frankly saw very little increase in overall power with the bigger carbs. It may have been a different story if we were running a racing expansion chamber, but with the stock pipe (mandated by the AHRMA rules) the 30mm carb worked great for us.
The 250cc F8 used a large body 30mm Mikuni that was cast from lightweight aluminum. Mikuni used this same aluminum casting for all their 30/32/34mm carbs, so it was an easy matter to simply install a 34mm carb for guys that were building racers. It bears noting that the internal diameter of all the stock 350/250 rotary valve covers was 34mm not 30mm. Just the same, going to a 34mm carb is likely only an asset if you are fitting a tuned expansion chamber.
 |
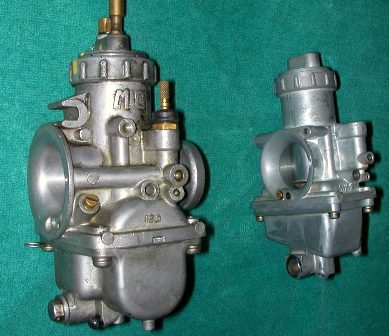 |
| On the left is the "Large Body" 30mm carb of the F8 250. To the right is the Small body 30mm single float carb of the later F9 350s, | Another view of the two carbs. |
About Fuel Filters - While it's always nice to have a fuel filter between the gas tank, and carb, it is of particular importance on the 350/250 machines... here is why. The pilot jets used in the small body 30mm carbs of the 350 uses a pilot jet with a very tiny orifice. Given this, the smallest fleck of debris can block it and very suddenly cause a host of different and undesirable running problems. Adding to this problem is the strong vibration of these bikes that can easily shake deposits from the interior of the gas tank into the fuel. The filter built into the fuel petcock can catch "some" of this debris ... but the smaller debris can still get through. To avoid all these issues, we use a high volume fuel filter with an extra fine plastic mesh that can stop debris to 5 microns. We sell them, and strongly recommend their use.
About Fuel Petcocks - Most F5/F9 models were built with a vacuum actuated gas-tank petcock. The original intent of these over-engineered petcocks was to help avert the crankcase being flooded with fuel by a poor sealing carburetor needle and seat. Unfortunately, the petcocks often malfunctioned, and caused a litany of other fuel system problems all by themselves.
We recommend to replace the petcock with a non-vacuum aftermarket model from Reproduction Decals in Canada. Their replacement petcocks are affordable and very functional.
About Exhaust Pipes - There are two different pipes that came on the Bighorn/Bison models. The early 350/250 exhaust had a stinger exit that was in front of the top-left shock absorber mount, and the later 350s came with a slightly longer exhaust pipe whose stinger exit was behind the top-left shock mount. We did plenty of performance comparison testing of these pipes on our AHRMA road racers, and there is no doubt that the later long pipe performed better particularly at higher rpms. For restoration minded owners using their bike for low-speed recreational purposes pipe choice will not matter much.
For performance minded owners, we recommend to fit the exhaust manifold on to the exhaust pipe, and do the best job you can of matching the internal pipe spigot to the stock exhaust manifold.
To be sure, the 350/250 bikes performed noticeably better (and ran cooler) with the exhaust baffle tube out. Surprisingly, removing the baffle tube does not really make the bikes that much louder. For owners that like the visual appearance of having the baffle tube in, we recommend to cut it down to 6-8 inches in length.
One important point about the exhaust pipe is how is can contribute to smoking. While testing our production road racers, we gathered several stock long pipes to see if there were any significant performance variations from one pipe to the next. We installed the first test pipe, and drove the bike to our high speed test site .. following it with a van full of other pipes. The very first time we opened up the bike with the first test pipe, the bike billowed out a huge cloud of blue smoke, along with lots of physical debris that peppered the windshield of the following van. We pulled the bike off thinking that we had a new mechanical problem . But found nothing. We would later learn that these stock pipes have a full length internal wire mesh baffle that was holding 40 years of unburned 2stroke oil. Each time we installed another stock pipe to test, it took about 3-4 miles of peak rpm operation to literally burn-out the many years of oil in that pipe. Once we had burned out all the old oil, the bike ran completely smoke free after that. The lesson here is that 350/250 bikes that never get run at higher rpms will eventually load up the steel mesh in the pipe with unburned oil. The first time that low rpm bike get run at high rpms . It will smoke like hell for a few miles until it burns all the oil gathered in the internal steel mesh.
About Oil Injection - Many owners feel very strongly about keeping the oil injection system on their Bighorn/Bison. While oil injection certainly is a nice convenience, it is a big reliability risk on machines that get ridden a lot, or ridden a lot at high rpms. From a strictly reliability oriented standpoint, removing the oil injection and going to premix, is by far the smartest thing to do .why? The oil injection pumps, pull cables, and banjo fittings are all weak points subject to failure without notice. The only way to know that you have had a failure somewhere in the oil injection system is when the bike stops with a seized piston. In addition, the oil injection passages and joint bolts are all very significant air-leak risk points. In the end, any Bighorn/Bison intended for long rides or sustained higher rpm (highway or fire-road) riding, should have the oil injection system removed in favor of premix. For machines that will be ridden very casually at low rpm, oil injection failure risks are much lower. It bears noting that in the event of a full oil injection system failure, the piston will seize long before any of the lower end bearings experience any detrimental affects of the lost lubrication unless the engine is being held close to peak rpms. On a higher rpm use machine, the top end parts, and lower end bearings will both sustain life ending damage by the time the piston seizes.
There is a fallacy that the cable driven variable oil injection system on these machines results in far less smoking than premix . Wrong. All of our testing showed that machines that never ever get run at peak rpm (oil injection and premix) will smoke, but machines that are occasionally run to high rpms remain very clean and clear of smoke. We frequently ride our AHRMA production road racers on the street with a 40:1 premix, and they operate 100% free of visible smoke even when riding in slow traffic.
About 2-Cycle Oils and Premixing - Our street legal AHRMA production road racing 350s had the oil injection removed, and we ran premix. While road racing, we ran a 20:1 premix (6oz per gallon) of Maxima 927 bean oil, and 110 octane race gas. With this 20:1 mix, the bikes would load up easily if we idled them for any length of time. However as soon a we got the bikes under way on the track, they immediately cleared out, and operated perfectly clean (virtually smoke free) for the entire race event. The next weekend, we rode the exact same bikes on the street running a premix of 40:1 (3oz per gallon) with the same Maxima 927, and 91-octane pump gas. With the leaner oil mix, the bikes smoked just a little bit during startup, and operated 100% free of visible smoke during inner city stop light riding as well as recreational touring. We made no changes in the carb jetting at all, and the bikes started, idled, and carbureted perfectly under both riding situations.
From a theoretical standpoint, the carb jetting should have been slightly richer overall with 40:1 mix vs. the 20:1 mix (because there is more gasoline per gallon in the 40:1 mix). However the actual percentile of increased fuel volume per gallon is so little that in the big scheme of tings, it never made a noticeable change. It bears noting the owners that plan to use their 350/250 machines strictly for low speed touring can very safely run on a premix of 50:1 - 60:1 (2.3oz - 2.0oz per gallon), For such a premix, we would recommend Maxima Super M because it is the cleanest burning premium oil we have encountered.
About Transmissions - All F5/F8/F9 machines came with the same durable 5 speed gearbox that was generally very trouble free. In truth, this gearbox is a somewhat close ratio 4 speed trans, with a very tall overdrive 5th gear included. This very tall 5th gear is a great asset to riders that need to do occasional high speed freeway runs as a part of their daily rides. Owners should gear their machines to use primarily the lower 4 gears for all general riding, and reserve the 5th gear to keep from screaming the engine on high speed areas of pavement riding.
The biggest gearbox problems are a result of the countershaft bearing and clutch bearing getting loose in the crankcases. If these bearings become loose enough to allow side to side end-play of either transmission shaft, both will result in the gearbox frequently jumping out of gear, as well as frequent missing shifts. The clutch bearing movement can be fixed by slightly machining down the surface where the bearing retaining plate sets (this mod is part of our Blueprint Engine Rebuild).
If the countershaft bearing is loose in the crankcase, the case must be bored slightly to fit a custom made steel sleeve that will all the bearing to be installed with a proper press fit. Klemm Vintage can do this repair for an additional cost, however it is not included in the cost of the Blueprint Rebuild.
About Chain Drive and Gearing - All the 350/250 machines come stock with a 525 pitch chain and sprockets that are a perfect match for the torque output of these engines. Early 350/250 machines came with 14/45 gearing, and later 350s cam with 14/41 gearing. We strongly recommend to fit a 15 tooth countershaft sprocket on all recreational 350/250 machines. The taller gearing helps to avoid screaming the motor during highway riding, and the larger radius of the 15 tooth sprocket helps to keep the chain away from the swing arm . Not to mention improving long term wear prospects of the chain itself.
Its very important to leave the proper amount of free play in the chain. Failing to offer enough free play causes rapid wear of the countershaft bearing and its fit in the crankcase to say nothing of the increased wear on the sprockets them selves. If your sprockets show any tooth deformity at all replace them. Worn sprockets can ruin a new chain in very short order.
About Chassis Stiffening - The stock 350/250 chassis is very suitable for most recreational riders. However for owners that want to improve the overall handling and rigidity of the frame, there are three important upgrades to make.
Steering Head Bearings - The first is to replace the stock steering head ball bearing arrangement with taper roller Timken bearings. Sadly, there is no kit made that fits right in place on the 350/250 chassis, but there is one that can fit by doing some custom machine work to the stock steering stem and threaded stem collar. The tapered bearing set (with seals) is $49, and Klemm Vintage can do the custom machining ($80) to your triple clamps to properly fit the bearings. These tapered bearing greatly improve front end rigidity, and are a must for aggressive riders.
Swing Arm Bearings - The second upgrade is to replace the plastic swing-arm bushings needle bearings. These needle bearings are commonly available, however great care must be taken when pressing the bearings into the swing-arm. If the needle bearings are not pressing in perfectly square and straight, they can be easily damaged. At Klemm Vintage, we use a special fixture to press in these bearing to assure they are perfectly installed with no damage.
Motor Mount Bolts - The final important chassis upgrade to make is to install grade-8 1/2 motor mount bolts. The stock 12mm motor mount bolts of the 350/250 machines make for a very loose and not very rigid fit between the motor and chassis. The chassis holes are easily big enough to accept the slightly larger ½ bolts, and most engine cases need just a light clearing of their holes with a 1/2 drill to accommodate the ½ bolts. By installing high quality grade-8 1/2 bolts in the front, top, and forward bottom motor mounts, the fit between the motor and chassis is tightened up considerably, and this added rigidity results in better overall handling and a more solid feel on the road.
About Front End Inspection Getting good handling from your 350/250 starts with closely inspecting all your front end parts. Here is the best approach.
Besides the fork legs being perfectly straight, the surfaces covered by the fork seals should be completely free of any rust or surface dents. No matter how straight your fork legs look, we consider it mandatory to inspect the straightness with an indicator and V blocks on a granite surface plate. Total run-out with the leg supported on each end should not exceed .005. If yours are worse than that, they should be straightened by someone with (a lot of) experience doing the job. This is a service that Klemm Vintage offers.
|
|
This is the basic setup to inspect the straightness of your Bighorn fork legs.
If straightening is required, it should be done by someone that has the tooling and experience to do the straightening without leaving any "flat-spots on the leg faces. |

Lower Triple Clamp - The stock lower triple clamp is largely responsible for holding the forks rigid . And it does. However the lower clamp is made from relatively soft cast steel that can easily be bent in a moderate crash event. The good news is that a bent lower clamp can be straightened to racing quality.
The clamp can be checked for straightness by fitting the two (perfectly straight) fork legs in each side, tightening the clamps on the legs, and then inspecting the perfect parallel-ness of the two legs on a granite surface plate. If the two legs are not perfectly parallel, the legs should be removed to physically bend the lower clamp until perfectly parallel legs are achieved. This whole process sounds like a big pain in the butt to do . But it pays huge dividends in high speed handling stability. We consider this mandatory for any owner that plans to ride at highway speeds.. Klemm Vintage offers fork leg straightening, and lower clamp straightening services for owners who do not have the equipment.
About Front Suspension - The 3-position Hatta forks fitted to the 70-74 machines are not great racing forks, but they are very suitable for most riding applications. The suspension company, Race-Tech, offers a Gold Valve and spring kit that fits these forks. The Race-Tech kits offer much better dampening and stiffer springs that are an asset to more aggressive riders. We installing this kit on our production road racer 350 Bighorn, and were very pleased with the improvement in front end handling
About Rear Suspension - All 350/250 chassis utilize standard 13 shock absorbers. The stock shocks can work fine for casual low speed riding and gentle touring, however for riders that want good handling, replacing the shocks is mandatory. While there are plenty of shocks out there, we had very good luck with the relatively affordable Progressive 13 Series shocks and the #1387 springs. These shocks offered excellent dampening on our 100mph production road racers and enough preload adjustment range to cover most situations. For casual street riding they are a bit firm, so lighter springs might be in order .. especially for riders under 180lb.
About Brakes - For most recreational owners, the 150mm Single leading shoe front and rear brakes will be adequate. For owners that want to make their front brake everything it can be, the following is the process we went through to prepare this brake to work well enough for road racing.
Vintage Brake Preparation - Turning the brake drums and arcing the brake shoes of a drum brake are common mods done by many folks . us included. However there is an added detail that no one talks about that makes a big difference in perfect brake performance.
First a bit of history, its important to remember that 1970s Japanese motorcycles were made in an era when computer controlled machining did not exist. On top of that, most Japanese motorcycles were mass produced to a meet price point, not a standard of mechanical excellence. Mechanical perfection of the brakes on 60mph recreational bikes was not a big deal. We learned these lessons while attempting to build our perfect stock 150mm front brake.
In an effort to cover every possible variable, we laced our hubs to fresh rims, and planned to turn the drums with the wheels laced and trued. We did this to cover the possibility that the spokes collective pressure may have the strength to slightly deflect the diameter of the brake drum. We took our perfectly trued front wheel off the truing stand (that holds the hub by the outer edges of the two wheel bearings) and mounted in our lathe via the axle between the two wheel bearings. Upon turning on the lathe, our perfectly trued rim now spun wildly out of round .. it made no sense. After taking considerable time for measurement and scrutinizing, we realized the problem was that the two wheel bearings in the hub were about .008 off center from each other in the hub itself. If we had any hopes of this brake working perfectly, this problem had to be fixed.
The short version of the fix is, we perfectly centered the (unlaced) hub in our lathe via the drum side wheel bearing and then cut the drum diameter, as well as two face and diameter locating surfaces. This allowed us to mount the hub on a mill table to perfectly center the hub to check the concentricity of the other wheel bearing hole. Doing this, we found both the front and rear hubs had the second bearing diameter .008- .010 off center from the drum side bearing. Instead of boring and resleeving the off center bearing hole to attain concentricity, we just bored the hub to fit a slightly larger double row bearing. After pressing in the new double row bearing, our wheel (and brake drum surface) spun perfectly true on both the truing stand, and the lathe. This hub was now perfectly true, and would offer full brake shoe contact with the brake lining.
In addition to all this hub preparation, we also fit the brake shoes. Fortunately, EBC still makes high-performance brake shoes for the stock 150mm brakes of the Bighorn. While these shoes are made of a very good braking material, they are far from being an "optimum" shape. With that, we mounted them on the backing plate and opened them to the hub diameter to give the ideal "arc" contour for full contact with the liner diameter in the hub. We offer this service for owner who do not have the equipment.
|
|
|
|
|
The diameter cut concentric with the left bearing diameter. |
The other surface cut square and concentric to the wheel bearing diameter. |
The centered hub being bored with a perfectly centered wheel bearing hole. |


|
|
|
|
The first skim cut of the painted brake shoes shows how "not flat" the new virgin surfaces are. |
The new double row right wheel bearing vs stock. |


About Brake Cable Routing - Multiple large radius bends in the front brake cable lead to a mushy feeling brake, and compromised brake effectiveness. To minimize the number of these bends in the front brake cable, the front brake anchor should be made to a length that sets the cable parallel to the fork leg. The cable can then be firmly secured to a cable holder at the top of the fork slider to further reduce cable movement. The end result is a front brake cable that has only one 90 radius as it mounts to the lever perch. This single 90 radius will net the least amount of cable movement, and significantly improve the positive feel of the front brake. (see photos above).
The Finished Race Prepped OEM Brake On the Road - Like any fresh brake, it requires some seating. Since our Bighorns were registered for street use, we took a an 80 mile road ride to help seat in the 150mm front brake of our bearing-aligned hub. After this seating, we found the perfectly trued 150mm SLS brake to be within a hairs-breath as good as our old DLS brake. The only downside was that it faded slightly if we did repeated high-speed to first-gear stops (that do not exist on any track). At the very tight and technical Miller Motorsports track, our 220lb rider never experienced the feeling of running out of brakes. The biggest difference was the increased use of the rear brake. With our big 200mm DLS Honda brake, we used the rear brake only for trail-braking purposes. With the upgraded stock SLS brake, the rear brake needed to be used as a true stopping force during high-speed to low-speed stops. One unexpected advantage of the SLS front brake was safer braking into turns. The old 200mm DLS brake was so touchy, that there was a risk of locking the front wheel if the brake was used heavily entering a high speed turn. The less violent grip of the SLS brake allowed for full grip front braking deep into the turns with a nearly non-existent risk of locking the front wheel. All in all, the AHRMA rule did not change the braking force of our Bighorn . It just made that braking force much more expensive (in shop time) to achieve. For those that do not have the equipment to do this front brake mod, Klemm Vintage offers this service.
Instrumentation - While the stock Bighorn instruments have a very classic vintage look, their gross inaccuracy makes them close to worthless as tools to help an owner do fine tuning of a high performance machine. For serious performance oriented owners, we recommend to remove the stock tach and speedo (along with all their heavy drive mechanism components), and replace them with lightweight modern instruments. We consider any non-digital tach to be not precise enough to help do any meaningful tuning. Our favorite choice for a digital tach is the TinyTach commercial model. Besides an excellent readout that updates ever ½ second, this very durable and affordable digital tach has a built in reset able hour meter, as well as a highest peak rpm indicator. While the readout numbers are not as large as we would like, this tach is still the best combination of affordability, durability, and visible readout.
Speedometer - For owners that feel a strong need to have a speedometer, we recommend a non-wireless bicycle digital speedometer. Non-wireless is important because some cdi ignitions will talk to a wireless unit. The non-wireless models (without cadence and heart-rate) are very durable and effective, and can be found with large digital displays.
|
|
The center mounted Tiny Tach digital tach has it's own power source, and pulls signal data from a wire wrapped around the spark plug wire. The "non-wireless bicycle speedo is functional and visible. |

|
91-Octane Head and cylinder Modification |
240.00 |
|
Blue Print engine Assembly and Pressure test |
575.00 |
|
Heli-coil Spark Plug Hole Repair |
50.00 |
| Time-Sert Spark Plug Hole Repair | 75.00 |
|
Level 1 Top End Modification Unleaded Head Modification Cylinder Port Match Cylinder Decking
TOTAL With Blueprint Rebuild |
150.00 49.00 90.00
218.00 169.00 |
|
Level 2 Top End Modification Unleaded Head Modification Blueprint Cylinder Porting Cylinder Decking TOTAL With Blueprint Rebuild |
150.00 149.00 90.00
318.00 269.00 |
|
Level 3 Sport Top End Modification Sport Center-plug Head Modification Sport Cylinder Porting Cylinder Decking
TOTAL With Blueprint Rebuild |
249.00 229.00 49.00
527.00 478.00 |
|
|
|
|
|
|
|
Blueprinting Inlet Upgrade (R/V cover blueprinting, carb throat mod, rotary-valve mod) |
69.00 |
|
"Sport" Inlet Upgrade (R/V cover blueprinting, carb throat mod, Sport" rotary-valve mod) |
69.00 |
|
In-Line High Volume Fuel Filter |
9.00 |
|
Ignition Flywheel mod (-.5 LB.) |
75.00 |
|
LOWER END MODIFICATIONS |
|
|
Crankcase Bearing Re-Sleeve |
60.00 |
|
Basic Crankshaft Rebuild (Labor) |
60.00 |
| "First-Year Crankshaft Modification | 150.00 |
|
Lower End Allen Bolt Kit |
45.00 |
|
Crank Bearings (each) |
41.00 |
|
Engine Seal Kit |
48.00 |
|
Gasket & O ring Kit |
39.00 |
|
Allen Bolt Kit |
45.00 |
|
Grade8 1/2" Motor Bolt Package |
39.00 |
|
Tiny Tach Commercial Model |
79.00 |
|
COSMETICS |
|
|
Cylinder & Head Glass Bead and Paint |
95.00 |
|
Ignition & Sprocket Cover Glass Bead & Paint |
45.00 |
|
Clutch Cover Glass Bead & Blast |
45.00 |
|
|
|
CHASSIS PRICE LIST
|
|
|
|
Fork Leg Inspection & Truing (2 legs) |
60.00 |
|
Complete Fork Leg Disassembly and Re-Assembly (pair) |
60.00 |
|
Lower Triple Clamp Inspection & Truing |
70.00 |
|
Tapered Roller Steering Head Bearings |
49.00 |
|
Machine Fit Tapered Bearings to Steering Stem |
80.00 |
|
|
|
|
Needle Bearings Set for Swing Arm |
75.00 |
|
Install Needle Bearings in Swing Arm |
40.00 |
|
|
|
|
Grade-8 ½ Motor Mount Bolt Kit |
39.00 |
|
|
|
|
Fit Wheel Bearing Spacer & install Sealed Wheel Bearings (labor only) |
40.00 |
|
Brake Shoe Arcing and Dust Cut |
85.00 |
|
Wheel Bearing Alignment Machining |
120.00 |
|
Brake Drum Turning |
50.00 |
|
Wheel Lacing & Truing (Labor only) |
95.00 |
|
|
|
www.klemmvintage .com 928-763-7600 Fort Mohave, Arizona USA
|
|